March 29, 2013

Put Some Paint On It

For some reason for this post I keep thinking of Mrs. Carter- "If you like it then you should have put some paint on it." She rocks it out in the original version, but this one is by far my favorite.


It was time to finally get our paint on, and there was a lot of it.  Seriously, we were painting for a week down there, and here's why.

Family Room Paint List
  • Trim Primer & Paint
  • Doors Primer & Paint
  • Board & Batten Primer & Paint
  • Cabinets Primer & Paint
  • Cabinet Doors Primer & Paint (Both Sides)
  • Wall Paint
 Oh, and while we were at it we thought, we might as well paint the hallway just a half level up from the Family Room that leads to the Furnace Room, Downstairs Bathroom and Workout Room.  You know... why not? (Seriously- we do this to ourselves people.)


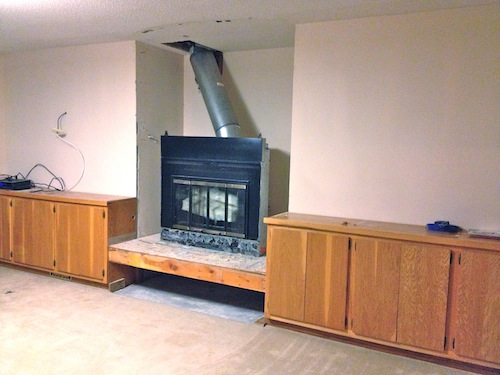
 When we include the cabinet doors for the built-in hutch, we had 22 cabinet doors total to refinish.  That's like an entire kitchen!  And after our first go round of having a painter come paint our Kitchen cabinets, this time around we decided to do it ourselves.


The process wasn't hard, just long.  We had to start by removing all the doors, hardware and hinges. Then we lightly sanded and then wiped down all our doors. The next step was a thin and even coat of primer that we applied carefully with a brush.  We did the first coat, waited a day for it to cure, then flipped all the doors and primed the back side. 

When it came to the paint, we originally intended to apply it with a brush like our painter did in the Kitchen, but after just the first round of priming, we were worried that if we painted everything by hand our babies would be in high school by the time we were done.  The Hubs did some research online and suggested that we use microfiber rollers.  A quick trip to Home Depot later, and we came home with this little miracle.


This magical little tool is literally the difference between a obvious DIY and a professional looking job.  The microfiber ensured a smooth, even coat every time, with no bumps or roller lines.  The coverage was thin, requiring that we do three coats on each side with our Benjamin Moore Satin Impervo, but totally worth it for the professional looking finish.  


PS- I know what you're thinking.  If we could do it all over again, would we still hire a professional to paint our Kitchen?  In short, no.  Our biggest concern with the Kitchen was that it was going to look low quality.  We've seen our share of homeowner painted cabinets that are gloppy and scratched, and we didn't want to put in all the work just to make it look bad.  But now that we've found a paint we love, and a roller that makes you look like Michelangelo, we'd tackle this project ourselves any day.  That's not to say that there wasn't a huge value in getting that work done for us right before the baby arrived, but in retrospect we totally could have waited and done this project ourselves down the road.  You live some, you learn some.

Here's the room with the board and batten and trim done, ready for wall paint. 


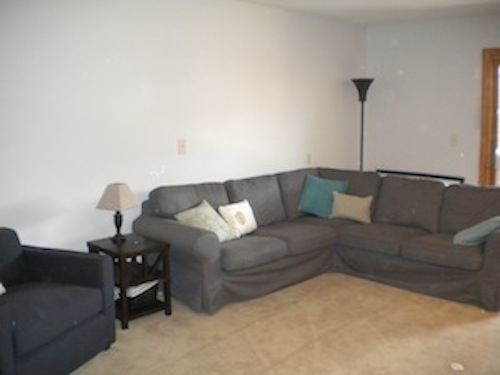
With a few coats of Burnished Clay later, and we have one new looking Family Room.


Even the hallway looks one zillion times better. 


But we couldn't hang the cabinets just yet, we had a little hardware work to do. More on that in the next post.  Has anyone else painted their own cabinets?  Do you have a method that works perfectly for you?  Or tried one that didn't work so well?  We've known about the beauty of microfiber cloths in our house for awhile, but I'm a complete convert to microfiber rollers.  Genius!

March 26, 2013

Getting on Board

Once we had the fireplace wall built out and ready for tile, we started to focus our attention to the other side of the room.  I mean, we had big plans for this focal point side of the room:


But the other side of the room was left lacking, as seen in this super old photo from when we first moved in. 


Even when we pathetically tried to add a photo gallery to this wall, it was pretty boring and nothing really felt grounded.


So I spent a lot of time searching for a solution.  I didn't want to do anything too major that would complete with our focal wall, but I didn't want it to be boring and flat either.  I wondered what the catalogs do with a long expanse of drywall.  I searched West Elm, Pottery Barn, Crate and Barrel and a few other favorites, and here's what I found: they don't do anything.  That's because they rarely, if ever, photograph a room with this scenario.  Go look for yourselves, in all of their staging all the photos have these great architectural elements that help to fill up a space like a exposed brick wall, floor to ceiling windows or wood beams and pillars.  They never have to deal with the typical home owner scenario of a boring wall of nothing but drywall.  So after a little brooding frustration, I decided to take their lead, and if I didn't have an architectual element, I'd make one.  

Cue board and batten.  For those that don't know, board and batten treatment is like a wainscoting, but instead of a bead board, country feel, it has clean lined linear panels.  There are dozens of board and batten before and afters online, but I think these images really show how a boring wall with pictures randomly floating on it can feel purposeful and cohesive with the addition of board and batten.

Harper Nipples
Blue Clear Sky

Love of Family & Home

As I do for some of my favorite DIY projects, I turned to the advice of Ana White for a step by step plan, which you can find here:

Ana White
Our downstairs Family Room is in a walk-out basement, and half sunken into the ground.  For this reason we have a few random things like outlets mounted in the middle of the wall instead of near the floor.  So creating this element right along that "sunken in" line feels really natural and intentional.  I also decided to line up my board and batten exactly with the built in cabinets we decided to keep, so that you get the feeling that they were meant to be there all along, and seemlessly line the room as one consistent element.  I worked with MDF 1x4s for the base board and MDF 1x3s for the top, as well as lattice pine boards for my verticals. 

 I won't go into every step of this process since it is so well documented all over the internet, but I will share one little trick that made this go fast.  I cut a 16" piece out of scrap wood that served as my spacer.  Once I found my first stud, this spacer worked to help me quickly and easily find all the studs around the room.  I just checked my vertical for level and then used my nail gun to quickly attach it.  I was faster than a Bachelor contestant on a first date.


The only thing that slowed me down were those dumb mid-wall outlets.  Turns out that when I put my top ledge perfectly in line with the built in cabinets, they ran just across the bottom of my outlet covers.  


While I probably could have just trimmed down all of these covers, it would have looked pretty amateur hour, and my Dad's mantra- "If you're going to do something, do it right" kept repeating in my head. (Thanks a lot Dad!) So I took a short break from the nail gun to do a little electrical work.  

First of all, if you're ever going to do electrical work, even just a small outlet or light switch change, please, please do me a favor and purchase one of these cheap circuit alerts.  They are about $7 and quickly and easily tell you with a red flashing light and loud beeping if any of the wires you are about to touch are still live.  Every time we watch Renovation Realities the Hubs ends up yelling at the home owners TV as they shock themselves.  It's pretty funny to watch his bald head get all red as he yells, "There's no excuse for that!" Consider yourself warned.


Once I was sure my wires were safe, I removed the outlet and box, used a drywall saw to move up the outlet about an inch, and then reinstalled the box and outlet.  


That left a gap under my electrical box, (and some damaged drywall), but that will be an easy fix, which you'll see in a minute.

I also had this empty electrical box which once held a phone jack and now served no purpose to anyone. 


Again, I probably could have just covered this back up with a solid outlet cover, but I could visualize my Dad shaking his head at me, so I took the time to patch this space up with drywall and joint compound.

This has just one coat of patch so far, but after the second coat you'd never know it existed.

Forgive this grainy iPhone photo, but as you can see, once the top piece of trim went up and the outlet plate when on, the hole below the outlet is covered and you'd never know it was moved. 


 All in the Board and Batten took just a couple of hours and only $74.  Next up, painting. 


A LOT of painting.  You can see I have a few wall samples up, and we also have all the trim, doors, board and batten, cabinet frames and cabinet doors.  We'll save that update for later this week.  It's all starting to come together!


March 20, 2013

A Snails Pace


Our little, "Let's just see what's behind this mantle" has somehow thrown us into full out Family Room Reno Mania. We've demoed, we've scraped the ceiling, we've built a wall and installed a fireplace, and now we're at that frustrating part of the reno I like to call the "Dink and Dunk Stage."  It's that part where the walls are all open and you have to complete a bunch of little, time consuming projects before you can put everything back together and make it look nice again.  It's why for weeks it can look like you're making no progress when you're actually spending every free second down there.  Here's a few of my dink and dunks...

A few eagle eyes might have noticed in the fireplace post that the cabinets that were formally sitting on the left side of the room:

Had disappeared:


Well, not disappeared, they're right here:


The Hubs and I had to move it so that we could get access to the outlet behind it.  One of the requirements of our new fireplace was that we run an electrical source to it.  We decided to save money on this part of the install and run the wire ourselves.  I had to race over to City Hall over my lunch break, which turned out to be the second hardest part, since conveniently they are only open during the hours I'm normally at work.  Once I obtained the permit, (taking a moment to introduce myself to my inspector and make him my BFF), I tore open the sheet rock, drilled holes through the studs and ran through a new 14-2 wire.


I had to turn the corner, which was a hot mess, but luckily this will all be covered up anyway.  


When we were done we just had to place strike plates over the studs (so you can't accidentally drill through the studs and hit my new wire), then covered it back up with sheet rock.  Luckily no mud and tape was necessary since our cabinet fits back over this wall and completely conceals it. Unluckily, the hardest part of the electrical was still ahead of me.  My city requires that whenever you pull an electrical permit that you change the braker on that circuit to an arch fault braker.  Which means I was doing a little of this:


 It looks a lot more intimidating than it really is.  After a pretty intense game of Follow the Wires I was able to locate the correct hot and neutral wires and install my new braker.   When my BFF inspector showed up he was all smiles and signatures.  Boo-yah!

Even though we weren't thrilled to move the cabinet, it turned out to be a blessing, as it helped us solve the big lack-of-heat, freezing-our-tails-off mystery.  You may remember that the primary reason we started this reno is because this room is so, SO cold in the winter, and we wanted a working fireplace.  There are only 2 heat vents in this pretty large room, and one of them was located at the base of this cabinet, which you can kind of see in this old photo.


I took a bunch of photos of this next part, but there was an incident involving a 4 year old and a camera (I don't want to talk about it), so I found a few photos online to help me illustrate the situation.  Turns out these cabinets weren't original to the house, they were added by a previous home owner.  When they added them, the base of one of the cabinets landed directly on top of the heat vent, and instead of adjusting or rebuilding the cabinet so that the heat could be properly vented, they just plopped it down on top of the vent and called it a day.  
 
Not my cabinet, but pretty good photo I found to describe the situation.
 
Which means there was little to no warm air coming out from that vent in the kick plate.  Most of the hot air was trapped under the cabinet, keeping the mouse poop warm.  Efficient.  

So once the electrical was done we had to do a bit of duct work and wood working before we could put the cabinet back.  That big hole in our floor is the vent.

 
Basically I attached a 90 degree angle piece sort of like this: (Sorry folks, my photos were better, but this is the best I could find on the interwebs.)


Then I attached a stack piece like this to it so that the air could flow directly out of the vent, turn the 90 degree corner, the straight out through the bottom of the cabinet.  I used foil duct tape, not actual duct tape, left over from my previous bath fan install projects (in the Downstairs Bath and the Main Bath) to connect my joints.


Then I had to rebuild the bottom of the cabinet so that the base no longer came down in the center of the vent, but created a channel that my new venting could fit into.


 So when we finally placed the cabinet back on the venting comes straight out in line with the kick plate of the cabinet. 


Now all I had to do is place a air vent plate in front, which of course couldn't be easy and requires that I cut the new vent we bought to fit.  Dink and dunk.  We'll get to it eventually.


The next little project was preparing the wall for our TV which will be mounted.  I love the cord hider product that we used to mount the TV up in our Living Room, so the plan was to do that again.  


Unfortunately these basement walls are insulated with a stiff foam board behind the drywall, which prevents our cords from being able to fish through.  So first step was to find the stud, and measure out the portion of the wall I would need to remove. (I find the stud first so that when I go to patch my drywall back up, I have a stud to attach it to.)


 Then I used my favorite tool, our Dremel Multi Max to quickly cut out the drywall and foam board behind it.  I also used our hole saw bit to drill holes at the top and bottom of the channel to feed the wires through.

Ignore that second hole down at the bottom, it was made by a previous homeowner.  I'm not sure why.

With the foam removed from the channel, and a path cleared to run the wires, I could patch our wall back up with drywall.  Don't worry Dad- I do plan to spray foam insulation back in this channel after we run the wires so we won't be letting in all that cold air.


Messy mud and taping to come next, and then hopefully we can finally start painting.  In the mean time we're working on a few more big projects down there.  I can't wait to show you what's next! But what about you guys- has anyone else been in the Dink and Dunk stage of a reno before?  Am I the only one who can't stand the snails pace of it all?  I know I said I was going to take it easy this time around and go slow, but just want to get this project complete already. 

March 12, 2013

Now That's a Fire!


The ceilings are finally done in our big mess of a basement.  Feast your eyes on this gorgeous span of white.


Okay, admittedly the amount of work required to scrape and refinish the ceilings doesn't begin to pay off with the after photos.  In fact, if we did them right, no one will ever notice them.  But I will know my friends, and in those moments I will remember how much work they were, and wonder why we bothered.  I mean I'll be proud.  I'm only partially kidding. 


But moving on, because that's all I can do, next it was time to take care of that big fire burning monstrosity. 

After weeks of shopping, the Hubs and I finally found the best deal on a fireplace we were both happy with.  Rather than placing an insert into this old beast, we decided to go with a brand new one, because with us doing the demo and the rebuilding,  the price was basically the same.  That meant the Hubs got to do a little more demo.  Adios Old Smokey.

With everything out of the way, it was up to me to figure out where the new fireplace would go.  I consulted the rough opening instructions on our brochure, and after about 6 cups of coffee one Saturday morning came up with this.


 I had to account for the height, width and depth of the wall to accurately fit the opening and our fireplace, while also making sure the fireplace was at the exact height on the wall that we wanted, and structurally supported with a header beam.  After I was done, I calculated exactly how much wood of the various lengths and thicknesses I would need.  I had about 30% confidence at this point that I had done it right, but we strapped the kiddos into the car (two cars actually so the kiddos didn't have to ride home with a bunch of 2x4s) and headed to the Home Depot.

Later that afternoon when the kiddos went down for a nap, Hubs and I got our build on. 

After hours trying to wrestle with braking masonry bits trying to attach the frame to the concrete floor, we finally called in the big guns, and headed back to Home Depot to invest in a concrete nail gun.  This .22 caliber tool uses what is basically a bullet in a chamber to force the nail into the concrete.  It went boom, and it was magical.


When we were done we had this glorious, and surprisingly level, creation.


But the real test is when our fireplace installers came over to introduce our new best friend to the family. Just a slight mistake in my calculations would mean that the fireplace couldn't fit in our wall, and we'd have to tear apart everything and rebuild before it could go in.   I was out with the boys when the installers showed up, and when I returned, there was this.

Success!!  I asked the installers how the unit fit and he responded, I kid you not, "Like a glove."  (PS- I just read that out loud and realized that I said "the unit fit like a glove", but I'm not going to change it.  It was an honest, and awesome mistake.)  Let's just celebrate the fact that somehow I magically planned and built this wall exactly to the specifications.  Miracles do happen. 

The next step was to cover our little wall with Durock, a strong surface that will hold our mortar and stone. 


 Before too long we had this.


 It's not much to look at right now, but try to imagine it covered floor to ceiling in this beautiful stone.


Not feelin' it yet?  Then perhaps you need to take a look at these sexy little flames. 


Is that beautiful or what?  This guy already provides so much needed heat to that cold, basement room, we couldn't be happier.  There's still so much to do down in this room, and we've committed to taking it slow so that we don't feel too over worked, but I'd say it's coming along nicely so far.  Has anyone else installed a fireplace before?  I've got to be honest, this is such a different experience than I expected when we started, when I was expecting that we were working with a traditional masonry chimney.  It's strange to me that my fire box is basically supported on big wood sticks, but that's progress for you folks.  I can't wait to show you guys what's next.