October 31, 2013

Sew a Turtle Costume

Happy Halloween!  This year our little crazy 5 year old had no doubts in his mind- he wanted to be a Ninja Turtle.  So initially we did what we've done the past couple of years, head to Target to find the one piece Ninja Turtle suit.  On the way home, 29 beans lighter, I began having second thoughts.  I mean, what ever happened to the Halloween I grew up with?  Where we needed to use our imagination and work to make a costume?  Looking back, some of my best Halloween memories are about creating the costume. By the time we got home I had already made up my mind, the store bought costume was going back, and Ry and I were going to make a costume together. 

A little inspirational internet search (because it is the twenty first century after all) netted a few disturbing Slutty Ninja Turtles, and thankfully this perfect homemade variety.  Unfortunately there was no pattern or tutorial to accompany the image, so I had to make my own, which I thought I would share with you awesome people.  (You know, just in case you also have a chaotic 5 year old that has never seen an episode but still somehow know all of the Ninja Turtle's names and their weapon of choice.)


Or perhaps you just have a sweet little that munchkin that likes to be just like is big brother, (minus the mask and weaponry.)
The little man's photos are all blurry, because he moves at the speed of light.  I tried friends.

I started at the fabric store, and came back with 3 different kinds of fabric, felt in 2 different color browns, and one super fun brown scaly kind I found on the clearance rack. You could definitely make both sides of the shell just dark brown felt if you prefer.  The amount you need really depends on the size of your child, but I got a yard of each and had more than enough to make both boy's costumes.


Next I measured Captain Chaos' back and got the approximate height and width I wanted the shell to be. Then it was pretty easy to fold the felt in half to cut my shape, and notch out the sides.  I think using felt is key because it is so easy to work with and cut.


I could use my felt back to trace the shell shape onto the scaly fabric as well so they would be a perfect match.


Which gave me these two pieces.


Next I drew the pattern of the turtle shell on the inside of the scaly (outside) fabric.  It doesn't matter if this is exact or if you have to scribble out any lines, as this inside will never been seen.

I looked up "turtle shell" on the interwebs to give me a template to follow.

Once you like your design, sew with your machine along the lines with a thread slightly darker than your fabric.  It will create the subtle shell pattern on the outside of your shell. 

Before you stitch the two pieces of your turtle shell together, attach 2 straps to the top portion to go over the shoulders, and one to the bottom to go between the legs.  I used 2" brown elastic, but I bet you could use strong ribbon too.


I sewed pieces of velcro to each strap to connect to the body of the shell (which you'll see in a second.) The shoulder straps are extra long in case we need to adjust it for larger turtles in the future.


Then I sewed both pieces of the shell together (right sides together), turned right side out and stuffed!  I closed the bottom with a sewing machine stitch, and had this:


 And since we have two little trick-or-treaters, I made a second mini-shell:


Next I cut a piece for the tummy, again getting a general height and width measurement from the kiddo first.  Ryder took his job very seriously.  I traced a simple pattern on the inside of this piece too.


I sewed on my pattern lines with dark brown thread:


And attached velcro pieces to the side:


The hardest part was actually finding the plain green sweatsuits to wear underneath. Stores don't seem to do anything without design anymore, and especially not in kelly green.  After 6 stores and hours of late night internet searches, I finally found the perfect set for Ry at H&M online. Unfortunately the same set didn't come in Lil' Man's sizes, so I had to settle for white and a box of Rit dye. But at the incredible price of just $22 for both kiddo and free shipping, it was a no brainer.

I got a discount on the pants too, but for some reason it isn't included in this photo.
I've learned over the years not to be afraid of dye.  For only $2 (with coupon) and 30 minutes, a box of dye solved my problem I wasted hours on.  I dye in a small dish tub in my laundry tub, and wear an apron just to make sure I don't splash on my clothes.


After the dye was rinsed out I washed my sink quickly with Soft Scrub with Bleach, and it was as good as new.

And with that my littlest turtle was done!


For big bro I added a few "ninja" details, like this ribbon and buckle to the shell body:


I also whipped up a quick pair of knee pads and elbow pads.  I just cut them out of felt (no need to stitch the edges or seams) and attached velcro for easy on/off on the big day.


I swung and missed the first time around on the ninja mask, attempting to cut the eye holes and stitching a clean circle.  It was a disaster.


So instead I took a tip from the shell and simply cut the eye mask out of felt.  Ryder still insisted on the "long ties that fly in the wind," so I found a piece of felt in the same color and stitched the leftover fabric to the edges.


Add a belt made from the 2" elastic and a few $5 ninja weapons and we have our very own Leonardo.  So happy he couldn't even stop smiling for this "tough guy" shot. 


Both the boys love their costumes, and I love that we made them together. 


Turtles gotta hug...


How about you guys?  Any home made costumes this year?  Any matching or coordinating kiddos?  I hope you all enjoy your candy day and get some time to use your imagination with the little ones in your life.  Happy Halloween! 


October 24, 2013

Super Swings!

It's been awhile since I've shown you this strange area outside of our house that we call Ryderland.  With the house being built into a hill, we've got an interesting series of levels, and in this photo you can see 4 different exterior doors:

 At the very bottom is the slider from the Family Room, the next step up, in the lower right corner of the photo is the Workout Room slider, directly above the Family Room patio is the Living Room Deck and slider, and directly above the Workout Room slider is the Screened In Porch and Kitchen slider.  Whew.

These are all pre-move in photos, but they give you a better look at those bottom two patios, surrounded in rock.


 The Family Room patio was the most awkward, as it's about a 4 foot drop, and there are no stairs, so the only way you could get in or out of it was from the Family Room.  It's like an adult playpen.


That is until my Dad built us these.


Which made a previously dead space super useable for us.  I even hung a swing for him up on the Workout Room patio.

But it's not just Ryderland any more, Bo just turned one and is ready to start playing out here with his brother.  The first step- get that little man a swing.

I started by drilling a couple of pilot holes into the rafters, and then twisting in my swing hardware.

Once I got it started, using a screwdriver gave me a nice, big handle to quickly twist this piece into place.
 
Then I just had to screw in the plate around it.

 And we're in business.


 I had some extra chain left over from the last swing install, so I swagged it first to see how much I would need.


Once I settled on the correct length, I just needed to cut off the excess and load in the babies.


The best part is that the Screened in Porch above keeps out the elements, so even on a rainy day we can get outside and play on the swings a bit to get the wiggles out. 


It's not a traditional playground, for sure, but it works for us.  With a pretty narrow backyard, this was our best option to create a play area for the boys, and I'm proud we were able to make good use of this previously dead space.  Ryder begs to head down to his playground every night after dinner, and with all the lighting in this area, we'll be able to even as the sun sets earlier and earlier.  We may just need to bundle up!

October 22, 2013

Screened In Porch Sprucing

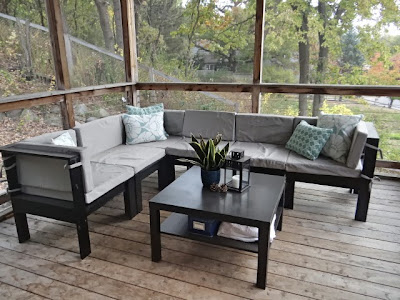
In the autumn there is nothing like sitting out on the screened in porch in the mornings with a cup of coffee and a throw blanket.  Pure. Bliss.  So it was about time that I returned a little of the love this room was giving me and spruced it up a bit.  Here's where we started with the outdoor sectional I built and the Ikea coffee table:

 
Here's the in progress:


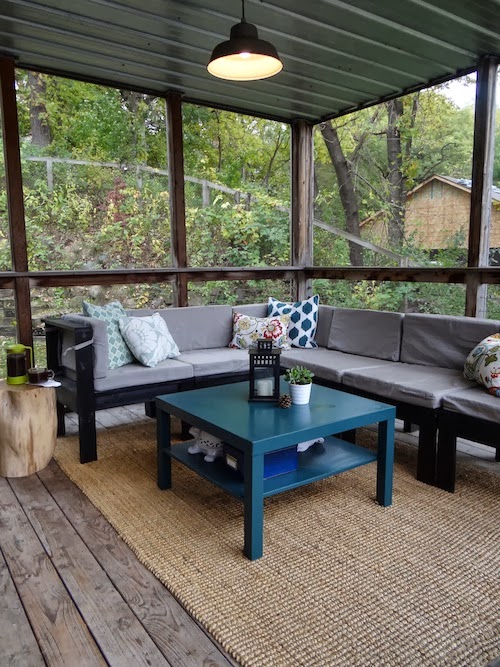
The repainted coffee table brings a fun pop of color to the space.  The natural fiber rug (which we purchased awhile back from Ikea) definitely didn't work well in the Dining Room, but it works perfectly out here to warm up the space.  I still plan to paint/stain the floor and wood framing of this room, but for now the rug helps a lot.


Did you catch that new fancy end table of mine?  As you may recall it started as this:


And eventually my year long project finally got to this:


And after about 5 coats of spar varathane left over from my build a double longer project, it looks like this:


 My Dad said that for a moment upon first glance he thought this table of mine was inappropriate- way to keep it classy Dad! But he's right, and we now refer to it as "The Butt Table."  I personally think every home should have one.

I picked up a few new pillows to compliment the new coffee table color, and I love how much more interesting they make the space.  It's the little things...


I'm not sure if I've shown you before, but I love the ceiling of this room, and we didn't have to do a second of work to achieve it.  Somehow this beautiful tin ceiling and rustic/industrial lamp were co-existing in the same home with the rain shower bath tub mural and indoor planters filled with rocks.  


 So it's not yet done, (is a room ever really done?), but it sure is perfect for a Minnesota autumn day.  Eventually, in addition to staining the wood I'm thinking of adding some outdoor curtains to soften the place up a bit. 

There I go again-- do you all notice that I can't ever end a post with "Horray- I'm happy with the progress?"  Instead I'm always ending with, "Here's a list of things I still need to do..."  I'm sick my friends.  For today, let's just end this with cheers to a cozy place to relax!