Remember how I said how much he luuuvs to throw things away? Lucky for me this includes demolition and carpet removal, not just home decor items. Score one point for me. The carpet actually came up pretty easy, he just cut it into manageable squares with a utility knife and rolled up the pieces. We rented a dumpster for the project (which I'm sure our new neighbors are loving as it sits in our driveway- cue the banjo!), so he just hauled the carpet and the pad outside and it was game over. Before I came home from work that evening he was complete, so it was on to the tile.
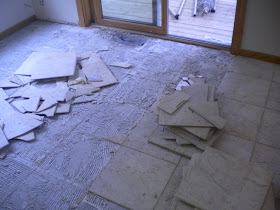
The problem with any demolition job is that you never really know what you've got until you get started. We did a lot of internet research first, and were crossing our fingers for tile that was laid on Hardie Board or a similar type surface. Then we could just use the removal technique we see all the time on Holmes on Homes, which is break up and remove the tile to expose the Hardie Board below, unscrew the Hardie Board from the sub-floor, and carry out all the mortar, grout and remaining tile in one large sheet. Unfortunately, we weren't so lucky, and when we took out the sledge hammer and crow bar for the first time, we found this:

Let me give you the play-by-play on what you're seeing here. Instead of a nice, clean sheet of Hardie Board, what we have is heavy duty wire lath, that is nailed to the wood sub-floor, and then a layer of 1 inch concrete that was poured on top. Then they finished with the mortar, tile and grout on top of the concrete. (We later learned that Hardie Board, Durrock, etc... wasn't invented back in the early eighties when this tile was laid, or at least not yet widely used, and this was the most common tile install method at the time- a little warning to all you 1980's home owners/potential buyers out there.) We quickly did the math and realized that we would have to chisel concrete out of 450 square feet of our home. Not. Awesome. At. All.
Being without any other options though, we got started, first prying and chipping out all of the tile. This part was actually pretty easy, as the tiles weren't installed very well, which is why they were cracking and chipping to begin with.

The next part is where things got tricky- the concrete and lath. We pretty much went with a 3 step approach: 1. Hammer a chisel/pry-bar under the lath, 2. Pull up on the lath as hard as you can to lift it from the nails and break up the concrete on top of it, 3. Scoop up all the broken concrete and tile and place it in the trash bin. Repeat.
 Repeat
 Repeat
 Repeat
When we started, I honestly thought, "How the heck are we going to do this ourselves?" The job was so overwhelming, and it felt like there was no way that we would ever finish. But it wasn't that we didn't know how to do it or that we needed an expert, it was just really hard, excruciating work. Meanwhile the house was a disaster. There was sharp wire coming out of the floors, chunks of concrete and concrete dust everywhere. Let's be real here, it was back breaking, impossibly hard physical labor, but we could do it, and since we were saving in the neighborhood of $1500-$2500 doing it ourselves, we just kept going.
Eventually we found that if you try to roll a whole sheet of lath at once, it helps get it up a little quicker. A little...


But it was still crazy hard work. In the mean time Ryder stayed in his "Safe Zones" that we had designated for him, and worked at his own tool bench with his own pair of safety glasses:

And surveyed the construction work being done next door: (We had no idea when we purchased The Lodge that the owners of the house next door planned to level the current home on the property and build a new one from scratch.)

And we just kept chiseling, and lifting and hauling. When the 30 gallon trash bin was full, we'd haul it out to the dumpster.

And finally, after days of exhausting, morale depleting work, we had pulled up the last piece of lath.
I grabbed the camera to commemorate the huge moment, and asked The Hubby to "Say cheese" by the very last piece as he pulled it up. I got this:

"No seriously, give me a real smile."

After we finally stopped laughing we swept up the last of the concrete, and tried our best to mop up the concrete dust that had settled everywhere in our house that we couldn't close off (which is pretty much the whole house considering the huge ceilings and open floor plan.) We were physically beat in every way, but super proud of our progress in such a short period of time. As we went to bed that final evening, we tried not to think about all the hard work still ahead (laying new sub floors and installing all the hardwoods), which was pretty easy considering that we both crashed within minutes of hitting the pillow.
Only 4 words: I'm glad that's over.


No comments:
Post a Comment