I wanted something with a pop of color, and a bold, modern design, but refused to pay upwards of $100 for a rug for the Laundry. Top it with a kind of awkward size requirement, (the space is 2 feet wide and only about 6.5 feet long, while most runners are a full 7 feet), and it was a difficult search. I did, however, find the perfect dimensions and sale price on this name rug from Ikea- just $29.99.
The problem was it was beige and boring. But once I saw this inspiration on Pinterest from Pudel-design, and I had my motivation. The blog warned that it was a long process, but I was too excited about the idea to care. Rookie mistake.
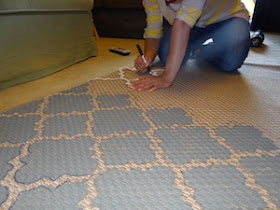
I started by printing out a pattern I liked on a large 11 x 17 piece of paper, and cutting it out. Then I just traced the design on my rug.
It took me a little while to come up with the right writing utensil, since a pencil didn't show up, nor did a pen. A Sharpie was too dark and took multiple coats to cover over with paint, but a dry erase marker was just right because it was dark and visible on the rug, but covered with paint easily.
You can see in this photo down below in the lower left hang corner where I was tracing with Sharpie and the paint definitely did not cover it. Oops.
It's not that this project was hard, it just took an incredibly long time. After I had finally traced all my design, I had to go through and fill it all in. And at least 4 hours later, it became painfully obvious that my paint was going to need 2 coats. If I had to do it all over again, (and for those of you planning to attempt this,) I would definitely paint the entire rug with a coat of primer as my very first step. Otherwise the fibers are so porous, it will take multiple coats to get the color and coverage you're looking for. A can of spray primer would have been ideal.... but I don't want to think about that. Don't say I never did anything for you.
 |
| See the shapes in the top center? Just one coat. |
For brushes I started with a small, angled craft brush to trim out the edge of the design.
And then I found that a thick stencil brush gave me the best coverage for the inside of the design. And after 8 hours of work when 2 coats of my blue/gray/green was applied to the entire rug, I realized that I was going to have to paint the lines of my design white. I didn't want to, and I tried to convince myself that it wasn't important, but I'm obsessive compulsive like that, and it just had to happen. See?
Way better right? But guess what- another 3 hours later once all the white was filled in, I had to go back with the second coat of white. Shoot me. See how 1 coat of primer would have cut the project time of this one in half? Here's a closer look so you can see why the white needed a second coat:
All in all it wasn't too bad actually, for about a week I'd just spend a few hours every evening painting while I was watching TV with the hubs. (And yes, a few pathetic weekend evenings staying up late, watching a chick flick and drinking a glass of wine while crafting. My 16 year old self would be so disappointed in my lameness. ) It was sort of cathartic actually, and it made me feel artistic even though I've never painted anything but walls or furniture.
Here's where I ended up after approximately 12 hours on this project. (Which is probably an underestimation.) It was a long haul, but totally worth it I think:


Yay. Finally finished! The priming idea is genius :)
ReplyDeleteIt looks so great! It's a beauty.. and definitely worth all that work!
ReplyDeleteGreat rug! looks great in the laundry room!
ReplyDeleteI've been dreaming of DIYing a rug almost exactly like this for our living room (just bigger... which I'll probably want to shoot myself after finishing). I'll definitely be reading your tutorial again before I start!
ReplyDeleteErin @ The Great Indoors
HI, Just found your blog;)
ReplyDeleteI think Pinterest is amazing;)
And I love that you `ve been inspired by my project!
This rug looks amazing in your laundry room!
Thank you for sharing.
Lovely greetings from Germany...
http://pudel-design.blogspot.de/