Showing posts with label Loft. Show all posts

July 3, 2012

New Rug in the Loft


If you've been following along lately (and if so, might I just take a moment to say Thank You for that?) we've done a little work to the Loft.  First we replaced the carpet with hardwood floors in a manic 5 hour wirlwind to end our holiday weekend:


And then added a fun, white, antler chandy for mood lighting and character:


The next step was our hunt for an area rug for this space.  We had a couple of prerequisites: A.) It must be cozy to fit the chillaxin', book-reading vibe we have going on up here, and B.) It must be cheap affordable. We also thought it would be a good idea to bring a little more white into the space to balance our new, shiny light fixture.  We landed on this $80 shaggy white rug from Ikea:


We found the sheep skin a little too much layered with this high pile rug, but that's a happy accident because we actually needed another sheep skin for Baby Boomer's room, which I swear we're going to get started on soon.


In in a short amount of time our Loft went from this:


To this:


I can't believe how much the lighting makes a difference.  The over head light is on in both photos, but as you can see the chandy does a much better job lighting the space than the 6 bulb track light ever did.  There's still tweaks we'd like to make to this room down the road, but for now it does the trick, and it's the perfect little space to curl up with a book and a glass of wine after the kiddo goes to bed. (Or glass of lemonade currently, but a girl can dream.)  

The next big project up is that nasty staircase which has been plaguing us since move in day.  We have most of the wood, and we're ready to get started.  Well... if I'm honest, we're running out of steam, but the impending arrival of our second little monster is providing a deadline that we can't mess around with, so hopefully you'll see progress shortly!

June 27, 2012

#190- Hanging an Antler Chandelier

I'm not going to lie to you, living in this house has been pretty fun lately.  We've had our share of extremes since we moved in over a year ago, from excitement, to depression, to exhaustion and everything in between.  There was something so frustrating and defeating about working into the midnight hours every single night for months on end, and waking up every morning to a gross construction zone.  I would look at other blogs with all these gorgeous and well decorated homes, and be filled with jealousy.  

We kept at it though.  Instead of giving up, we pushed it into overdrive.  We were going to have the house we wanted to live in, even if it killed us.  Fourteen months later a lot of the tough stuff is done, and we're finally getting on to the business of decor and personal touches.  And there is one touch we've had in mind since the beginning, that we finally got a chance to concur.


Above is a photo of our Loft, as viewed from the Living Room.  From the start we wanted to tear down that dated, beige-yellow track lighting and replace it with a statement piece.  Something that said Modern Natural Lodge, and gave the house a little character and intent.  I wanted an antler chandelier here.  Badly. 

Problem #1- Do you have any idea how expensive antler chandeliers are?  Every time I found one to swoon over, I would fall out of my chair at the price.  We are not the type of household that can spend $800+ on a light fixture.  (Or anything for that matter. #CheapDIYers)

Problem #2- Do you know how hard it is to find/acquire antlers to make your own chandelier?  I suppose this answer depends on where you live and the type people you know, but for me, it was as impossible as me getting into my skinny jeans right now. 

So when the Hubs sent me a Craigslist listing of a local guy selling an antler chandy for just $150, I was at the guy's house within 4 hours.  When I got there I was a little disappointed to find that the chandy was natural, not all white as he had shown in his listing, but used this to bargain a bit and got the piece for $125!  It was still in the Styrofoam in the box, never even taken out.  I attempted to hold in my party dance until I left his house, but I couldn't control my bootie and did a little conga on the way out to the car.  

The first step was to take down the old fixture, which we were pretty worried about since it was anchored into the natural wood tongue and groove ceilings.  We were pleasantly surprised that the holes in the wood were small and all but invisible, and there was no discoloration or anything on the ceiling once it came down.  Party rock was in the house. 


Unfortunately the ceiling box was way off centered on the wall, which meant we would have to swag the light.  I don't love that, but short of removing and reinstalling the entire ceiling full of panels, there wasn't much we could do.  We quickly moved on.

I knew almost immediately that I was going to spray the chandy white, but the Hubs wanted to at least see what it would look like natural, so we took 10 minutes to quickly hang up the light and take a look.  Because compromise (and proving your spouse wrong) is what marriage is all about.


Hubs took the bad boy back down in failure, and brought it out to the patio to spray with many, thin coats of a gloss white. 


After a good 48 hours of dry time, we brought it back in wired it up.  Here's a quick before pic of the Loft that sort of shows the old lighting. (Not to mention the gross carpet and rug, halleluiah for that replacement!)


And here it is now with the new light:


I love how it gives a certain feel to the whole house, as you can see it from the Living Room too:


My only concern was that the six 40 watt bulbs would be way less light than the 6 spots on the track lighting, but actually, I think this baby provides more light.


 Since the lights on this fixture point up instead of down, they seem to illuminate the whole wood ceiling,  really making the room feel warm, and well.... lodgey.  Yep- that's a word.  Don't bother to look it up, just trust me. 

Both the Hubs and I realized that this might be one choice in the house that is pretty personalized.  I mean I'm not sure why, but I gather that not everyone loves a good antler chandy as much as I do.  But in the end, for just $125 and 30 minutes of work, we're thrilled with what this piece adds to the room.  From the beginning the goal was to take this strange house and embrace the things that made it cool and unique, while downplaying the things that made it feel 80's and dated.  Now we just need to find a rug for this room, which I hope to post about shortly.

What do you think?  Anyone else made a daring lighting choice lately?  Or chose an upgrade in their house that you know isn't for everybody, but you don't care because it's really for you?  I mean if this is our forever house, then I really shouldn't care what potential buyers think, right?  Heaven help us if we ever try to move again!


May 30, 2012

#189- All in a (Half) Day's Work

I hope you all had a fantastic Memorial Day Weekend.  I was thrilled for my little family of 3.5 to get out of town for the weekend.  We went up to Northern Minnesota and stayed at our family cabin, and it was incredibly relaxing and fun.  We purposely left the house so that we wouldn't be lured into any home improvement projects, and could just enjoy some down time together. It was project-free-fantastic.

We got home at around 3PM on Monday afternoon, and after unpacking the Hubs ran across a sale on our wood flooring at Lumber Liquidators.  Before I knew it, he had made a call to confirm that it was in stock, and was out the door to pick it up before they closed at 4PM.

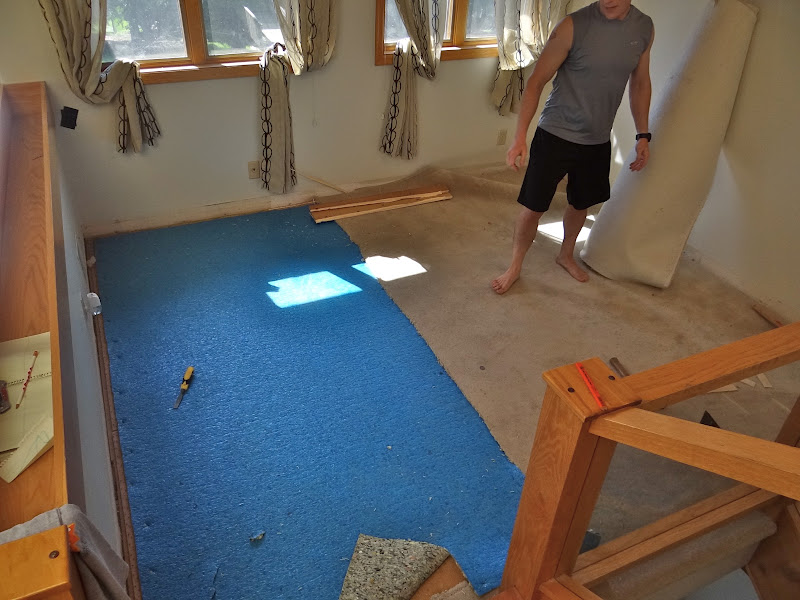
While he told me that he was just picking it up today so that we "had it," then next thing I know by 4:30 the Loft looked like this:


I mean, I couldn't blame him.  The carpet in this room had always been the worst in the house (well... almost.)


I mean, it was like someone shook up a can of soda laced with permanent ink and let it rip in this room.


So I guess I shouldn't have been shocked when before 5PM he was doing this:

 
And then this:
Which left us with this:

If you are thinking that this was just a prep day, then my Hubs is about to surprise you too.  Before I knew it staples & nails were pulled, underlayment was down and the wood was starting to fly.  I laid the wood and measured the cuts, while the Hubs ran up and down the steps a thousand times to cut the boards down in the Garage. (Getting out of stair duty is one of the many benefits of human incubating.)   It all went so fast I barely remembered to take any photos, but this one is date stamped 7:27PM:


At 7:54 we have a finished floor:


And by 8:16 the molding is back in:


And forgive the crummy iPhone photo, because at this point we were quickly cleaning up so that we could eat some dinner, but by 9PM we were looking like this:


Over all, not bad for a "project free weekend" huh?  It's funny to me that we didn't even consider doing this project this weekend until about 4PM, and at 9PM the room was complete.  We still have to pick up a better rug for this space, and right now we're thinking something shaggy and white.  The Hallway and Playroom are up next, but considering how quickly this room went, we can knock that out on Saturday. 

So what did you guys do this holiday weekend?  Did you get out of town?  Relax with the family?  Work on any house projects?  I still can't believe we fit in all three.

October 31, 2011

Turn Any Curtains into Tab Panels


While our Loft is still in progress, I love the direction it is heading, and whenever I need to step away and relax from Crazy Project Land I run up here with a Kindle and a glass of red wine.  Ahhh.


That is, except for one minor problem.  One of those that gets under your skin and makes you twitch every time you see it, kind of problems.  (What?  No one else does that?  Me neither... I'm just kidding.)

 I love our curtains, but I can stand how they hang.


These curtains from Ikea came with a poll pocket in the back only, no tabs.  The result is a mess of bunched up fabric.  They can barely even open, here's as far as they can go open without immediately popping back:


So finally this weekend I got to the business of fixing them.  I took 1 panel down at a time, and borrowed another Ikea panel (with tabs) from the Master Bedroom to copy the width and spacing of those tabs.

Then all you have to do is cut a slit in the back of the poll pocket exactly where the tabs are.  Just be careful not to cut all the way through the curtain.  Only cut the back of the poll pocket which will never be seen.

It was sort of hard to see with these curtains since they are sheer, so here's a visual of what it looked like when I did this same technique for the curtains I sewed for our little robot's room. 


 This quick and easy trick was over before I could say "Kate Gosslin's career."

 Don't they hang so much cleaner?  I can actually open the curtains to see outside now.


That couch looks ready for some gratuitous vampire novel reading.  If I can relax there long enough and not think about how I should remove the old blinds....  (oneprojectatatime, oneprojectatatime....)

July 5, 2011

#105- Modern Lodge Loft

Now that Bath Crashers is gone we can finally start moving stuff from the garage into our house, and get on with the business of trying to make this house a home (the producers had asked us to keep our Master Bedroom and Loft area completely clear of all furnishings to provide them with the maximum space possible to work).  I started with the Loft, mostly because the Master Bedroom is too much work for me to fathom right now.  For those of you still confused by my new home's crazy layout (I still am), the Loft is a small space located just above the Foyer on the way up to the Master Bedroom, and can be viewed from the Living Room. 
The Loft as seen from the Living Room
This space was sold as a home office in the listing, and the photos looked like this:


Maybe it's just me, but I might have cleaned off the desk a bit and closed the drawers before shooting the listing photos. But you know me, I'm obsessive like that.

To the Hubs and I, a messy office space on the way up to the Master Bedroom felt like anything but the calm and relaxing area we were hoping for.  Since we already planned to place our desk in the Guest Bedroom, we thought that this would be much better suited for us as a quiet reading area (we're not trying to be pretentious by having a "reading nook," as we both do quite a bit of reading and would love a private oasis to do so - but yes, you'd be justified to make fun of us). On inspection day, the room looked like this:

Diggin' that rock bed in the ledge?  I know I am.


And now it looks like this:


The great wood paneled ceiling in this space inspired us to incorporate the Modern Lodge look:


The bookcase might change a ton still. After all, this house still is a work in progress.


These little cardboard friends were a Father's Day present to the Hubs this year.  Whenever we searched the internet for Modern Lodge inspiration we would come across different modern twists on the traditional deer or moose head.  Since you would never catch me alive with a dead animal head hanging from my wall (seriously, it's a dead animal people), I was more than happy to embrace this  fun and quirky variation.

As much as we'll miss the rock beds and ergonomically designed office chairs that previously graced this space with their presence, we're excited about the new, comfortable modern feel.

May 20, 2011

#1, 10, 36 & 101- 7 Gallons of Paint and a Few Near Death Moments.


Over six months ago when Jason and I were waking through The Lodge with our Realtor, we had a conversation that went something like this:

Realtor: "Wow, these walls all need a serious coat of paint.
Jason: "Yeah, we'll definitely have to hire out that one.
Me: "Absolutely. There's no way I'm getting up there on a ladder. "

Yet somehow, months later, we seem to find ourselves like this:

Painting the living room with scaffoling
Jason and my Super Dad building a jungle gym in the Living Room

First, let me back up. Once we settled on our Living Room color pallet based on some inspiration from the HGTV 2011 Dream Home in Vermont, we couldn't wait to get started. Mostly because our garage currently looks like this:


That's right, 2 of the 3 stalls are full of all the furniture and boxes that belong to the Living Room, Dining Room and Kitchen. We knew from the beginning that the gross tile and carpet in these rooms would have to go. Like immediately. So there was no point moving in anything into these rooms that we'd just have to clear out later. How's that for motivation? But before we lay down those gorgeous new floors and finally get our furniture in, we need to do all the necessary painting, sanding and scraping to make sure nothing gets on those beautiful Maple panels. Or that we don't scrape up the floor with scaffolding. Yep, scaffolding.


What can I say, we're suckers for DIY, and after we got a quote on having painters come out, the idea of doing it ourselves was more and more appealing. Then my Dad scored us a great deal, as he has a friend that would lend us his scaffolding for free. FREE. It was on like Donkey Kong.

The Living Room actually was pretty easy (relatively speaking) with the scaffolding. It just took a lot of time to take down, and then rebuild sections of it when we needed to move it. The angled ceilings made this more challenging, as we needed all three tiers to get to the top of the kitchen side, but only 2 tiers would fit on the fireplace side. We also took this time to clean the skylights, fan and lights while we were up there, as well as touch up some ceiling paint, as I'm not sure we'll ever get to be that up close and personal with the ceilings in this room again.

The Loft actually turned out to be the really tricky part.

Covering up the purplish-gray walls would make me happy, if I wasn't so scared.

Yep, that's my Dad about 3 stories up (and my empty ladder right next to him as I stepped down to take the photo.) The stairs prevented us from being able to set up the scaffolding in The Loft, so we were perched on some pretty scary ladders. Don't believe me?

Here's a look down from my ladder, stretched over the stairs, all the way down 8 half flights to the basement.

My Dad and I we scrunched up in the very peak of The Loft. (My empty ladder on the right.)
View from The Family Room, with my Dad eight half-flights above me.


Okay, so maybe there weren't "near death" moments, but I'll be honest with you, being on that ladder made me feel like Death was knocking on my door. I don't think I've ever been so scared in all my life. We were both shaking so much it was tricky to make a clean cut in line. At one point my Dad asked me a question and all I was able to squeak out was, "Can't... talk... just... paint."

In the end though, after about 5 days, the Living Room, Loft, Foyer, Kitchen and 2 hallways were all painted in 7 gallons of Glidden Cappuccino White. We liked the color because it gave the room the bright pallet we were looking for, but with just enough color to make it interesting. I'm so ecstatically happy with how it turned out. (Which is good since the Hubs says we can never, ever paint these rooms again.) Since we made the decision to embrace the wood work, the goal was to find a color that really let the wood stand out and steal the show. The previous combination of muted grays, greens and taupes didn't do any favors for the focal points of the room, they just made it look really dated. Not to mention that there were all sorts of "seams" where different paint colors from different rooms butted up against each other, since really these rooms are all one big space. Now we have one cohesive, bright and modern looking space.

Kitchen Eat In Space

Living Room with the Kitchen on the left

In the Living Room looking up to the Loft

Living Room looking up to our sweet Master Bedroom windows


I know, it's a bit of a empty pallet now, but that's the point. We'll warm it up with rugs, curtains, art and throw pillows to layer it with color, instead of over doing it on the walls.
See how it looks great against the wood accents, but also has a nice definition from the white trim paint in the hallway?

Living Room
Hallway


More than anything, things are starting to feel "clean," which may have been the very last adjective I would have used to describe this space 6 months ago. Now on to the fun excruciatingly painful part- tearing up all that tile and carpet to make way for the wood floors. This is going to be interesting.