July 24, 2012

#3- Part 5- Finishing the Steps

As promised we' re near the finish line of our big, bad step project, but first I had to survive through one last Little Engine That Could weekend. I'm not going to lie to you, by Friday I was already spent. After about a week of step covering and then another week of trims, putty and sanding, this project had gone on way past my tolerance window. Whenever we take in a big project the rest of the house slowly seems to fall apart (dishes pile up, laundry overflows...) and this time was no exception, especially since the big, sawdust bomb mess was happening right through the center of our house.  And have I mentioned that I'm just getting way too pregnant for this? Baby Boomer has already seen 2 full bathroom guts and remodels this pregnancy, and it was time for this final project to meet the end, as I vowed to finish all big projects before the third trimester.  

The good news is that I had a full weekend ahead of me. The bad news is that since you can't really get between any 2 rooms in the house without using the steps, I couldn't finish them all at once. But if I could complete all the sanding on Friday, I could spend all day on Saturday applying multiple coats of poly to every other step, and then all day on Sunday applying coats to the opposite steps.

Game on. I had a few more sections to touch up putty and sand out on Friday. Bringing the mess like this:


From before:


To stain ready:


But I highly underestimated how much work was left, because this little piggy didn't get to bed until 2:30AM.  It reminded of our glory days a year ago when I'd be up to all hours in our new disaster house DIYing, but this time I was knocked up and exhausted. I couldn't quit though, I knew I would need a full day of finishing on Saturday and Sunday to meet my deadline, and I just wanted this thing over with.

The next morning my little monster woke me up at 7AM,  and we immediately got to work.  Sanding.  Again.  As much as I wanted to get started with the poly, in the light of day there were a few last spots to clean up, and I've learned once you poly you can't go back.  (Foreshadowing...)

Earlier in the week the hubs and I had tested dozens to of different stain and poly combinations. We decided on nothing but coats of water-based poly, which appeared to be the best color match to our floors. I was thrilled we were going the water-based route since its odor free, and although we could have opened the windows in the house, the heat and humidity would have slowed down our drying process dramatically.


We went with Varathane brand for wood flooring, since it is extra durable, quick drying and allows you to apply additional coats every 2 hours. It's basically the Beyonce of floor ploy - triple threat.


I started with applying a coat to the undersides of all the steps so that I could use the ladder first and then clear it out of the way. Once the undersides were done, I applied a coat to every other step, applying a PostIt to the dry steps so I could easily remember which were okay to walk on. By 10AM my first successful coat was applied, and my little man and I took off to the farmers market to enjoy the beautiful summer morning.  We bought veggies, sat in the sun and ate ice cream before noon. It was bliss.

When returned home and things went bad. Very bad.


The stairs without the PostIts aren't polyed, and the ones without the PostIts are.  Can't tell the difference?  Neither can I.  Problem.

Unlike oil-based poly (what I used to finish the maple wood door I built for the Main Bath) which brings out the natural color in your wood, water-based poly sits on top of your wood as a completely clear coat.  While our sample pieces looked right on, in reality putting just the water-based poly on top of these steps made them still appear raw and unfinished.  They would always look like we were still waiting to finish them.  I called the Hubs (who was unfortunately working all weekend), my Dad and even the paint desk at my home improvement store but no one answered.  Really, I didn't need anyone to pick up to tell me what I already knew, which was the only way these steps were going to look professional and finished was if I sanded off all of the poly I had just applied, and then either applied a oil-based poly, or a stain and water-based poly combo.  

I screamed, put Ryder down for a nap, took a deep breath, got my sanding block and made a new plan.  (Not necessarily in that order.)  I could have dwelled, but there was no time to waste.  I got back on the ladder, this time with 60 grit stripping sand paper, and started to work on the undersides of the steps repeating to myself out loud, "You can do this," "It's going to be worth it," and "Just two more sections."  I may have been borderline certifiable at this point. 

Luckily, 2 magic things happened at that moment:  Ryder took a 4 hour nap and my cousin Kenzie came by to help.  Kenzie is 21, back from college for the summer, and has an incredible "I  can take on anything" attitude.  She is fantastic, and just what I needed.  Kenzie took over on the ladder, and I took on the much-less-likely-to-fall-from tops of the steps.  With the two of us work went faster, and just before dinner all the poly that I had meticulously applied that morning was removed.  Full day of work, back to square one.  Still determined to finish the steps during the weekend, I came up with the new plan which was to apply a natural colored, water based stain to all the steps (tops and bottoms) that night right before bed (basically staining myself into my bedroom), which would give them about the 8 required hours to dry.  Then the next morning I could still apply my multiple coats of poly to all the steps, finishing by the end of the day. I was in bed just after midnight.  I don't even remember lying down. 

The only snag in my plan?  The fact that we wouldn't be able to use the steps for the day.  But I had a moment of inspiration when I realized that since our house has 8 exterior doors, nearly one on every floor, we could go outside to access the different levels!  So if you were in the kitchen and needed to use the bathroom, you could go outside, around the house, down through the Workout Room door into the Downstairs Bath.  I was smart enough to know that my three year old bull-in-a-china-shop kiddo wouldn't mind the taped off steps for long though, so we came up with a schedule that went something like this:

Set Ry up with a craft downstairs - Apply a coat of poly starting at the top flight and working my way down to the bottom - Both of us leave to go grocery shopping.

Let Ry watch a cartoon- Apply a second coat- Go for a run and stop at the park to play

Put Ry down for a nap- Apply a third coat- Blog on the couch in the basement (my favorite)

And so it continued for 6 total coats. 

My 3 year old Paparazzi strikes again.
The stop signs Ry made for his craft helped remind his little motor to slow near the wet steps.
I didn't have to sand between every coat, but I did sand it lightly with 320 grit finishing paper, and then wiped them down completely with a microfiber rag before my 7th and final coat.  For the last one I once again started at the bottom and worked my way into my bedroom, finishing at exactly 11:47 PM on Sunday night.  13 minutes before the start of my third trimester.  Success.


Although the poly was dry to the touch the next morning, we're currently walking on them very minimally (and always without shoes) until they cure up completely in the next few days.  Mostly I just sit near them to admire.


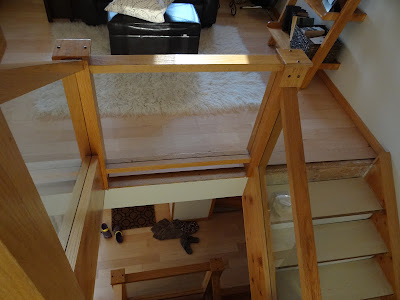
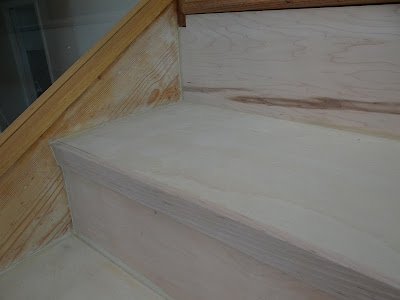
And let's celebrate with a little before and afters...


I'll be honest with you guys, I'm not completely done with projects, since we still have Baby Boomer's nursery to tackle, but we are done with some of the more difficult projects for awhile.  Unless we decide to paint the kitchen cabinets... or redo the Family Room... I can't make any promises.  What do you guys think?  Was it worth the hard work?  Any big projects you all are working on lately?  Big ones sitting out there that you really need to tackle?  I suggest getting knocked up, it's amazing what you can accomplish while you're nesting.

#3- Part 4- It's Tricky to Rock the Steps

When we last left you on the steps project, the Hubs and I were cranking away at a pretty systematic approach to covering our stairs.  It was a detailed process, but nothing we couldn't handle, and we were getting about a section done a night.  And if that would have been all we had to do with this project, it would have been easy.  But like every good DIY, we had a few randoms thrown at us.
The first tricky thing was the thresholds.  At every space where the wood floors came up the edge of the steps, there was a unfinished lip- like this:


Or like this whole edge of the Loft, which I creatively decided not to show you in the wood floor reveal photos.  Which means it's looked like this for the past 6 weeks.  Oops.


And even down on the Kitchen and Foyer levels we had been living with these old golden oak stair nose pieces since we installed those wood floors a year ago.   They might look okay from far away in this photo, but up close you'd see that we had to cut the wood flooring as close to the stair nose as possible, an then there was just a gap there where the 2 came together that we tried to fill with putty.  It was ghetto.


So for each of those 9 areas we had to purchase maple stair nose molding from Lumber Liquidators to match our flooring.  It took a lot of work in some cases to get the old ones out, (a few times the Hubs had to bust out the big demo reciprocating saw, and I wasn't about to wield that thing on a ladder with this belly) but eventually they were all out.  The cuts were all exact and tricky, so it wasn't hard, just really tedious. 


There were also a number of areas that required a bit more creative molding, like the quarter round in the photo above at the base of the steps where the riser meets the floor.  Ry and I had to run back out to my favorite lumber store to stock up on a bit of specialty maple molding.  He's like my own personal paparazzi.

I'm trying act like I know business with the wood workers and my 3 year old is yelling out, "Hey Mama!  Say cheeeeese!"
 There were a few awkward situations we had to fix up too, like this flight of steps that were spaced pretty far apart, and had 2-4 inch gaps between each step.  I've been picturing a baby falling through this space since the day we moved in, pure terror every time we had friends with little crawlers over.   We started by cutting 2x4s to size and then using my Kreg Jig and pocket screws to attach it on the top and bottom. 


 Then we covered up the full step with the 1/4" maple plywood tops, and you'd never know all that ugly was under there.


And after all that, we weren't even close to done, because it was time for the sanding and putty.  Lots of sanding and putty.

No matter how exact we were when putting in the three different types of wood on every step, it was going to take some wood putty on the seams to make it all look seamless.  There also may have been a minor setback apocalypse when the Hubs spent a bunch of time filling in these cracks with the evil putty I accidentally purchased, the kind that doesn't harden or sand. I don't want to talk about it.


Once you put in the putty it looks like a total mess, and even the Hubs thought I had lost my mind.  Trust me baby- I got this.


Once its all sanded and smooth- perfection.
 We had to fill, let dry, then sand every flight by hand.  It felt like it would never end.  And just when we thought it would... there was these guys.


 Yep, all the underneaths of the steps had to be patched and sanded too.  All in these tricky little items took up our whole week last week.  Every evening after eating some dinner and putting the kiddo to bed we took on a new challenge.  But it was nothing compared to our marathon weekend.  I'll fill you in on all that fun, plus the big reveal pictures tomorrow.  Yes sir- we finished and I can't wait to show you.  But right now, I need to go to bed, because tired doesn't even begin to cover it my friends.


July 18, 2012

Making the Swtich

I'm not going to lie to you, we're still knees deep in this step project, and although we're making great progress, it's taking a lot of time.  (As all good woodworking projects do.)  So in the mean time while we cut, nail, putty and sand, I thought I'd fill you in on a quick project that I did a couple weeks ago that I forgot to share.

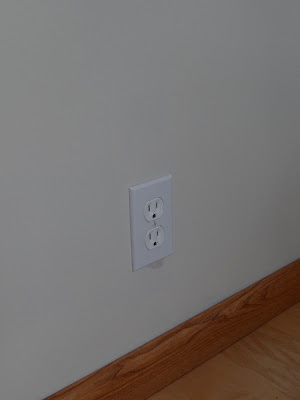
Back when we moved into the house there was one (ok, hundreds, but one particular thing) that really bugged me.  The previous owners had switched out all the switch plates for clean new white ones, but left in the old almond colored switches and outlets.


And they were every where.  Seriously.  Since this house has so many half levels, at the top and bottom of every set of steps is switch plate full of 3way switches.  And those almond colored pieces of poo have been tormenting me for over a year now.  In fact, back when we first moved in I did an inventory of all the switches and outlets to buy new ones, as I wanted to replace them immediately.  At the time though both my mother and the Hubs *gently* told me that this project probably wasn't our biggest priority, and to hold off on something so trival until there was more time.  I reluctantly agreed, but silently cursed the little buggers every time I flipped a switch. 

Until now.

I used a nice long nap one Saturday afternoon to systematically go through the house (or at least the first main levels) and remove and the replace the ugly switches.  The best part is that the typical switch is only $1 or so, and I had a few extra in the house left over from various projects, so even though I replaced a couple dozen switches and outlets, it only cost me about $20.  $20 and my sanity.


 I know its probably not all that noticeable, but that's sort of the point.  Before these switches were just one more thing that made this house old, dirty and dated.  Now they look shiny white and new.  Sometimes its big projects like full bathroom renos and furniture building, and other times its the little things that make my bacon sizzle.  How about you guys?  Any quirks about your house that drive you batty?  Old, strange light fixtures or sockets that throw you over the edge?  We had 3 different dimmer switches that had long since lost the dial to turn, leaving just a little stub to turn.  That's just not right people.

July 12, 2012

#3- Part 3- Covering the Floating Steps


Its steps time baby.  As I mentioned earlier this week, after a couple of tried and failed attempts, we finally have a plan that we think will work.  It's a little complicated, and it's also not very likely that others will have our same exact situation, so I won't bore you with too many details, just the fun stuff.  Yes, rebuilding steps is totally my idea of a good time.  I'm letting my freak flag fly. 

First we got our wood.  We decided to go with a light maple that will match our new wood floors, making all the various spaces and levels feel cohesive.  We actually like how the light maple and Golden Pecan stained oak go together in the Living Room, Foyer and Loft, giving it a duo-tone look that appears slightly more modern. (Plus, I just couldn't get myself to stain anything new in the house golden pecan.)  I ended up going to 3 different lumber yards on an endless trek for maple, but here's what we found:


1.  3/4 inch plywood with maple veneer for the stair risers.  (I wanted to use solid boards for this, but 1 x 10 maple boards were going to break the bank, so we'll take the time to cut down our plywood and apply veneer to the raw edges.)

2. 1/4 inch plywood with maple veneer to the stair treads. (The part you step on.)

3. Ranch style maple molding for the edges.

It will make more sense in a second.  Here's a section of my big ugly stairs now:


 First we cut down the 3/4" plywood to the width of the step, and the height from the bottom (underneath) of one step to the bottom of the other, plus 1/4".  (I'll explain the 1/4" in a second.)  In theory this should be easy, but every single one of our 19 steps is a different width and height, so I was the crazy Type A one with my measuring tape, graph paper and insane lists.  When you cut plywood you get a exposed/raw edge that is not very attractive, like this:


So for each riser we have to iron on a veneer strip to the exposed bottom edge, which makes it look like this:

The bottom riser has a veneer applied, the top does not.

Hubs maned the ladder underneath the set of steps (did he ever), and placed the stair riser in place, using a small level to make sure it was perfectly vertical.


 Once set, I went to work with 3 different drills.  One 1/4" bit to bore a shallow hole in the step that the screw would fit into to make it flush, one tiny bit to create a pilot hole so that the board didn't crack, and finally one to drill in a 2 1/2" wood screw.

My screw nested in the face of the step, completely hidden.

Then the hubs used finishing nails on the nail gun to tack in the bottom of the riser to the stair from underneath.  Hubs stands on the dangerous ladders, I make the babies.  We all have our roles. 


Once they are all in, it looks like this:


Next step, we cut the 1/4" plywood to the exact width and depth of the stair tops.  Again, this insane house did us no favors, every step = different size.  We used Loctite Sub Floor Adhesive and finishing nails on our nail gun.  Starting to look better...


A little finishing touch with the molding is the icing on the cake.  You'd never know there were ugly floating stairs under here:


Unless you were looking from the floor below that is.  

The flash kept coming on in these pics, making the trim look much more orange than it is in real life.

Nothing that a little more 1/4" plywood can't fix.  Remember when I said we cut these risers 1/4" longer?  That's so that we could fit a piece of plywood, in the quarter inch thickness underneath the step, and the riser caps off the raw edge perfectly, creating a flush corner.  It's the type of thing I come up with when I'm laying awake at night planning every detail of a project.  I can't shut it off.  It's a sickness.

We're waiting to put on the bottom riser until we have a finishing piece for the floor.  More on that later.


It's not going quickly, but we're getting through about a section each night after work when the kiddo goes to bed.  After all the wood is on we'll still have a bunch of work to do with wood putty and sanding, and then the fun worst part- polyurethane. Since you basically can't get to any room of the house from another without using the steps, we're going to have to get creative about the poly, but let's jump off that bridge when we get to it.  I'm just going to take a few deep breaths and appreciate the progress. 


Ahhhh.....

July 10, 2012

The Dreaded Steps Return

From the very first moment we stepped foot into this house, we knew that one project would be the death of us... the steps.


There are 8 half flights of steps in our house, all that run in a square pattern through the center of our house. 
Photo taken from the top during our Loft painting project.
While the floating steps might have been as cool as Members Only jackets in the 80's, they aren't exactly family friendly.  The previous home owners solved the problem by wrapping them in Ikea floor mats and chicken wire.  Genius.


And we loved that chicken wire, really we did, but the pet hair and food particles left over in that wire was enough to drive the Hubs to drink.  We weren't in the house very long before he ignored my frequent requests to leave it until we had a plan, and made the executive desicion to remove it.


That's where things went very badly.  Unfortunately, the solution to replace the chicken wire wasn't quite so easy.  The Hubs spent thousands of angry, cursing hours trying to sand the steps down to the original wood,


 and re-stain them,

While I cut and stained wood risers to  install across the backs.


And in the end it looked... well, better.


But the reality was that the stained treads and new risers never looked like the same color no matter what we did.  The steps out of the foyer weren't bad, but the ones leading up to the Loft and Master Bedroom -- Hot. Mess.


We never even bothered to poly and finish them, because we just weren't happy with the look.  Instead we did the perfectly rational thing, ignored the fact that they looked terrible and moved onto other projects on The List.  A year later, those steps are coming back to haunt.  The rest of the house is coming together, and we really can't leave this project in progress just lurking in the center of our home anymore.  The breaking point was when a stranger came to the house to buy something off Craigslist from us, and immediately upon entering pointed to the steps and said, "Looks like somebody has a project..."  Yeah thanks buddy, just give us the cash and take the big ugly piece of furniture.  Thankyouverymuch.

So all that's to say, it's steps time.  We have a plan (that's going to actually work this time), and although it might take awhile, we're not going to quit until we get it done this time.  And just in case we need any more motivation, the little kick boxer in my belly reminds me every day that there's no way we'll have time to build wood steps with an infant in the house, much less have the ability to stain and poly (and therefore not be able to use) the main walking space in our house.  I'll be back this week with the update, because even though this before and after was better...


It's just not good enough.  Wish me luck!