
Hey folks- thanks for being patient while I take a much needed break from home improvement to spend more time snuggling with my boys. In truth it hasn't been all snuggles though, and I have spent a bunch of nap times catching up on projects that have been taking the back burner for awhile. The problem is, they are not very interesting projects: fixing 3 way light switches, cleaning out the cat door storage closet, organizing and trashing our paint, and prepping the yard for winter. There was one recent project though that might sizzle your bacon.
I absolutely LOVE how Boden's nursery turned out. I mean, if I liked it before he was born, I'm absolutely giddy about it now. That's because I've been spending a lot of time in there lately, and the calming peace of the room literally transforms my mood whenever I'm in there. At 3AM, instead of being a grumpy zombie, I'm actually cuddled up with him on the daybed, taking a few deep breaths and appreciating everything we have, and all the hard work we've done to get here.

While this side of the Nursery looks finished though, the other side is a bit bare...

I have been looking for the perfect growth chart to fit in between the closet and entry door, but still no dice. Bo has, however, recently received lots of beautiful new books from our incredibly generous and thoughtful friends, so I thought this might be a great place to display them. I mean, why not? I still have these leftover book ledges that my dad made.

They were leftover from the ones I hung in the Playroom, remember?

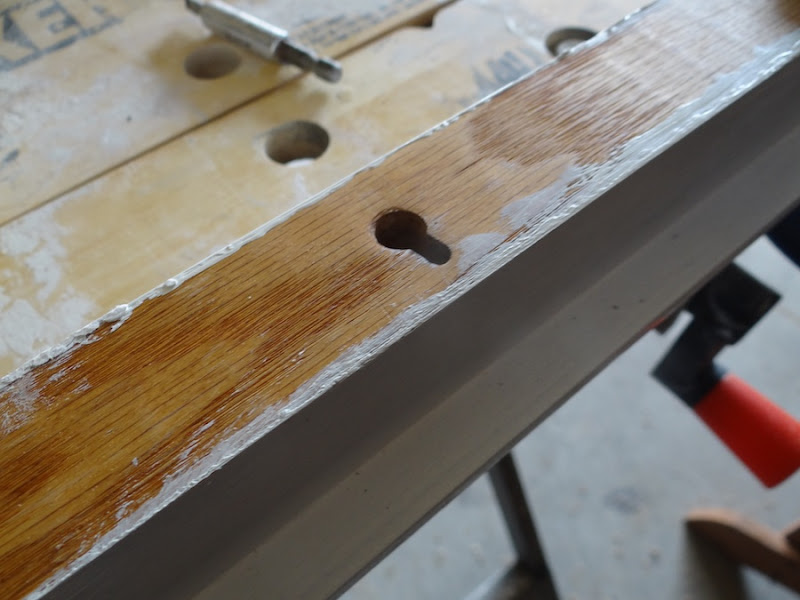
First things first, I need to fix my old mistake. Back in the Bungalow, I had used one of these ledges in Ryder's baby room, and to refinish it white from the original stain golden oak, instead of doing it right and sanding, priming and painting, I just slapped on a coat of white paint. DIY is a learn as you go process my friends, and I learned that over time, without primer, your pretty white paint gets stained from the poly below, creating a yellow mess. Exhibit A:
 |
| My non-primed shelf is the one on the bottom. You knew that though, didn't you? |

Since I cut down these ledges, I needed to add a few more hanging holes to the back of them so the could hang evenly. For that I needed this beast:

That big guy is my Dad's router. Admittedly, for someone that builds furniture I'm not nearly as comfortable with a router as I should be. Probably because I don't have one of my own (Christmas gift hint Hubs), and I haven't had a lot of time to practice with one. Lucky for me drilling in this keyhole was pretty easy.
I hate, HATE hanging things with the hidden keyholes though. If you are off by just an 1/8" inch any way, your whole piece is off. So to hang them I cut paper bags to the shape of my shelves, and marked where the keyholes were in each one. Once the templates were up on the wall centered, level and the appropriate distance apart, I could easily drill my holes for the mounting right through the template.

And here's the final result:

So why the swing and a miss title of this post? Because to be honest, I hate it. I mean, on its own it's fine, but in the context of the full room, the random and colorful books look busy and don't fit the vibe of the room at all. Here's the view from my usual spot on the daybed:

It's just not working for me, but I'll leave it for now until I find a better solution. Perhaps I'll keep looking for the perfect growth chart... What do you guys think? Would you keep it or bag it? I don't think it's a total loss, I can always use these ledges again down the road, I'm just not sure they are right for the room right now. Tell me what you think, don't worry about hurting my feelings, I can take it!
I have to agree with you. Those shelves just don't fit the vibe you have going on in the room. You could DIY something awesome with a 2x4 like Emily did on her blog here: http://emilyaclark.blogspot.com/2011/10/wall-to-remember.html
ReplyDeleteMelinda- we must be kindred spirits. I was already planning on how I could make a ruler growth chart of my own!
DeleteI kind of agree with you as well...I ordered a wall decal for above our entry closet from this shop and saw a cute giraffe one that may work for the room, in a matching color: http://www.etsy.com/listing/113796137/giraffe-growth-chart-vinyl-wall-art. The nursery looks amazing - you have such a great eye for decorating!
ReplyDeleteI agree. The shelves are nice and the books look cute on them. But the primary colors of the books just don't jive with the earthy tomes of the nursery. I'd say leave them for now until you find what you really want!
ReplyDeleteI suggest that you paint the shelves orange, similar to the tone in the rug. It is just too white over there IMO.
ReplyDeleteyou could always put a couple neutral looking books, and some photos/pictures/whatever, on the ledges, to keep them w/ the colour scheme. nursery looks amazing!
ReplyDeletewilma
I think your shelves look great but I do like the idea to paint them orange. I have to admit I got a little excited when you mentioned that you're looking for a growth chart! I just built one (but haven't got it hung and written about yet) based on this. (http://www.cape27blog.com/2012/07/pinterest-challenge/) I had been wanting to keep track of my kids growth but didn't want paper or to write directly on the wall (because it could get left behind or painted over) so I was excited to see a DIY idea! :)
ReplyDeleteinstead of books, what about white framed sepia (not black and white) photos of his growth, and the family
ReplyDeleteWhat if you make book covers with scrapbook paper or wrapping paper that fits the color scheme of the room? They'd be quick and simple to make and since they just fold over the actual book, they can be removed and changed easily.
ReplyDelete