August 30, 2013

Building a Double Lounger

Last weekend we decided to stay home, and not head up to the new cabin for nearly the first weekend since we purchased it.  While we want to spend every second we can laskeside in the summer, the Hubs was working all weekend and I decided to take the time to spend at home with the boys, and catch up with some house work.  At nap time on Saturday, I was left with that glorious and rare moment- nothing to do but relax.  As I pondered what I would do with a full two hours to myself, I thought, "Man it would be nice if we had that double lounger up on our Master Bedroom Deck, I could read a book and get some sun."  

Listing photo with previous owner's chairs. 
This deck has stood empty for the two and a half years since we bought the house.  I've always had a plan to put a nice, comfortable piece of furniture up here for the Hubs and I to spend some quiet time alone together, but so far all we have is a rusted out lawn chair.  Come to think of it, since this deck is a big 14' x14', it's a lot like having a whole room of your house completely empty for 2 years.  What a waste.  So before you can say "I'm a compulsive DIYer," I abandoned my plans for a relaxing weekend and started Operation: Build a Lounger.

I spent nap time searching my favorite Ana-White.com site, and planning out the project.  Since I built an outdoor sectional with her plans in the past, I knew she would have the style I was looking for. I decided on this beautiful Wood Slat Double Lounger:


Which conveniently looks stunningly similar to this piece, which is no longer sold at West Elm.

Tell me that this doesn't look like heaven...

The minute the kiddos went to bed at 8PM that night, I said adios to the Hubs and headed to Home Depot to purchase my materials.  When I got home I immediately began cutting and about an hour later I had this:


A messy garage?  Well yeah, I had that too.  But let's not get side tracked.  Step One was to build the frame.

 I used a scrap cut to 15 3/4" so that I could get the spacing in between the joists perfect.


Ana's Step 2 was to attach the decking.

Again, I used a scrap of 1/4" molding to use as my spacer.


I used 2 1/2" deck screws to build the frame for strength, but went with brad nails for the top decking pieces that won't really have any pressure on them other than pressing them down.  This way I'll have a smooth, seamless top.


Unfortunately this is the part where I ran out of wood.  Ana's plans call for four (4) 25" pieces for the back deck, but in reality you need eleven (11), which means there wasn't enough for the bottom decking.  I was forced to call it a night.

Those pieces aren't going to cut it.


The next morning the boys and I headed back to the Depot.  Captain Chaos said "Hi" to Jim (yep, they know each other by name there), we grabbed a few pieces of wood and we headed back home.  At nap it was back to business.

Ana's Step 6 makes it sound easy, "Build the Back." 


In reality it was pretty complicated.  Getting everything perfectly spaced, while keeping it perfectly square took time.  I rocked two T-Squares at the same time, which helped.


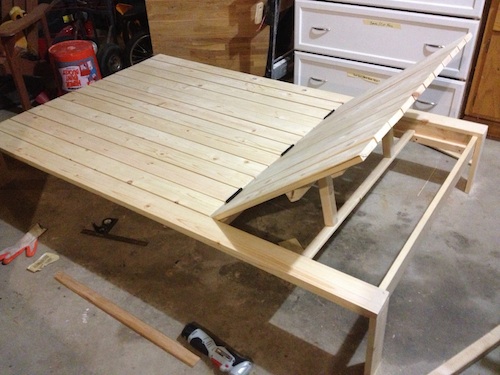
By 8PM bedtime on Sunday evening it was all over but the hinges.  Ana's plans include this really smart way to make the back adjustable.


So in approximately 24 hours, working only while the kiddos were asleep, I had this.


It was at about this moment, between my little bursts of celebration, that I read this in the General Instructions:

"I also recommend finishing your boards first, unless of course, you own a sprayer. Painting those tiny gaps is going to be quite tedious otherwise."

Uh-oh.

We'll save that for another post. Let's get back to the gratuitous self-back-patting.  My materials so far, wood and hinges cost just $47.99, since I had the screws and wood glue already.  I don't know the price West Elm was selling their lounger for since it is no longer available, but this very similar Pottery Barn version is $899, so let's do a little twerking for an $850 savings!  (I kid. I assure you there is no twerking happening here friends, I'm a mother.)  What do you think?  Not bad for 24 hours and a weekend of "relaxing," huh?


August 27, 2013

Paint the Dock

Getting the dock hauled over to our new cabin and into the water was just the tip of the iceberg.  We still had a technicolor dream coat of surfaces to work with.


The light blue on the far end is made of fiberglass boards.  It wasn't damaged, but it was really scratchy, almost painful to walk on.  And certainly too rough for little knees and bums playing on the dock.  The middle is a green treated sheet of 3/4" plywood, and the piece closest to us was some sort of manufactured board.  The top layer of this board was peeling, and the bottom was rotting out.


In fact, you can see above we marked with a rock where the big hole in the dock was so no one could trip.  That's a pretty fool proof plan- no?


So my first step was to remove the old rotten board.  This should have been easy- just remove the screws, remove the board.  Unfortunately many of the screws were rusted, stuck into place, and there was no budging them.  So began the tedious process of chipping out the wood around the screws.  I used a combination of my Dremel Multi Max, and a good ole chisel and hammer, which if I'm being honest worked the best.

One down, about 10 more to go.

When all the holes were finally bored out, I was able to lift the old sheet from the dock.  Then I used my MultiMax with a metal cut blade to cut off and remove the rusted in screws.  Once all the remnants of the old section were removed, it was time to carry out my new sheet of green treated 3/4" plywood.  I don't have any photos of this because I was by myself, while the kiddos were sleeping, attempting to move and haul heavy 4'x8' sheets of wood.  I had my hands (and back) full.

Here's the new guy.  (Don't worry- it gets better.)


I drew lines across with a straight edge at the support beams so I knew where to drill in my new screws without missing.  One quick step avoids a half dozen moments of frustration.


Admittedly this looks pretty rough.  But I have a plan to restore this deck to one, cohesive surface.

Disclaimer: Rust-oleum has not sponsored this post, nor do they know who I am. 
I've never used this product before, but I thought it would be excellent for a dock surface as it would provide a little extra anti-slip traction, as well as a waterproof coating.   It was certainly a new experience- I'd liken it to painting with cake batter.


 The kit comes with this honeycomb roller that gives you the finished texture.


Besides being thick and a little foamy, the paint was really easy to use.  In just 20 minutes I had my first coat on.  It says right on the package that you need a minimum of two coats, and they were right.  The first coat looked pretty sparse and had me worried. 


I waited until the next day to put on coat number two, right before it got dark so it would have the whole night to dry.  More cake batter- nom nom nom.


The second coat worked like a charm, and filled in all the little unpainted blotches.   Viola!

Ignore those darker spots across the middle.  Captain Chaos had just been doing some mean swimming and jumping off the dock, so it was still wet.

Let hit you up with a little before:


And after:


Upgrade- no?

Next year we're going to work on creating a platform and pushing this out a little farther into the water.  We'd also love to add another section that comes out to the right like an L for more swimming and lounging.  For this season though, we're calling it a success. 

Has anyone else used these Restore or Behr Deck Over products?  They are not cheap, but in my case it was exactly what we needed.  I'd be curious to hear from any of you on how they hold up over time, so let me know if you have the inside scoop!

August 20, 2013

Rock the Dock

We did it!  We've moved our crazy cabin projects outside!  With the wallpaper in the Living Room looking much better, I've resigned myself to putting on blinders in the bedrooms and bathrooms, and focusing on the beautiful outdoors.  And as some of you may know, the most important outdoor element of a cabin is the dock.  Your connection to the water.  Your springboard to fun. 


Okay, yeah.  Ours leaves a little to be desired.  We were able to purchase this very used dock for a good price, but as we've learned with everything the key to a good deal is a lot of work and elbow grease.

Step 1 was just getting this bad boy in the water.  The hubs and I rented a trailer and hauled this guy in 2 huge 4'x16' pieces.  I wish I had taken photos, but I was far to scared that we were going to loose a dock off the side of the road to pose.  I've got to get better at the photo taking- I promise, I'm working on it!  Once we arrived at the cabin my brother helped us get the 2 big pieces off the trailer and put back together.


Then there was a lot of work trying to get the poles and fittings, which likely haven't moved in over a decade, to budge.  We used sand paper, scrapers and even olive oil, until eventually they could be adjusted to the right height.


When we finally felt comfortable with our adjustments, we hauled the guy in.
Looking at all those weeds along the shore makes me tired...
Ryder had been jumping at the bit all morning to get on this guy, so when we finally got it in the water we took a moment or two to celebrate.


That, my friends, is what it's all about.

Unfortunately there's a lot more work where this guy is concerned.   More to come!


August 15, 2013

How to Buy a Super Cheap Washing Machine

As far as appliances go, I'd give our new little cabin about a C.  It did come with the essential- a good, big, newer fridge.

Our first thought was to turn in that water cooler, but after a warm weekend, we instantly fell in love with the simple to access, cold water.  The well water isn't very tasty to drink, and we didn't realize how much water we would drink until it was easily accessible like this.  For now- function trumps form.

The stove, although it's electric which is not my fav, is on the newer end and will do just fine for bacon and egg cooking.  The cabin did come with Micro-saurus Rex over there.


Good thing my brother and sister-in-law recently moved to a home with a built in microwave, and donated theirs to the cabin.  Upgrade.


The place was lacking 3 things though- a washing machine, a dishwasher and a TV.  While the necessity of #2 and #3 is still up for debate, we hoped early on to find a good deal on a washing machine, so that we wouldn't need to haul baskets of sheets and towels home to wash them each week.  So as the Hubs and I were exiting the Menard's lumber yard with the bricks for our new fire pit, we passed by a section of old used appliances and I yelled, "For God's sake man, pull over!"  There, among the avocado green and harvest gold graveyard, stood this little beauty with a sign on it for $49.


We asked the gate attendant in the lot what the story was, and she said whenever they deliver new appliances, they haul out the old ones for free, and stack them there in the lot.  There's no guarantee that they work, but you have up to 2 weeks to bring them back for a full refund.  That sounded like a much better deal to me than Craigslist, where you have no guarantee that they work, so after a quick inspection, we loaded her in the back of my Dad's pickup and rolled out.  The new guy is definitely a step up from the dryer.


When we returned with our score, by some incredible stroke of luck, my uncle, who is also repairs appliances, happened to stop by to check out our new digs.  It took him all of 3 seconds to tell us that the reason why the previous owners threw it out was likely the lid switch.  (You know- the little hidden switch in the lid that stops the machine from running when you lift it.)  The good news is that this is a cheap little part, and super easy to install.

But there was one key thing we forgot to notice.  See what's missing?


If you guessed "A Power Cord," you would be correct.  Rather than deal with the cord when moving the beast, it looks like some genius just cut it off.  Brilliant.  But fear not, this is a cheap part and a plug-and-play install as well.

So the next weekend we headed up to the cabin with parts and tools in hand.  If there is anything I've learned over the last few years, by the help of our dreaded dishwasher, it's that with the help of the internet, appliances really aren't that complicated to fix on your own.  Sure, I was lucky this time to have my Uncle's help diagnosing the problem, but I have no doubt that with a little time and internet searching I could have gotten to this info on my own, just as I've done 3 times over with our dishwasher.  If you don't mind me stepping on the soap box for a minute, it kills me that we are such a throw away society, that one little problem occurs and instead of fixing something, we just throw it away.  Just like most DIY projects, this one proved that a little time on our end saved a bunch of cash.

Here's my set  up in the Laundry, the iPad with the movie tutorial on how to replace my parts playing.  I use RepairClinic.com, and it was as easy as they made it look.

 First you remove a few screws and flip back the control panel cover.


 Then you loosen a couple of clips to bring the whole case down.  It looks much scarier than it is.


It took me only a few seconds to locate my busted part- see it hanging down there?


All I had to do was remove a couple of screws, take the old one out, and screw the new one in.  The kiddo held up the lid for me so it didn't hit me in the head.  He was so excited to tell Daddy he fixed the washer.  I'll let him have this one.


In the end our $50 washing machine works great, and is putting that old dryer to shame. 


The moral of the story- don't be afraid of fixing your appliances my friends.  Of course, be careful, shut off the electrical or any water connections, but if you follow the instructions you'll be surprised how easy fixing an appliance can be.  Worse case scenario you can't figure it out and you'll need to hire someone, and that's exactly where you started.  Has anyone else out their tried their hand at fixing appliances?  Anyone fix their own cars?  I'm getting up the nerve to fix a broken door handle on our car now.  I figure the process can't be much different, as long as I'm not touching any major engine parts.  Wish me luck!