
Last weekend we decided to stay home, and not head up to the new cabin for nearly the first weekend since we purchased it. While we want to spend every second we can laskeside in the summer, the Hubs was working all weekend and I decided to take the time to spend at home with the boys, and catch up with some house work. At nap time on Saturday, I was left with that glorious and rare moment- nothing to do but relax. As I pondered what I would do with a full two hours to myself, I thought, "Man it would be nice if we had that double lounger up on our Master Bedroom Deck, I could read a book and get some sun."
 |
| Listing photo with previous owner's chairs. |
This deck has stood empty for the two and a half years since we bought the house. I've always had a plan to put a nice, comfortable piece of furniture up here for the Hubs and I to spend some quiet time alone together, but so far all we have is a rusted out lawn chair. Come to think of it, since this deck is a big 14' x14', it's a lot like having a whole room of your house completely empty for 2 years. What a waste. So before you can say "I'm a compulsive DIYer," I abandoned my plans for a relaxing weekend and started Operation: Build a Lounger.
I spent nap time searching my favorite Ana-White.com site, and planning out the project. Since I built an outdoor sectional with her plans in the past, I knew she would have the style I was looking for. I decided on this beautiful Wood Slat Double Lounger:

Which conveniently looks stunningly similar to this piece, which is no longer sold at West Elm.

 |
| Tell me that this doesn't look like heaven... |
The minute the kiddos went to bed at 8PM that night, I said adios to the Hubs and headed to Home Depot to purchase my materials. When I got home I immediately began cutting and about an hour later I had this:

A messy garage? Well yeah, I had that too. But let's not get side tracked. Step One was to build the frame.


Ana's Step 2 was to attach the decking.

Again, I used a scrap of 1/4" molding to use as my spacer.

I used 2 1/2" deck screws to build the frame for strength, but went with brad nails for the top decking pieces that won't really have any pressure on them other than pressing them down. This way I'll have a smooth, seamless top.

Unfortunately this is the part where I ran out of wood. Ana's plans call for four (4) 25" pieces for the back deck, but in reality you need eleven (11), which means there wasn't enough for the bottom decking. I was forced to call it a night.
 |
| Those pieces aren't going to cut it. |

The next morning the boys and I headed back to the Depot. Captain Chaos said "Hi" to Jim (yep, they know each other by name there), we grabbed a few pieces of wood and we headed back home. At nap it was back to business.
Ana's Step 6 makes it sound easy, "Build the Back."

In reality it was pretty complicated. Getting everything perfectly spaced, while keeping it perfectly square took time. I rocked two T-Squares at the same time, which helped.

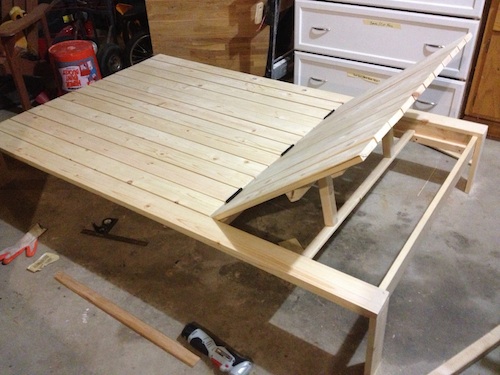
By 8PM bedtime on Sunday evening it was all over but the hinges. Ana's plans include this really smart way to make the back adjustable.

So in approximately 24 hours, working only while the kiddos were asleep, I had this.


"I also recommend finishing your boards first, unless of course, you own a sprayer. Painting those tiny gaps is going to be quite tedious otherwise."
Uh-oh.
We'll save that for another post. Let's get back to the gratuitous self-back-patting. My materials so far, wood and hinges cost just $47.99, since I had the screws and wood glue already. I don't know the price West Elm was selling their lounger for since it is no longer available, but this very similar Pottery Barn version is $899, so let's do a little twerking for an $850 savings! (I kid. I assure you there is no twerking happening here friends, I'm a mother.) What do you think? Not bad for 24 hours and a weekend of "relaxing," huh?
Holy crap! You are a DIY rock star. That thing is amazing! I am in love and wish I was handy enough to build one of my own.
ReplyDeleteThis iis great
ReplyDelete