
My West Elm style double lounger, built with the fantastic plans from Ms. Ana White is now complete!

The only thing standing in my way of maximum relaxation is a comfy cushion. Of course I did an online search first to see if I could save myself some work, but with this double chaise cushion pushin' $450 at Pottery Barn, I knew I was going to have to find a better way.
First I had to find the foam. I waited for the perfect combination of sale and coupon code for free shipping to swoop up this outdoor foam from JoAnn Fabrics. It cost $54 all in, which was by far the single biggest purchase of this whole piece of furniture.

Ana's plans call for a 24" wide standard cushion, because she's smart like that. I found that a 10' roll allowed me to get three 24" x 40" sections. Perfect.

With the perfect foam purchased, I was on the hunt for the perfect fabric. I found this at my favorite local discount fabric haunt- Mill End Fabrics. Guess which one I chose:

I needed 4 1/4 yards of fabric total, but on sale for $4.50 a yard, this Sunbrella outdoor fabric cost me just shy of $20. I win.
For those trying to create the same thing- here is my layout and cut plan:

Step 1- Sew a 22" zipper, (of which I still had a bunch left over from this project), in between 2 Short Side Zipper pieces. Once put together, lay a Short Side piece on top and trim so they are the exact width. I find this way to be much easier than trying to cut your zipper pieces perfectly the first time. Repeat 2 more time for 3 total zipper sides.

Step 2- Sew a Short Side and a Short Side Zipper piece between 2 Long Side pieces (right sides together, 1/4" seam) to create a full outside box- like this

Step 3- Pin the outside box to a Cushion Top piece and attach (again, right sides together, 1/4" seam).

Step 4- Make the straps that connect the cushions together by folding a strap piece in half and sewing together the 2 short sides (you know the drill- right sides together, 1/4" seam.) Pull to right side out. Repeat 5 more times for 6 total straps.
Step 5- Pin 3 straps onto the edge of a Cushion Bottom piece. Then pin your Cushion Top and Sides piece (which you connected together in Step 3) to the Cushion Bottom piece and sew- 1/4" seam, right sides together.

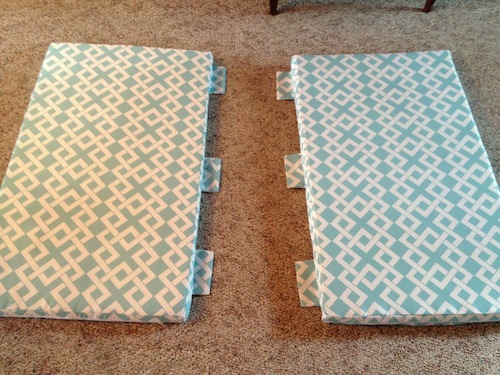
It helps to leave your zipper slightly open so that you can easily turn your cover right side out. When you do, and struggle to squeeze it onto your cushion like I struggle into a pair of skinny jeans, you have this:

See how those straps hang out of the bottom seam? We'll get back to those.
Here's the fun part. Do it again.
And again. But the third time is a little tricky. Instead of pinning in 3 loose straps, you need to pin on the straps from the other 2 cushions. This requires you take the covers back off the cushions, (or don't put them on to begin with, I just wanted to make sure I was happy with them first) and pin the 3 straps from each cushion to opposite sides of your last remaining Cushion Bottom piece. It's just takes a little care here as you're essentially sewing the two outside pieces inside of your center cushion. Once completed though, you flip your cushion right side out and all 3 are magically attached.
BA-BAM!

I owe you all a big reveal of it all together in the space, but we're already a dozen photos deep in this post, and I'm getting a little long winded, so I'll give you all a break for the day. More to come soon!
I can't believe you left us hanging like that!!!
ReplyDeleteTruth be told I haven't had a chance to photograph the space in the light yet- I promise to do it ASAP!
Delete