March 30, 2012

Drywall in the Main Bath

So we're in the middle of the worst part of a reno right now (in my humble opinion), the drywall.  We're following this step by step process, so for the past few days we've just been mud, dry, sand, repeat. It goes incredibly slowly, because you have to wait for the mud to dry, but its actually been nice to work for a little bit, and then force ourselves to step away from the bathroom and go have some fun.

To give you an idea, sometimes after step one, the mud and tape can look as bad as this:


But if you let it dry, sand it down and reapply, things start to look a little smoother.


Here's the wall where our vanity will be, with the Durock cement board on the bottom because of our tile half wall.


From a distance the doorway framing looks good.


But when you get up close after the first coat you see that this guy definitely will need 2 more coats before its smooth.


I measured out the wall exactly so when our barn door is open it will sit completely flush with the wall on the left side, and when it is closed it will cover up the opening perfectly.  My plan is that the door will mostly stay open and be decorative, until the future when we have multiple little people using the room at once and need to close it.   I'm hoping this door style is less awkward than a pocket door.  Is it just me, or does anyone else feel strange when using a bathroom with a second pocket door?  Even with the main door shut and locked, I always pause a moment on whether or not I should close this second door.  If it's closed you're really over doing it, but when it's open you feel a little exposed... Just me?  Let's pretend this never happened then.

I'm really glad we moved that header up, as the opening looks so much bigger, especially when there will be tile all the way to the ceiling in the tub. 


Ryder photo bomb.  I can't take a blog photo around here without him jumping into the picture.


We built just a little lip on the other side of the doorway, as well as on the ceiling so that the barn door had something to slide in front of, and will "seal" around all three sides. I'm also going to find a way to put in a lock here somewhere, preventing pre-tween bathroom fights.  Or maybe starting them... well see.


Hopefully we will get to leave the drywall and sanding mess behind this weekend and start playing with paint and tile.  It's a sickness- I realize.  Anyone else have fun plans this weekend?  The weather in Minnesota is supposed to be in the 70s, so I promise not to spend all my time indoors.  Any ideas?

If you're just joining us, here's a look back at the Main Bath project so far:

March 29, 2012

Skim Coating a Ceiling

So even though we have walls back up in our Main Bath, we still had a pretty major problem.  Straight up... there.  That popcorn ceiling that we scraped down really left a hot mess on the ceiling.


Taken before my exhaust fan replacement.


So the next step was to skim coat it and make it look like new again.  Here were my tools, only one of which I had the first time I did this in the Downstairs Bath, but all seemed 100% necessary this time around.


1. 12" Drywall Tray with Metal Edges
2. 12" Drywall Knife
3. 9" Putty Knife
4. 12" Drywall Multi-Tool.  (This piece was originally my Dad's, and he used it to mud the drywall in the home that I grew up in that he built, 25 years ago, so I have no idea if they still sell these.)

The other mandatory tool I haven't mentioned yet is a good step stool.  The ideal height lets you stand comfortably, with your head just brushing the ceiling.  That way you have a good horizontal view of the mud as you apply, and you don't have to crank your neck up to see what you are doing.  

So step one you fill your tray with joint compound (mud), and use your 9" putty knife to scrape the mud onto the ceiling. This is a good tool because it is flexible and allows you to get a lot of mud on the ceiling. Start in the corner and pull the mud towards you.  It doesn't have to be even or clean yet, just get a nice thin coverage.  Place your step stool about 24" in front of the space you are working on, as it's much easier to pull the knife towards you than scrape above you head.  Plus you don't have to fight gravity.  Spoiler alert- gravity always wins.  You may have more mud on the floor than on the ceiling when you are done.

Don't mind the gap between the ceiling and wall here.  We'll go back and patch that later.

In the photo above I've pulled the mud from the edge of the wall towards me.  After you've done a big enough area and the mud starts to set a little, grab your 12" drywall knife, and starting at the wall edge, pull a nice clean stroke at about a 30 degree angle to the ceiling.  This will remove most of the lines and ridges in the mud.  It won't get everything, but don't worry, you're not even close to done.  Repeat this until you've covered the entire ceiling.  For our 5' x 10' bathroom it took me about an hour and fifteen minutes.

Looking better already.


 Let your first coat set up overnight and dry completely.  The next day, you get to do the whole thing all over again.  (Whoo-to-the-hoo.)  This time start by pulling your completely dry drywall knife over your dry ceiling, which will break down any big ridges that you have.  Then start again covering the ceiling with mud, but this time I used a slightly bigger, 12" tool, since the goal now is more even coverage, and not about thickness.  I found the multi-tool of my Dad's really helpful because the handle in the center allowed me to twist the edge almost artfully to smooth things out.  I was Michelangelo on my Sistine Chapel ceiling... right over my crapper. 


The metal edge on the drywall mud tray helped scrape the tool clean for a nice clean edge.  It saved me a ton of time and worked great.  Continue with the same method, (occasionally pulling the drywall knife over the space to smooth everything out.


 If it looks like I'm just taking photos of a boring white ceiling, well... that's the point.  After the ceiling dries, on day three you can go back and use a drywall sanding block to smooth down any remaining ridges or rough edges.  I recommend eyewear and a ventilation mask, as well as a hoodie as dust will be raining down on your head and face.   I didn't mess around with ventilation either, opting for this big guy that I also used up in the attic for the exhaust fan replacement.

Luke... I am your father...

Now all that's left is some ceiling paint.  I know it feels like this renovation is crawling along, (it's not just me, is it?), but this is the worst part of the reno, that seems to take forever.  Once the ceiling and walls are done I swear the fun stuff starts.  Tile!  Vanity!  Fixtures!  It's going to be a big weekend!


Here's a look back at the project so far:


March 27, 2012

#186- Replacing an Exhaust Fan (Again)

Remember back when we were remodeling the Downstairs Bath and I had to tear out the ceiling to replace the bath exhaust fan and duct work?  Yeah, well back then I was certain that the exhaust fan in the Main Bath would be loads easier to replace since we have access to the attic above it.  In retrospect, that may have been my biggest miscalculation yet.  

One thing was for sure, this 30 year old fan had to go.  It was really loud and really weak.  When we discovered some mold on our insulation when we tore down the walls, we knew it was because this old guy just wasn't doing his part removing the moisture from the air.  And we don't mess around with mold in our house, not after the mold debacle in The Bungalow.


So the good news- in the Laundry Room just across the hall from the Main Bath we have this fancy little attic opening.


The bad news- the attic looks like this.


Yes my friends, that is 24" deep of cellulose insulation.  Fantastic for keeping our home efficient, not so great for accessing electrical two feet underneath it.

 So I strapped on a heavy duty ventilation mask, a head lamp, protective glasses, a tool belt with everything I would need, and a camera around my neck, (that's how we DIY bloggers role.)  I didn't take a photo of myself, mostly for fear that you would all immediately and permanently stop reading this blog.  It was frightening.  I was seriously wearing 50 pounds of gear, 25 of which were located on my face and neck.  Let's just say things were already going poorly.

I looked outside on the roof (thankfully before I put on all the get up), and found where the fan vents to the outside.  (Hooray!  At least this one has an outside vent unlike the Downstairs Bath which vented into the wall.)  Within a few moments I could see past my Darth Vader get up and found the vent tube along the side of the wall.


It's that gray plastic tube in the middle.

 I made my way to the wall with the tube, plunging up to my knees in cellulose and desperately trying to find the attic beams to walk on, and then followed the tube through the insulation to the fan.  I assume this is how parents feel when trying to dig through a ball crawl to find a kid's missing shoe.  Except the balls aren't dirty and toxic to breath, and the ceiling of the ball crawl doesn't drop dramatically with sharp, two inch nails sticking out to maim you if you misjudge the height or stand up to quick.  (I don't want to talk about it.)


Eventually I'm on my hands and knees, digging with my fingers to find the source.  Is that a treasure box?


 After more digging, and then prying of nails that held the lid to this baby down, I found the treasure exhaust fan.


Cue 20 minutes of pry bars and hammers trying to get this baby out.  Why is it in the 80's they used nails for everything, when screws would have been so much more accessible?  


Success!

I went ahead and adjusted the straps to my new fan, based on the length of the old ones, back down in the Laundry Room  before I reentered the attic.  Anything I could do down on the ground floor was bliss in comparison to attic work.


I didn't get a shot of installing the new one, mostly because I was d.o.n.e. at that point, put in brief I centered my new fan over the hole, attached the straps to the side walls of the treasure box, connected the new electrical wires, closed up the electrical wire box, closed my treasure box back up with nails and did my best to evenly recover the area with insulation as I exited.

And for all of that, this is what I have to show for it.


Yeah.  The shiny new fan doesn't look too exciting, so I just need to keep telling myself how great the high powered and whisper quiet fan will be for our brand new bathroom.  Not to mention provide more light for the previously dark and closed in space.  It always seems to happen to me that the worst projects leave the least impact on the space.  I mean no one is ever going to look up and take notice of this baby, but I guess that's the point, isn't it?

March 26, 2012

#62- Putting the Walls Back Up

Happy Monday guys! Let me start by saying thanks for allowing me the break on Friday.  At approximately 6:30 on Thursday night the Hub's tells me, "The dumpster is going to be picked up tomorrow.  Whatever we want in there, we need to get in there by the morning."  Then he proceeded to go to work for the evening.  Awesome.

It's not that he left me completely stranded, his plan was to just order another dumpster, as we were already pretty close to the top and we still had a whole mess of stuff in the garage to clean out and get in there.  It will come as no shock to you all though that this little cheap skate didn't think too highly of paying for another $200 dumpster (number 7 since we moved in I might mention), so after I put the little monster to bed I spent hours out in the garage sorting, cleaning, organizing, and hauling out to the dumpster.  Hub's said there was no way it would all fit, which was my personal challenge.  I'm proud to say that by midnight I was able to collapse in my bed, and slept well knowing the garage was clean, the garbage was out of it and the dumpster was perfectly level at the top.  You all didn't get a blog post, but let's be honest, something had to give.  I'm no Gweneth Paltrow.

So when we last visited the Main Bathroom she looked like this, all naked and exposed.


Let's make this lady purdy again, shall we?  We used this process to cut and hang the drywall again, which is almost becoming second nature around here. So easy in fact that I almost forgot to take photos for you guys.  Here are the couple-of-hours-in during photos.


Yes, the partial wall to the toilet and shower area went back up, (we just framed out a new one with 2x4s), and I have to admit that once we started putting drywall on it, I started getting cold feet.  The room just looked so much bigger without it... But the functionality that the door will add to this kids bathroom, as well as the focal-point-of-the-room barn door I plan to build, as well as the Hubs "you're kidding me right?" look when I suggested that we take it down again, all brought me back on course.  We did remove the larger header from the top so that the door opens all the way up to the ceiling, which gives it more openness, wouldn't you agree?  Here's the before:

I know what you're thinking- this room was so perfect.  Why would they tear it out?

Here's the look from inside the tub out towards the crime scene door.

The toilet will go back here.


Still a little more work yet to do, but look at that fabulous drywall progress, in the creepy mood lighting.


And here's the room the next day when it was finally all done.


Once again from inside the Potty Room, Water Closet, place were the toilet goes.


Notice that nasty ceiling once we scrapped off my arch nemesis the popcorn ceiling? Ugh- I guess I'm going to have to tackle that piece of garbage project again.

You may have notice that the bottom half of the wall where the sink will go looks different, and that's because we used Durock cement board there since we plan to tile a back splash from the floor up just on this wall. 


I realize now that it looks like I was taking a photo of our step stool and broom.  I'll try harder next time, promise.


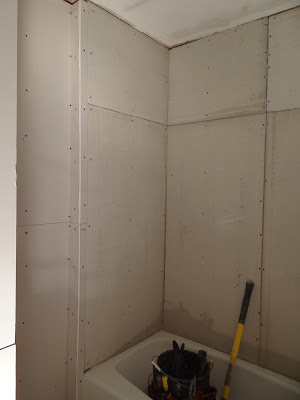
The shower also received cement board instead of drywall all the way to the ceiling for optimal tile hanging.


Alright, almost done.  I took this photo before the put up the last piece.
Now comes my least favorite project in the world- mudding and tapping.  Seriously, I'd rather fix Fat Bastard's toilet than get into that dusty mess again.  But we started this project and there's no way to go but forward from here.

What did you all do this weekend?  While there was plenty of time spent in the bathroom (insert Thai food joke here), I also found some time for working in the yard, a little brunch, fun times with the kiddo and even some cookie baking.  Seriously, if Saturday's were an Olympic sport I would have won the Gold this weekend.  Anyone else do the Weekend Warrior?

As a reminder, here's the Main Bath reno process so far:

March 22, 2012

The Floor Tile

The problem with tearing everything out of the bathroom, is that you have to put something back in.  So the Hubs and I took a little break from all the work and did a little shopping.  Our first stop was The Tile Shop, to try to find floor and shower surround tile.  For the floor, we were drawn to more neutral colored tiles, with a modern finish/texture.

These 18" x 18" tiles had a great grid like texture to them.


 This option was a little more toned down.


I really liked the natural feel of this piece with the linear lines.


I loved the extra long length of these tiles, but the gray finish was a little boring, and looked like it might look dirty on our floor.


But we weren't thrilled with anything, especially with the $6-$7 per square foot price point.  So we kept our options open, and moved on to our local Menards store, where we saw came across these beauties in the close out section.


Yep- you are reading that right, they were only $2.78!  That price is not per square foot, but per tile, which at the 12" x 24" size means that these guys were only $1.39 a square foot!  That was more than this cheap skate budget conscious DIYer could handle- I couldn't get them in my cart fast enough.  When I got up to the check out, I was told the price was wrong.  I was bummed, but sort of expected it, I mean that price was way too good to be true.  The cashier clarified that the price was actually $2.50 a tile- less!  I paid as quick as I could and raced out to the car like they were going to change their mind.


One major decision down, about a dozen more to go.  Now if only we could get to the point where we were ready to put them in.  We've got a long way to go before then though.   Dear Lord help us get through this one.