
Alright. Now we're prepped. Now we're ready. It's time to start tiling. It was actually a pretty quick and fun renovation. There wasn't a lot of space to cover, and the subway tiles were super easy to cut with my favorite tiling tool- the snap saw. Dad got started on the installing, while I did the cutting.


The next morning after a little book reading and scrambled eggs eating with the boys, it was time to grout. We went with "Dove Gray," which was a medium toned gray. I was worried about going really dark since point of this tile was to lighten things up in here, but I definitely wanted the definition of the darker grout to give the wall more depth. You've seen me grout before (Kitchen Backsplash, Downstairs Bath, Main Bath), so I don't need to go over the details with you guys. Basically you smear it in and then 10 minutes later wipe it off.

Then I want to pet it.

The other side went pretty fast too.

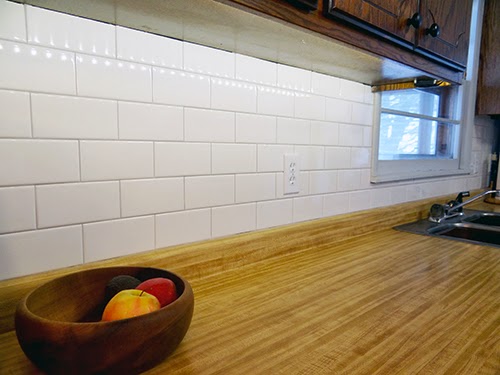
While we had the wall open on this side I wired in some under cabinet LED lights on this side. I love how they sparkle off the new tile.

The funny thing about the window on this side of the Kitchen is that we were all certain it was white, right up until the time we placed the bright white tile right next to it.

"Oh hey there, blue-gray window."

We'll have to wait until the weather warms up to paint it so we can crack it open for a day or so. This baby needed a refresher anyway after we pulled down the old window treatments.

When we put on the grout I thought "Perfect color! Fist pump!" Later after it dried I was less enamored. It's lighter than I was planning on, but in the end I think it does just what we wanted- provides dimension without making it too dark. Happy accident, I guess.

If I'm being honest I had big hopes that this tile would fix all our Kitchen problems, but now I think it just makes the cheap counter and "fancy" dark cabinets look worse. I mean, it's definitely an upgrade. But since we've finished I can't stop myself from searching the internet for cabinet door making tutorials and white stone counter top options. It's a sickness.

Before and afters do tend to help though.
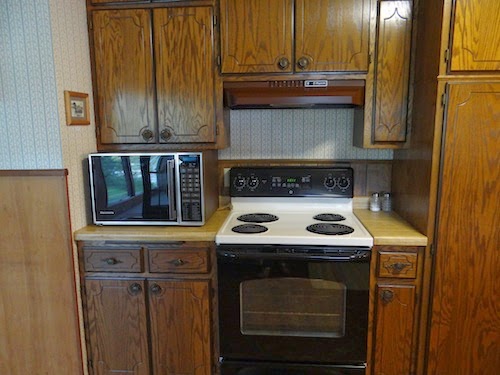 |
| Before |
 |
| After |
Hey Erin, Have you thought about using polyshades on the cabinets? Might be the perfect compromise with your parents since they don't want paint. You could get them a deep rich walnut color that would take out some of the yellow tone, while still leaving the grain (which I assume is what your parents want to see). Might make the counter look a little worse (read: more yellow) as the only yellow tone left in the room, but it would make a HUGE difference in the cabinets. Cheap, fast, big impact. Best kind of project for a cabin :) Hope this helps!
ReplyDeleteCarrie you are reading my mind! I sent this very request to my parents last week. The only thing I need to decide is if I want to make new cabinet doors first, or if we should try this step and see if we still need new cabinet doors. I don't want to waste the time refinishing these doors if we're just going to toss them, but if this step helps us decide we can live without new doors, that would be even better. Stay tuned!
DeleteHi Erin,
ReplyDeleteCurious why you took the order of operations you did. Why not do the backsplash as the last aspect of the kitchen after re-doing the cabinets and the counters? We recently re-did our kitchen, and our counters are a simple flat granite, without the built-in backsplash edging. Are you planning to replace the current wooden counter with a counter that also has that built-in backsplash?
You're right Kate- we're definitely out of order here, as I mentioned in the post. The reasoning is that we're waiting a bit to save up money for the new counter tops, and with a new door, new deck, new flooring, new fireplace, new built ins, etc... that might be a little while. We couldn't wait and live with the orange paint on the walls, so we figured we'd at least put the new back splash up. The built in back splash on the existing counter top is the exact height of one row of tile, so if all goes well we should be able to add a row of subway above our new counters and call it good. To be honest I was hoping that the new tile would improve the kitchen enough that we could live with the other stuff for awhile, but unfortunately I think it just made my desire for more kitchen renovations worse.
DeleteHey Buddy ,
ReplyDeleteThe renovation is looking really pretty cool and you share your idea. Perhaps next month I should fix my own cabinet, so why I really appreciated for your tutorials and thanks again for your LED Idea. I think paint is really a big headache then tiles. That's why you compromise with your parents and hopefully it works. Any way, I already read your another blog about "Tiles Cutting Tools".
Thanks Erin to your consideration and have a good day.