Showing posts with label Master Bathroom. Show all posts

March 10, 2014

More Master Bedroom Decisions

I can't thank you all enough for sounding off on the great window debate!


To be honest, from the beginning I've felt like windows into the Living Room would make the most sense based on how the house was built, but I was certain that I may be the only human in the world that felt that way.  Hearing all you (surprisingly) agree with me, was the push I needed to get over the hump.  That doesn't mean that I won't still place a window out on this wall to the backyard someday...


A few of you mentioned plantation shutters, which I agree would be a really good option, but I probably didn't describe well enough that the biggest problem with these 'holes' is the sound.  The Hubs goes to bed and wakes up really early, and the sound just echos through the house with all the open and high ceilings.  Which means I wake him up at night if I even open the dishwasher in the kitchen below, and the Hubs wakes me up just walking down the stairs in the morning.  

It. Has. To. Stop.

This amazing little option was brought to my attention though, and I'm totally smitten.


Gorgeous- right?  I can even see making these 3 holes one big one with these fold out windows like this.  I haven't gotten a price back yet, which will likely pop my little bubble, but for right now I'm lusting after these windows. Big time.

In the mean time, we're starting to come up with a plan for the fireplace situation. 


What fireplace situation you ask?  This one.


Bath Crashers put in this fireplace, and it has always felt really weird to us.  Not only is it free floating in the room,  but it is shorter than the wardrobes next to it.


It is also oddly positioned partially in front of the Hub's wardrobe, overlapping it by about 6 inches.  We're not sure why, and it just isn't working for us.  People are always like, "What's with the fireplace, was it always here?"  Yeah... uh no.


So the plan is to dismantle this little stack, keeping the cool fireplace box, and reinstall it into a full wall (floor to ceiling), that spans just halfway across the room, bringing a little more distinction between the two spaces.  Then we would wrap this fun, new, focal, fireplace wall with some sort of treatment.  Like tile:


Or wood:


Since you guys provided such great feedback on the last big choice- would please sound off on this one?  Do you like the tile, which could tie into the marble sink and make that space feel a little more cohesive? 


 Or do you prefer the wood which gives us more of the rustic vibe we're looking for in this house?  It's likely that the tile will cost much more, but we don't want to make a decision based on price alone in this forever house.  So if I could ask for this favor one more time, I can't wait to get your opinions and get moving on this weird room of ours. 

February 25, 2013

This Bathroom Hates Us

It's official- we're cursed.  Our Bath Crashers Master Bathroom hates us.  In the latest installment- the vanity lights that used to look like this:


Now look like this:


The bulb burnt out, which for normal, non-cursed people is an easy task.  But for the Hubs and I, not so much.


We've discovered that this fixture holds only Xenon bulbs.  After trips to 4 different hardware stores, we also learned that it takes the type of Xenon bulbs that no one seems to sell.  So I headed out to the internet, because they sell everything.  

Wrong.

Apparently a T4 Xenon bulb is like a humble actor at the Oscars- impossible to find.  After a ton of searching, I finally found a little shop that appeared to sell them, so I forked over my 20-some dollars and waited a week in the dark for it to arrive.  

Then this happened:


Halogen. 

Even though these came up under a Xenon search, they are indeed Halogen, and my fixture specifically says not to replace with Halogen bulbs.  So we go back to the drawing board.  In fact, I'm not officially sure what to do at this point.  There seem to be lots of places online that sell Xenon 50 Watt bulbs in a bayonet base in the T3 size.  Maybe I'll purchase that and see if it fits.  Any one else have lights like this at home and have a suggestion?  Of course these couldn't have just been regular lights... that would have been too easy!  

PS- For those of you thinking that we are slacking off on the Family Room remodel- you are mistaken my friends.  We've been working our overly tired butts off down there, and I'll have an update for you this week. It's insanity down there.  How do we keep getting ourselves into this?


September 4, 2012

You've Got to be Kidding Me...

When the Hubs and I found out I was knocked up at the beginning of 2012, we made a plan:  Remodel the Downstairs and Main Bathrooms, add 700 sq feet more wood flooring and finish the steps all before the third trimester.  Basically, work our booties off for 6 straight months so that at the end of it all, the house would be in order, and there would be nothing left to do but rest and decorate our little one's nursery.   You know, the fun stuff.   And then this not-so-fun thing happened.


Picture me in the Dinning Room one evening, seated at the table sewing some crib sheets for the Nursery.  Captain Chaos was fast asleep and the Hubs went upstairs to take a shower, so I was enjoying the quiet moment listening to some music and creating items for my little baby's new room.  Bliss.  

Suddenly: Drip.  Drip.  Drip.  At first I thought I was imagining things... maybe I bumped the vase and spilled some water.  But there it is again... and it's definitely coming from the ceiling.  A slow but obvious drip.  That's when I took a look up and noticed this little brown spot on the ceiling:


And the rust that appeared to be building up on our gorgeous new chandelier. 


My heart sank, and I knew that what appeared to be a little problem on the exterior, was going to be a lot larger inside.  I can't believe we didn't notice it sooner actually, but to be fair we don't spend a lot of time in the Dining Room, and certainly never when someone is in the shower upstairs.  And really- how often do you look up and inspect your ceilings?

For those of you that have been reading this blog for awhile, you know that this isn't the first time our Dining Room ceiling has been ripped open.  The Master Bathroom that Bath Crashers created for us is located directly above the Dining Room, and the first hole happened when one of the Bath Crashers contractors literally fell through the ceiling while working, and the second hole happened again about 2 weeks after they left when we found the first water leak.  From the look of the rust on the light we knew that this slow leak in the ceiling had been going on for a long time, most likely the full year since Bath Crashers left.  We immediately contacted our show's producers to tell them what was going on and show them the photos, and they replied, "You're on your own on this one.  Have a nice weekend."  Fan-friggin-tastic. 

Step #1 was to take down the light.  Bad. News.  As it started to come down rusty brown water immediately began pouring out of the top of the fixture.  The electrical wiring was discolored from the rust and literally sitting in a puddle of water.  It is a miracle that our house didn't start on fire any one of the hundreds of times we've flipped that light switch on and off this past year.  I didn't get a picture of the moment, because we were too busy panicking (or cursing if you're the Hubs.)  Here's what the top of our fixture looks like now though, imagine 1/2" of standing water in there.


Step #2- Cut open the ceiling.  The good news is that we have a great friend that is a plumber, and was willing to come over to take a look.  The bad news is the only way to find out what's wrong is to open up the ceiling. We started at the most obvious and still damp brown spot, and unfortunately had to make our way across the ceiling. 


 All the while finding damaged wood, soaking insulation, and puddles of brown water.  Awesome.


And to our surprise we found, not one, not two, but three leaks in the plumbing of our "new," fancy & expensive Bath Crashers shower.   The biggest one was coming from this drain pipe that was never sealed correctly with ABS glue.

The black shiny stuff at the joint is the glue that holds the seal.  There was no glue on large portions of the seal when we opened it up.
The next leak was coming from the trough drain that was installed.  They never used any grout or silicone to seal where the drain and the tile came together, so water got up under the tile and leaked down through the ceiling. 


The third leak is much more unfortunate, as it is coming specifically from one of the body sprays in the shower.  We're pretty sure that there is a leak at the connection point, which is in the wall of the shower, and we're still waiting to find out if we're going to have to tear out the tile in the shower to fix it.  I don't want to talk about it.


Even if the tile doesn't have to be torn out, we still have the issue of repairing that ceiling, which means patching, scraping, skim coating and sanding.  And can I say that for this pregnancy, I've had enough of that?


Especially now that I look more like this:

This happy photo was clearly taken before we had to rip holes in our ceiling.
So much for having all the tough work done and enjoying the third trimester.  Now its all systems go to get the plumbing fixed and the ceiling closed back up before baby gets here, as I definitely don't want all that Sheetrock dust around for baby to breathe in (much less the rest of the family.)  Wish us luck, Lord knows we're going to need it.

January 10, 2012

#180- Part 5: Did You Think the Doors Were Finished?

Even though I showed you the big reveal of our new wardrobe doors yesterday, there were still a few details that I needed to attend to once they were up.  The tracks were working great, and surprisingly enough my design had worked perfectly the first time, sliding smoothly.  The only problem was that without a stop at the end of the tracks, they could also slide right off.


So my first plan was to use these rubber bumpers wedged up in the track so that the wheels would find a soft, tough landing. 

 I couldn’t get an angle on screwing these into the metal tracks in any way, so I tried Gorilla Glue and clamps. And by clamps I mean clothes pins, because that’s all I had that would fit.


 I’ll save you the suspense- it was a big fat fail.  One day later my doors pushed right through the rubber bumper and derailed like Britney Spear’s career.  So the next time around I got a much more sturdy solution, cutting a piece from one of the wardrobe shelves we weren’t using.


I just had to iron on a bit of veneer for the unfinished edge, and stain it to match once it was up and secure.  

 Then I had to deal with the issue of the bottoms of the doors.  The top tracks glided smoothly, but since there was no track along the bottom, the doors could pull forward at the bottom and bump into each other. 


 My tracks came with these bottom spacers, which just happened to be a good matching color for the tile.  The only issue was trying to drill through the tile in order to secure them.  After about 20 minutes with a masonry bit, I caved and went to buy a $7 porcelain tile bit.   It still took a good 5 minutes per hole to bore through each hole in the tile, but I killed the time by jammin' to a little Beastie Boys.  Why?  Why not?


The end result is barely noticeable unless you're up close like the photo below, and trust me, the doors glide like butter. 


And that my friends is the real end of the wardrobe door saga.  Promise.

January 9, 2012

#180- Part 4: The Wardrobe Door Reveal

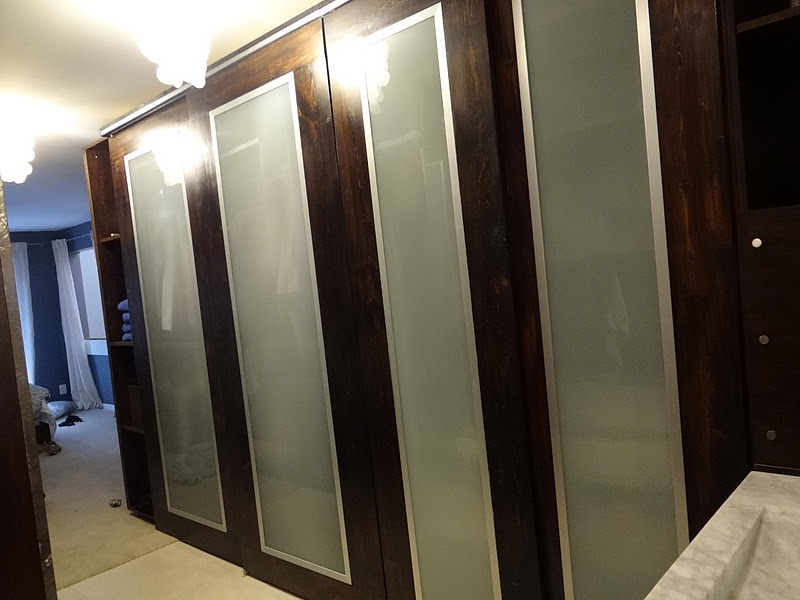
Finally- it's time for the big reveal on the wardrobe doors I built for our Master Bathroom.  Again, if you're just joining us the short story is that Bath Crashers built us amazing wardrobes without doors, so they gave me $500 to make some myself.  I built them, stained them, and hung a track for them.  

Then there was nothing left but to put the glass panels inside my frames.  If you remember, our glass panels are actually frosted glass cupboard doors from Ikea.  Which reminds me, I should probably submit this to Ikea Hackers. (Does anyone else love that site as much as I do?)  I brought the frames up to my bedroom first so that I wouldn't have to carry the full, heavy door up 8 tricky half flights.  Please ignore all the scattered items and unmade bed.  Whenever I'm working, Ryder brings his non-stop party to wherever I'm at. 


Since I had built the frames specifically around the glass panels, they were a really snug fit.   Then all I did was screw some brackets into the wood frame and the aluminum frame of the glass panel to connect them together. 


To make sure these were snug, I used wood screws on the wood side, and sheet metal screws on the aluminum side. 


Why did I buy one at size #6 and one at #8?  Because I'm dangerous like that.

 I used one bracket at the top and bottom, and three along each side.


 Then I just attached the wheels to the top of each door per the instructions on my track.


Are you ready for this?  You better be, it's been the world's longest build up. 


Unfortunately my camera wasn't quite up for the challenge to get the whole big system in one shot.  You'll have to trust me that it looks 100 times better.  Check this before and after.


I'm so proud of how they turned out, and even happier to tell you that the total damage was only $370, leaving us $130 for other projects.  Bou-jah!  Great news considering we have a big, bad bathroom remodel coming up shortly.  But for the time being I'm just going to enjoy this amazing 3 Day bathroom remodel, finally finished after 4 months.  Cheers!

January 5, 2012

#180- Part 3- Getting on Track


Alright, I’ll be honest... I didn’t spend my entire vacation relaxing.  I couldn’t help but find a little time to keep working on those ridiculous closet doors.

For those of you just joining us, check out the more detailed explanation here, but the short version is that Bath Crashers built us amazing wardrobes, but didn’t put any doors on them, so after months of back and forth they gave me $500 to make some myself.

I built them, and after 8 long days finally finished staining them.  So while I waited for the stain to dry, I had to come up with a plan to hang these big, wooden monsters.


First I had to deal with my track.  I had one closet at 75” wide, (just over 6 feet) and another at 51” wide, (just over 4 feet). And apparently I was being punished for all of my overindulgence this holiday season, because the track only came in lengths of 4 feet, 6 feet or 8 feet.  So I had to purchase a 8’ and a 6’, and then saw down to the correct lengths.  


As I blabbed about back in this capiz chandelier post, I hate cutting metal.  It’s not hard per-say, but it is hard work.  I start by slowing going back and forth until I make an even groove in the metal.


Than I go to town sawing in long, fast strokes until I’ve broken out into a Matthew-Mcconaughey-Working-Out-On-The-Beach sweat.  Is it hot in here, or is it just me?  Eventually, literally 20 minutes later, you get through to the end.


Once I had my two tracks cut to size, and what my mother would call a “glistening sweat” (Women don’t sweat, they glisten, she told me.  Perhaps she hasn’t seen me after a marathon...) It was time to figure out where these tracks would go.

The wardrobe they built us which did include mirrored doors, was clearly built with doors in mind from the start.  See how the top and bottom of the cabinet runs out past the inside dividers so that the sliding door tracks can attach to them, and the doors look inset?


Not so much on these guys:


So my plan was to stain a piece of 1 x 8, cut to the length of my doors, and hang this wood over the top of the wardrobes just enough for the width of the track.  Luckily my brain is always swimming with the “what’s next,” so I had cut this board in advance, and stained it along with my doors.


My “board” was actually 2 boards since I we are talking about an almost 11’ length, and there was no way I was getting a 12’er home from Home Depot without causing an accident.  I just connected them together by overlapping the track over them.


And here’s the obligatory “Ryder helping me with his own tools” photo


You’re welcome.  I swear for every photo you see on this blog I have another exactly the same, except Ryder is insisting of standing in front of the camera and saying "Cha-eeeeese!" in it.  The boy loves getting his photo taken.  Like father like son.


Hi might kill me for that one...


I knew these tracks were going to have to stand up to the weight of all 4 wooden door frames, the glass door inside, and years of frequent back and forth use, so I didn’t kid around when it came to attaching them.  Instead of screwing my track board to the top of the waredrobes, I used some heavy duty nuts, bolts and washers.


I practiced with the track wheels before I got started, and found that the doors would actually hang back 1/2” from the track towards the closet.  So I grabbed a 1x scrap, which is 3/4” in width, and used this as my guide to make sure that my track was spaced appropriately away from the closet to allow the doors to slide freely.


Then I drilled a hole with a 3/8” drill bit through the underside of the closet, up and through the track board.  Once it was clear I could run my bolt through (with a washer on each side) and then tighten the nut on top.


As you can see there was barely any clearance between the top of the closets and the ceiling, so I got a little carpel tunnel trying to tighten all the bolts.


And in the end- here’s how the track looks


So far so good I think.  They don’t stick out in front of the closets as much as I thought they would, so that’s a good sign.  We wouldn’t want to make this galley bathroom feel even skinnier.  Check back tomorrow and I’ll give you all the details on how I finished up the doors and put the glass inside them.