

We had purchased a digital timer for our exterior lights back in this post, and I was finally getting around to installing it. We installed one of these timers on our front light back in The Bungalow, and I loved the convenience and security of always having the lights on when you return home from work, with the money saving feature of having the light go off automatically. Our new home sports 3 exterior lights over each of the garage stalls, which looks really cool, but unfortunately we can’t see them from the front door. Coupled with a 3 way switch, we could never tell if these lights were on or off, which caused us to waste a lot of electricity. The timer also has a pretty fancy feature where you plug in your zone and time, and the lights can automatically adjust to go on at dusk and off at dawn through out the year. And you know how we love being fancy.

So the plan was to swap out for the new switch, and because I can’t help but take on accidental projects, while I was at it, I was going to replace the other two almond color switches for white ones. Seriously though, our house is full of mismatched switches, outlets and plates. It’s enough to give this Type A blogger a nervous tick.

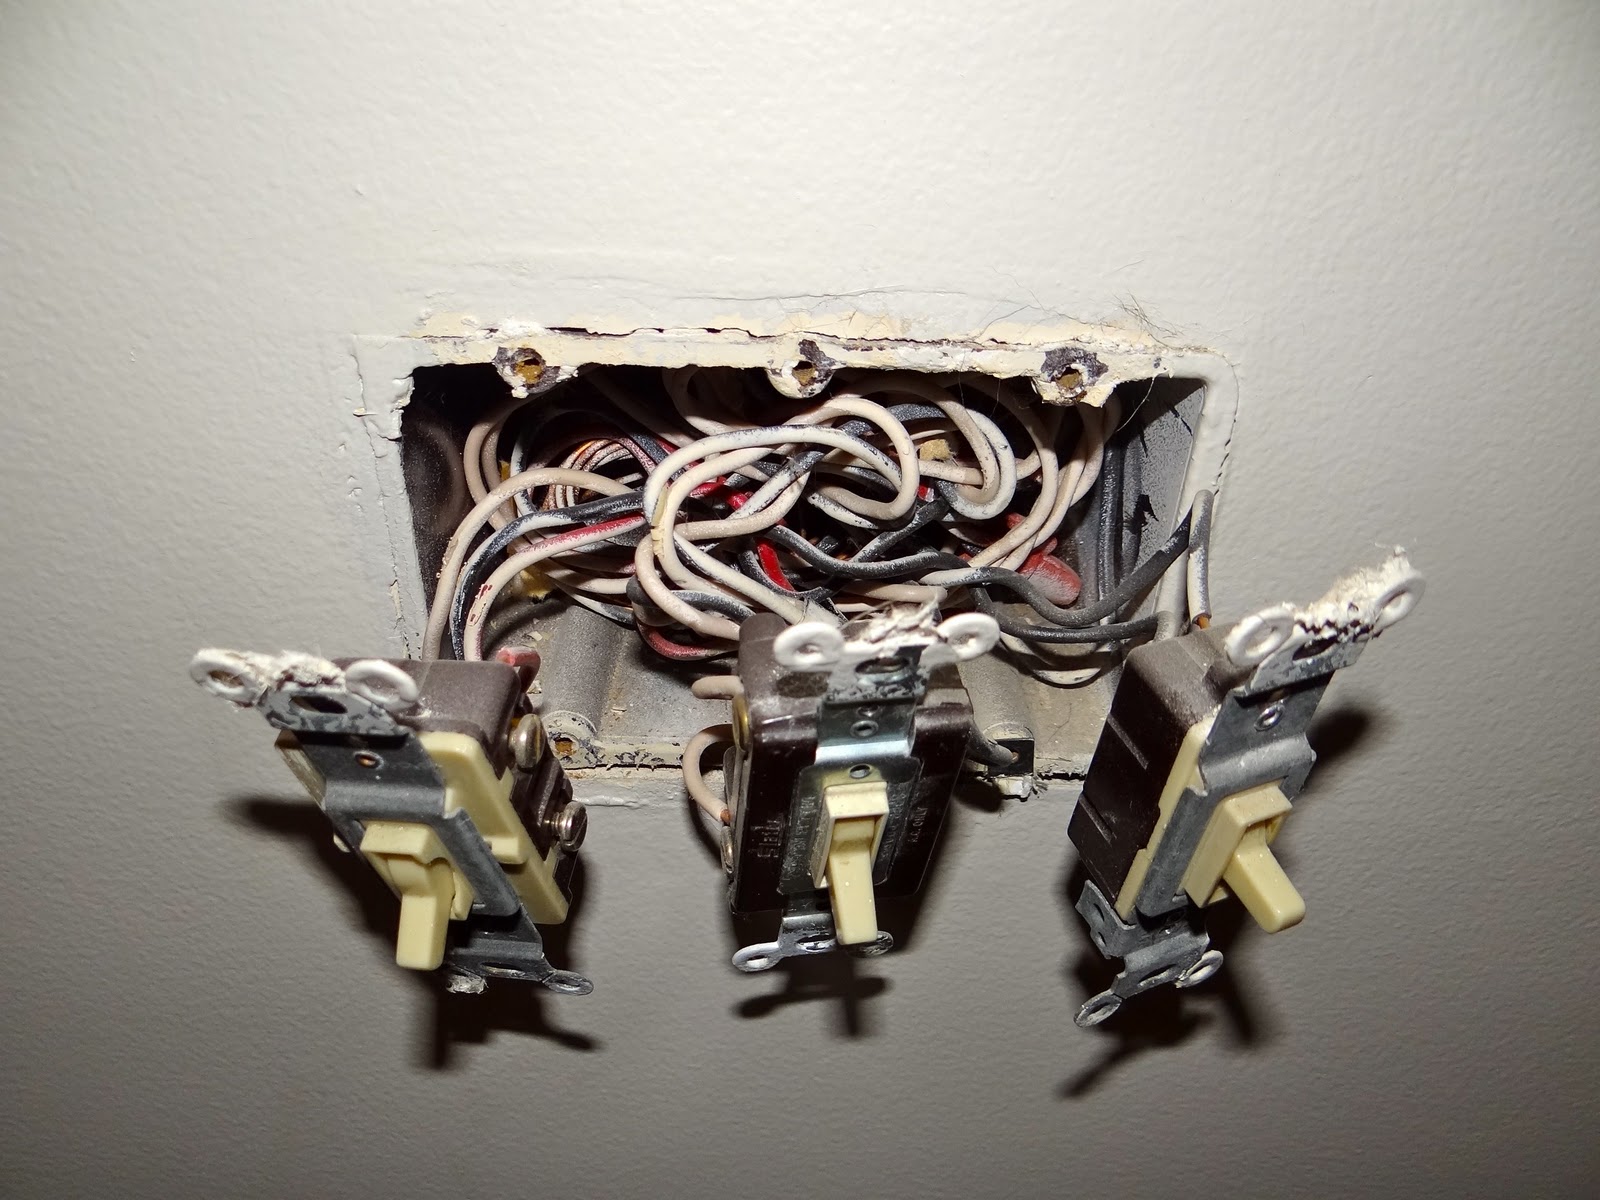
First things first, shut off the power. It took about a dozen trips up and down 3 half flights of stairs before I discovered the 2 separate circuits that needed to be turned off. Seriously, nothing can ever be easy. I was about 15 minutes in and sweaty before I had even picked up a tool. I’m turning you on now aren’t I? Sorry about that. Once the plate was off I double checked that all the circuits were out with my handy little tester. These babies cost around $10-15, and are worth every penny. Point at the wire, and if it’s hot the tester will light up and beep at you. This is how I discovered there was a second circuit lurking in here and trying to kill me. Smart huh?


The second way is much easier for install, as the wires go in easily, but to remove them you have to press a small screwdriver in to a button on the back. It’s sort of complicated to push in with the screw driver while pulling out on the wire, but not rocket science.

All I did was take the wires off the almond switches, and attached them to the new white switches in the exact same way. Simple. Until it was time to take on the timer. Back in the Bungalow our front light was just on one switch, so it was a quick, five minute swap. But like everything in this big, beautiful foreclosure of ours, nothing is ever easy. The garage lights are on a 3-way switch, which meant working with all 5 different colored wires on our timer (Black, White, Red, Green and Blue), and making changes to both the switches in our front entry and in the garage. Then the helpful diagram that came with the timer showed “the most common” 3-way switch wiring, which over course looked nothing like our set up. And to make things even more complicated, our 3-way wiring was done backwards, so what is usually the Red wire was the Black, and the Black was the Red, which took me a few (read: 30) minutes to figure out. I had every wire pulled out of the switch box just trying to figure out my mess, which is when I took a break to post my photo for you all.
Then it was time to find my sanity. That is- my books.

The one on the left is the DIY bible my dad used to build the house I grew up in 25 years ago, and the one on the right is my bible we purchased just after purchasing our first home. If you own a home and don’t have one of these books, go to the store right now, it’s worth it’s weight in gold. While my book is much newer with cleaner photos, timelines and skill levels of each task:


So it was here that I could sit down and reevaluate my situation. Electrical is really all about what we learned in third grade science, completing the circuit. Basically from a light is a line that goes down to the switch, and then back from the switch up to the light. Flip it “on”, and you leave the circuit on, it lights up. Flipping it “off” closes the circuit, and your light goes off. It gets a little more complicated, but the concept stays the same. Books like mine and the internet can provide you with a diagram of anything you want to do, and the only important part is making sure you make clean, and safe connections at the terminals so that nothing comes apart in the box and starts a fire. That’s more dramatic than it sounds, but you get the idea. It’s really not that tough. Well, usually.
In my case, after another 20 minutes or so of drawing out my mess on a piece of paper, I started to figure it out. The Hubs heard,
“So Red is Black, then Red connects to Blue, and if Black is common, then Black connects to Red, and White is actually my Red, so White connects to Red... Oh my gosh! White is Red! Jason, can you believe it? White is actually Red!” He looked at me for a moment like I had just escaped from Nick Nolte’s house and deadpanned,
“No Erin. I cannot believe it. Wow.” There was more than a bit of sarcasm there... I prefer to believe that he is just intimidated by my electrical genius, not appeasing a crazy person for his own safety.
Regardless, in the end we have this:

Instead of this:
Not to mention my exterior lights will be on and waiting for me to safely pull into my driveway this evening. That's a major win in my book. What about you guys- anyone else tackle their own electrical work? Any other "Big wins" on the home front? Anyone else's spouse think that they're certifiably insane?
What would you suggest for a switch that clearly does nothing in our house? It feels like that episode of Friends where Monica started ripping holes in the wall and then the floor and covered them with really terrible drawings and artwork. Any ideas for a switch like that? ...it also has a red light that shows when it's on.
ReplyDeleteI actually have a couple of those at our house too, and they are infuriating! The red light likely indicates that this light was somewhere not easily visible (in a closet, outside, a crawl space or downstairs) so that the previous owners would know that they left the light on, even if they couldn't see it on. So I'd start by searching for those unlikely spots. The red light is actually pretty helpful, I'd turn it on, and then take turns shutting off the circuits one at a time to see what circuit it is on. Depending on how it's labeled, that might give you a clue. If you still can't find it, well... it isn't really hurting anything. You could pull it out, but then you'd have an empty switch, which will probably look worse. I'm leaving mine for now anyway. Good luck!
ReplyDeleteNow, that’s a perfect addition to your house! Though this was way easier than other installations, you’re still dealing with electricity. So, you should still be careful in choosing the materials, especially the cables. They most often contain grounding conductors. But since you didn’t do the underground wiring, just make sure that it has the UL approval. ;)
ReplyDelete
ReplyDeleteخدماتنا متميزة عن غيرنا في مجال التسريبات سربات المياه والعوزال وحل بطرق سليمة دون التدمير فعندنا في شركة ركن البيت افضل يوجد افضل الفنين الممتزين في مجال التسربات والكشف عنها بدون اي مشاكل من خلال الطاقم التي تم تدريبه في شركة كشف تسربات المياه بالدمام فتعاملك معنا ستحصل علي خدمات متميزة
شركة كشف تسربات المياه بجدة
شركة كشف تسربات بجدة
شركة عزل خزانات بالرياض
شركة عزل اسطح بالرياض
شركة كشف تسربات بالدمام
شركة كشف تسربات بالرياض
شركة كشف تسربات المياه بالرياض
كشف تسربات المياه
Bhargavaindustry has emerged as a trusted name in the electrical manufacturing sector, especially as a reliable MCB Box Manufacturer. In today’s market, where electrical safety and durability are non-negotiable, Bhargavaindustry stands out for its consistent quality and attention to detail. Their MCB boxes are designed to meet modern electrical safety standards, making them suitable for residential, commercial, and industrial applications.
ReplyDeleteOne of the most impressive aspects of Bhargavaindustry is the strength and finish of their MCB boxes. The materials used are robust, heat-resistant, and capable of withstanding long-term usage without warping or damage. This ensures that the internal components remain protected, reducing the risk of electrical faults. Their designs are also practical, allowing easy installation and maintenance, which is a big advantage for electricians and contractors.
Bhargavaindustry clearly understands the importance of safety in electrical distribution. Their MCB boxes are engineered to provide proper insulation and secure housing for circuit breakers, helping prevent short circuits and accidental contact. This commitment to safety reflects the company’s strong manufacturing standards and industry expertise.
In addition to product quality, Bhargavaindustry is known for its professional approach to business. Timely delivery, consistent product specifications, and customer-focused service make them a dependable partner for bulk buyers and distributors. Whether for small projects or large-scale installations, their MCB boxes deliver both performance and reliability.
Overall, Bhargavaindustry proves that quality manufacturing and safety-driven design can go hand in hand. For anyone looking for a dependable MCB Box Manufacturer in India, Bhargavaindustry is certainly a brand worth considering.