September 29, 2014

Cabin Bedrooms

Now that the cabin has three bedrooms, and we no longer need to use home's original front door to enter the cabin thanks to our new main entry and new deck and steps, we can finally get to the business of making these bedrooms work and function for our family.  Up until now we've been using the new third bedroom just for sleeping, and we'd all parade in and out though it during the day.  Not ideal.

So first step of Operation Make the Bedrooms Functional, is to figure out what furniture goes where.  Here's a little list of the furniture we have available to us currently:

- 1 Queen Size Bed
- 1 Double Bed
- 3 Twin Beds
- 2 Dressers
- 3 End Tables

We initially had 2 double beds, but my parents ditched one and replaced it with 2 singles.  They had recently taken a trip to Europe where they noticed a trend of many hotels hosting 2 twins instead of 1 queen.  They like the flexibility of this option, where people can choose to sleep separately, or push the 2 together for 1 King size.  They also liked the idea of bunking these singles down the road for the kiddos.  So two singles might not be everyone's jam for a couple to share, but for our family it works.  

Here's how the furniture was laid out initially:


Bedroom #2 is just slightly the largest, thanks to the closet going out from the room and not being included within it.  This made it the ideal space for both a double bed and a single.  We can even fit a port-a-crib next to the dresser and closet, which makes it an ideal room for a family with a couple of small kids.  In short, this room works.

Bedroom #3 is our new room and the smallest.  We initially put the new queen size bed in this room which didn't leave a whole lot of room for much else.

Not that we need this room to be more than for sleeping, this is a cabin after all, but it would be nice to walk around a bit more freely.  At this point it was our only option though, since we needed to leave a walkaway to enter into the house.

That door will soon be replaced by a window, and the whole wall will then be painted the same Aged Beige color.
Bedroom #1 on the other hand, is pretty big, but we were challenged by the layout.  I was having a really tough time planning the decor of this room with the beds placed so hap-haphazardly in front of the windows.


All my favorite inspiration photos of twin beds show them right next to each other, so I did a little merry-go-round of furniture placement.


I tried them first against the far wall, but didn't like the unevenness under the window and tight fit of the dresser.

Placing them along the back wall left no where for the dresser to go, and it crowded the entry in a big way.


And while moving them to the closest wall made a spot for the dresser, you basically walked into the bed as you entered the room.  

  
So I dropped a hint to the family that I may be doing a little furniture rearrangement, and quickly before anyone else got up to the cabin one weekend, I did a little switcheroo. 

 
 Since we no longer need to use the door, I was able to place a twin bed and night stand right in front of it.

I'm really anxious to add in that window, but hang with me for now.
The other bed fits nicely against the near wall, giving the users plenty of room to navigate between the two beds and to the closet. 


Bedroom #1 got a major upgrade as well, now that the big queen bed could fit nicely against the back wall.

   
Leaving plenty of room for the dresser on the other side. 


And just in case you're curious, here's a reminder on how the layout looks in Bedroom #2


And now that we finally have a placement that's going to work for us, I can actually start to visualize what these rooms are going to look like.  We spent hours (more like days and weeks) striping the wallpaper and painting all these rooms, then put in the new carpet, and it's finally time to turn these blank pallets into something pretty.  I can't wait to get started!

September 25, 2014

Installing the Cabin Portico

After nearly an entire summer of tinkering with the portico in my garage, I was so anxious to get this bad boy up North and up on the side of our cabin.  I had pre-cut and painted all our pieces, and in my mind I had meticulously planned through every step of the install, so I figured that this step would be a breeze.  When will I finally get it that DIY always throws you some curve balls, and it's never as quick and easy as it seems? 

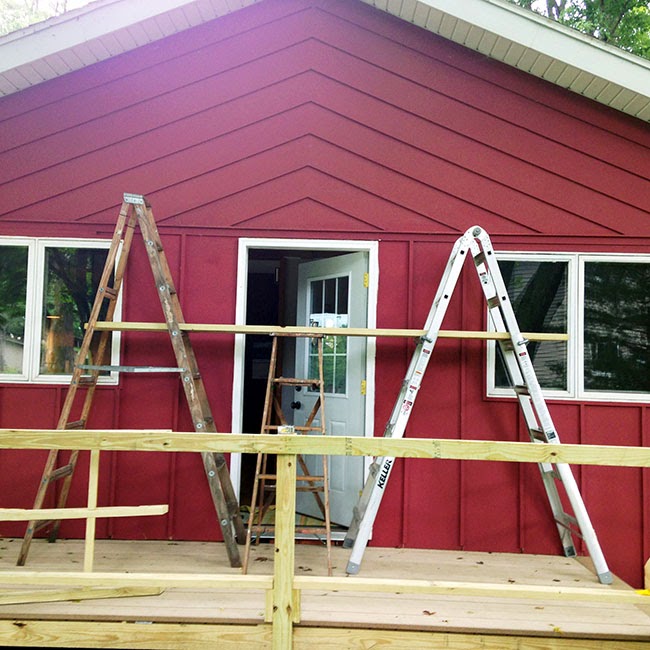
So this post is a little longer than I intended.  I started with this little collection of ladders.

And it took a nudge from my Father to organize them in this far more efficient fashion.  He's always telling me, "Work smarter, not harder."

 
The next step was to set the rafters up on the house exactly where we'd like them to go, get them level and centered, and then trace the outline on the side of the house. We used the very obvious horizontal line above our door as the base of our portico for clean lines and symmetry.

  
I needed to cut away the siding so that the rafters could attach directly to the framing of the house.  It was pretty challenging standing on our make-shift scaffolding and plunge cutting into the side of the house with the circular saw, but I was pretty impressed with my final result ifIdosaysomyself.

I was working by myself at this point while the Hubs kept an eye on the kiddos and my Dad ran into the store, so it was a pretty tedious half an hour of cutting, lifting up the heavy rafters to see if it fit, cutting a little more, lifting the rafters, etc... 

 
But eventually I had the perfect fit, so I installed flashing behind the siding, which should keep the rain and snow melt off the wood studs and onto the shingles to run off the roof. 

  
Dad was back at this point so I could step back and take a photo.

 We attached the roof directly to the studs with six big lag bolts.  That baby isn't going anywhere. I did a few pullups from it to test the strength, but I'll spare you those photos.  You're welcome.


If you recall, I notched away the rafters to fit our support brackets.

  
We had to cut away some of the house trim, and then attach these big, heavy things to the studs with lag bolts.  The bolts weren't centered or they wouldn't hit the stud behind them, but we sunk the bolts into the wood so that we could cover them up with putty later.


Next up I attached my roof boards.


And then my pre-cut trim boards.

Obviously I always wear construction appropriate shoes.

But that was about as far as we were going to get on day one.  The sky started to get dark and the rain was coming, so we attached the tar paper to the roof to protect it from the rain, and packed up the tools for the day. Sad trombone.


But it was already a big improvement.


I couldn't be completely deterred, so I went up into the attic and threaded through the electrical wire for the light.  I had planned on adding this light from the beginning, so back when we opened up this wall to install the door I installed an extra switch and sent the wire up through the wall into the attic where I had the end tapped off and ready to go. 


The next day I got to work installing the bead board ceilings, while my brother and dad got to work on the shingles.  But once again Mother Nature was out to foil our plans, and we went from sunny summer day to blowing storm in about 10 minutes.


The guys hustled to finish the shingles, racing the rain.


And literally two seconds after we got the last tool in the house and the last man off the ladder, the sky opened up.


Luckily, on the morning of day 3 the skies were clear and blue.  I got to work on puttying the holes and painting one last fresh coat of white trim paint.  Then I stepped back to marvel at my accomplishment.

Spoiler alert- we started on the railings for the deck, but I'll show you all of that detail in another post.

Now when you walk up to the cabin you see this welcoming view.


Don't you love those chunky wood brackets?


The lag bolts completely disappeared behind a couple of applications of wood putty and paint.


 I love the detail of how the edges of the brackets stick out a couple of inches. 


Here's the view back from the other side of the deck.


My light was still on special order, but I can't wait to get that in as a focal point in the center.


It was quite the adventure building and installing this roof, but I'd like to think that it looks like it's been here all along. 


 It makes our new door look intentional, and provides shelter and light as we enter.  Sure, we still need to finish up the deck, paint the door and add some more details.  But I'd prefer to enjoy a little before:


And after:

Miss A Post?  Here's our portico building adventure!


Or Pin It and save it for later:

September 23, 2014

Triming out the Portico

When I last left you, I had spent a ridiculous amount of time building rafters for the portico over our new door at the cabin.   It wasn't easy, but when it was over I had the perfect angle and width.  Now I just had to make it look pretty.


I started with the brackets.  I looked online and everywhere to purchase pre-made brackets, but couldn't find the size or price range I was looking for.  In the end I spent $24 on green treated 4x4 posts to make my own.  It went something like this:
  • I purchased two posts with a decorative end to make the brackets pretty, and cut them at 36" long so that the decorative end would stick out a bit.  
  • Then I cut a plain 4x4 at 24" and cut off a bit of the end at an angle, again, just for decoration.  
  • After I attached these two together at a 90 degree angle, I used the remainder of the plain 4x4 as the diagonal support.  To do this I cut one side at a 45 degree angle, then lined it up with my L bracket, and drew a line exactly where to cut the second 45 degree angle. I attached everything with 4" screws and glue.  
Or you can just ignore that, since this picture pretty much says it all:


Attaching the brackets to the joists was a whole other adventure.  I tried a number of different ideas and methods over the course of a week, but ultimately decided to notch out the joists.  The notches go up 1.5", and down at my 22.5 degree angle. This way the brackets can sit at a perfect 90 degree angle, parallel with the door.


Trimming out the face of the portico wasn't a walk in the park either.  I used 1x6 cedar boards we had purchased to fix some fence panels but ultimately not used. (The fence panel that the Hubs broke, by the way, when attempting to throw materials off our third floor deck into the the Bath Crashers dumpster below. But I digress...) 

My decorative posts meant that I had to trim out my cedar boards at precisely the right angle.  Luckily I did the whole "measure twice, cut once.."


I'm not going to lie, I'm pretty proud of this fit.


 The final step was to cut outdoor grade bead board to line the inside of the portico.

 
Remember that light I wanted to install?  I quick attached an electrical box to the center, and then  cut my center bead board piece around it.

 
There were 5 pieces of the inside roof total, since I had to trim out the small space on either side of the brackets.
Nothing is attached here yet, I just laid all the pieces on loosely to make sure that they fit before we headed up north.


The boys were a big "help" during the process, as we ended up spending a couple of nice summer afternoons outside in the garage together figuring this all out.  #Sawdust'nLegos.


Since he had been so patient during the building, I decided to let Ryder in on the fun part- painting. Once all the pieces were cut, we laid them all out for 2 coats of primer and 2 coats of exterior paint. Ry was a professional.


I was so busy carefully watching Ry paint, that my little ninja snuck in undetected and tried his hand at painting as well. 


I figured at this point we might as well make it a family affair, so I quick stripped him down to a diaper to avoid ruining his clothes and let him at it.  He was pretty excited.


I briefly considered staining the bead board a natural wood tone and just painting the trim white, but when I put it all together, the wide angle of my roof line made the interior roof really noticeable.  I decided with our red house with white trim, that an all white portico would look better.


So everything got a total of 4 coats, and then it was FINALLY time to bring it all up north and get it attached.


Which was supposed to be the easy part, but *spoiler alert*, in DIY nothing is ever easy.  More on that little adventure to come.


Miss A Post?  Here's our portico building adventure!

Or Pin It and save it for later: