Showing posts with label Bath Crashers. Show all posts

September 4, 2012

You've Got to be Kidding Me...

When the Hubs and I found out I was knocked up at the beginning of 2012, we made a plan:  Remodel the Downstairs and Main Bathrooms, add 700 sq feet more wood flooring and finish the steps all before the third trimester.  Basically, work our booties off for 6 straight months so that at the end of it all, the house would be in order, and there would be nothing left to do but rest and decorate our little one's nursery.   You know, the fun stuff.   And then this not-so-fun thing happened.


Picture me in the Dinning Room one evening, seated at the table sewing some crib sheets for the Nursery.  Captain Chaos was fast asleep and the Hubs went upstairs to take a shower, so I was enjoying the quiet moment listening to some music and creating items for my little baby's new room.  Bliss.  

Suddenly: Drip.  Drip.  Drip.  At first I thought I was imagining things... maybe I bumped the vase and spilled some water.  But there it is again... and it's definitely coming from the ceiling.  A slow but obvious drip.  That's when I took a look up and noticed this little brown spot on the ceiling:


And the rust that appeared to be building up on our gorgeous new chandelier. 


My heart sank, and I knew that what appeared to be a little problem on the exterior, was going to be a lot larger inside.  I can't believe we didn't notice it sooner actually, but to be fair we don't spend a lot of time in the Dining Room, and certainly never when someone is in the shower upstairs.  And really- how often do you look up and inspect your ceilings?

For those of you that have been reading this blog for awhile, you know that this isn't the first time our Dining Room ceiling has been ripped open.  The Master Bathroom that Bath Crashers created for us is located directly above the Dining Room, and the first hole happened when one of the Bath Crashers contractors literally fell through the ceiling while working, and the second hole happened again about 2 weeks after they left when we found the first water leak.  From the look of the rust on the light we knew that this slow leak in the ceiling had been going on for a long time, most likely the full year since Bath Crashers left.  We immediately contacted our show's producers to tell them what was going on and show them the photos, and they replied, "You're on your own on this one.  Have a nice weekend."  Fan-friggin-tastic. 

Step #1 was to take down the light.  Bad. News.  As it started to come down rusty brown water immediately began pouring out of the top of the fixture.  The electrical wiring was discolored from the rust and literally sitting in a puddle of water.  It is a miracle that our house didn't start on fire any one of the hundreds of times we've flipped that light switch on and off this past year.  I didn't get a picture of the moment, because we were too busy panicking (or cursing if you're the Hubs.)  Here's what the top of our fixture looks like now though, imagine 1/2" of standing water in there.


Step #2- Cut open the ceiling.  The good news is that we have a great friend that is a plumber, and was willing to come over to take a look.  The bad news is the only way to find out what's wrong is to open up the ceiling. We started at the most obvious and still damp brown spot, and unfortunately had to make our way across the ceiling. 


 All the while finding damaged wood, soaking insulation, and puddles of brown water.  Awesome.


And to our surprise we found, not one, not two, but three leaks in the plumbing of our "new," fancy & expensive Bath Crashers shower.   The biggest one was coming from this drain pipe that was never sealed correctly with ABS glue.

The black shiny stuff at the joint is the glue that holds the seal.  There was no glue on large portions of the seal when we opened it up.
The next leak was coming from the trough drain that was installed.  They never used any grout or silicone to seal where the drain and the tile came together, so water got up under the tile and leaked down through the ceiling. 


The third leak is much more unfortunate, as it is coming specifically from one of the body sprays in the shower.  We're pretty sure that there is a leak at the connection point, which is in the wall of the shower, and we're still waiting to find out if we're going to have to tear out the tile in the shower to fix it.  I don't want to talk about it.


Even if the tile doesn't have to be torn out, we still have the issue of repairing that ceiling, which means patching, scraping, skim coating and sanding.  And can I say that for this pregnancy, I've had enough of that?


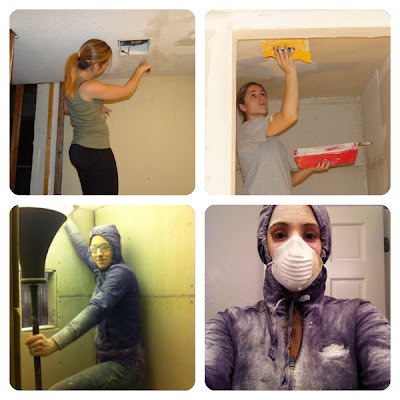
Especially now that I look more like this:

This happy photo was clearly taken before we had to rip holes in our ceiling.
So much for having all the tough work done and enjoying the third trimester.  Now its all systems go to get the plumbing fixed and the ceiling closed back up before baby gets here, as I definitely don't want all that Sheetrock dust around for baby to breathe in (much less the rest of the family.)  Wish us luck, Lord knows we're going to need it.

November 14, 2011

#181- How to Make a Capiz Chandelier


You may remember that as thrilled as we were to be chosen for Bath Crashers, one of the things we could have lived without was the lighting they installed.  Specifically, 13 feet of track lighting.


It's a personal opinion, but track lighting just isn't our bag baby.  To me it looked a little too "officey" for the upscale bathroom.  But then fate turned our way, (if you consider a 13 foot stick of track light malfunctioning, and burning a spot in the ceiling a positive turn of fate.)  We had some pretty tense moments, but when all was said and done our electrician from the show came back and installed two simple flush mount lights in it's place.


And that's pretty much how we had been living, with the bare blubs and all, until this weekend when I finally tackled our light project.  I wanted chandeliers here, but the Hubs didn't want anything "too frilly or sparkly."  Which left us to compromise on a capiz chandelier.  We knew we already love the one in the Dining Room, and I think a few repetitive elements through out this big house can tie it together.  But I certainly wasn't up for paying the big West Elm investment again on a chandy like this. 

I've been browsing Pinterest for months checking out great DIY versions like this one which make the shells out of wax paper, but in the end I decided that I wanted to swing for real shells.  I was already pretty nervous about a DIY chandy making this beautiful new space look cheap, and I didn't want to risk it with fake shells as well.  It helped that I found these shells for an incredibly low price- 100 shells, 2 hole drilled, for just $28.95!  I bought two packs, one for each light, as well as a package of fishing line for $1.99. 

I wanted the frame to look classy too, so I was pumped to find a pair of these trivets in my buffet.  They are stainless steel and about 10" in diameter with 3 rings- perfection.


The shells came in these nifty little packs.  I took my fishing line and started by stringing up lines of 3, 4 and 5 shells. 

Once I had a bunch, I started tying them to my trivet.  In each of the 3 sections I put two 5 strings on the inside, four 4 strings on the middle, and five three stings on the outside.


It wasn't until I started to put them up for the first time that I realized that the little hooked feet were really distracting.  I carefully sawed them off with a metal saw.  This step sounds easy, but cutting metal is just friction over time, and I had worked up a David Hasselhoff style sweat before I had all three removed. 


Then I just placed the trivet over my flush mount light, and used the screws that were supposed to keep the glass bulb on the fixture to hold the trivet up.

I don't think you're ready for this jelly.


It was tough to get a good shot with the lighting, but I'm thrilled with how they turned out.  They definitely "glam up" the room, while still using natural elements so it feels modern and unique.  Not too fussy.  Of course the whole space would look so much better with doors on my closets, and we're considering frosting the mirror doors on Jason's closets, but we're coming along. 

Better than this- right?


August 30, 2011

A Few More Bathroom Updates

Okay- so let's dish a little first.  Anyone watch our Bath Crashers episode last night?  We were actually pleasantly surprised- they didn't make us look like idiots.  We gave them plenty of chances to, believe me. By far my favorite part was my Hubby's last quote, "I've got everything I've ever wanted in a bathroom.  I have a fireplace.  Jets for my body, some for my butt..."  Hilarious.  Watching the show actually helped remind us how lucky we were to be able to participate.  The bathroom really is gorgeous, and with a few small remaining touches, it's going to look so impressive.

Like the return of Jason's mirrored closet doors:


This will look so much cooler when it reflects beautiful frosted glass closet doors and not my ugly open closets.  In progress...
Once these doors were up, the Hubs could finally move into his closet.  It was about then we discovered that while he has a ton of space, he didn't have any drawers. 

Picture of his closet before the doors went back up.  Lots of hanging space, no drawers.

"So share some of your drawers with him Erin," you say, "you have plenty."  Nope, no I do not.  Thanksforasking. 

They're mine!  All mine!

I would much rather make Jason new drawers than give up one of mine, and I knew just the place to start.


Remember the laundry shoot solution that Bath Crashers left us?  It was a good idea, but I personally wasn't a fan.  Especially after they came back to trim it out, and it looked like this:


It just doesn't feel very finished to me, and I have some ideas for this space, but that's a story for another day.  Let's get back to the closets- and the Hub's need for some drawers.  Since I didn't want this in the Laundry Room anymore, I tore it down to re-purpose up in the Master Bathroom.  The vertical pieces were a bit too long, so I had to use a hack saw and a lot of muscle to cut and 4 inches from the bottom.


Bath Crashers left us the frame, 1 pull out basket holder and 2 baskets, so all I had to do was pick up another basket holder from The Container Store.  Shazam!


Looks great huh?  Like it was meant to be there.  While I was at it I added a little organizational fun to my closet too, in the form of my favorite Ikea closet accessory- the pull out accessory hooks.  The perfect little home for my large necklaces and belts. 


 The pull out makes it easy to see everything, but it will tuck away nicely so that the new doors (knock on wood) can still shut completely in front of them. 

So the Master Bathroom keeps progressing, and I hope to be telling you about more updates soon.  For those of you that missed the show airing yesterday, I promise to post a link as soon as it is live on their website.  That way we can all laugh at us together. 

August 29, 2011

Bath Crashers- Master Bathroom Before & After

Since we spilled the beans on Friday that our Bath Crashers episode will be airing tonight on DIY Network, 9PM EST/8PM CST, we thought we'd take today to provide a little before and after of our own.  You know, since the "finished" product will be revealed tonight.  So here's what we started with:

Old Layout
New Layout

Old entrance to the bathroom from the bedroom.
New entrance on the day Bath Crashers left.

New entrance as of a few weeks ago.

Vanity to the left. 
View on the left now, my closets, shortly after they left.


View to the left now that the closets are full.  (A hot mess and we're still praying they bring us doors.)

Old water closet to the right


Awesome glass block window in the old water closet.
Spaced aged toilet in the water closet.
New water closet entrance.
New spaced aged toilet.

Old Vanity

New Vanity
New Vanity

Bathroom storage on the day they left.

Bathroom storage today.  (Still crossing my fingers for those closet doors.)
Old Shower

New Shower

New shower with lights off to show off that awesome hydro power LED light.
 So there it is.  Can't wait to watch the show tonight, even though I'm really nervous.  Oh my gawd, I just remembered that we found the porn... I wonder how much of that they are going to show!  I'll try to upload a link tomorrow once it's up!