March 26, 2015

There's Something I've Been Meaning to Tell You...


Yep, that happened.  In fact, we sold the house to our new owners today.

Yes- today!

Forgive me for not telling you all sooner, Lord knows I wanted to, but since a home address is really easy to find once your home is listed online, I wanted to wait until we were out of the house before I told the internet.

If you all are anything like the other people in our lives, your thoughts right now are likely one of the following:

1. Wait....what?
2. But you guys just finished your house!  What are you thinking?

The answer isn't simple, it was a long list of considerations between the Hubs and I.  But here's the best I can articulate on why we just turned over the keys to our "forever house."

1. We miss the city.  Three years ago the Hubs and I felt like it was the right time in our life to leave the city for the suburbs.  We craved quiet, big yards, a community full of kids and more square footage for the price.  Not to mention we fell in love with our dump of a house.  But three years later we've discovered that we are city people.  We miss the restaurants and cafes, we miss the busy lakes and parks swarming with people.  We miss the local hardware store that's been in business on the same corner for 80 years.  The one that taught me how to glaze my first window, or lends you their spreader for free just as long and you promise to bring it back.  I miss local book shops, and little libraries in your neighbor's yards.


Perhaps it's because we now have the cabin up north, which has become our quiet retreat.  Now we want our home in the middle of it all, and escape to our cabin when we need it. How incredibly lucky we are to have that kind of balance.

2. Speaking of balance, another big reason for the move is that my office moved downtown.  Work/Life balance is a constant struggle for me, (and the rest of the world.)   One of the major appeals of The Lodge was that it was located 4 minutes from my office, so going from "work" to "life" was a quick and less guilt-ridden transition.  With traffic, my new commute was more like 2+ hours round trip, which threw my delicate balancing act into a tailspin.  So I took inspiration from my favorite poster, "If you don't like something, change it."


3.  This wasn't our forever house.  Don't get me wrong, we love, LOVE The Lodge.  But overtime we came to realize that it wasn't the house we wanted to spend forever in.  In fact, I'm not sure that there is a house we want to spend forever in.  We're the type of people that love to take an old house and breathe new life into it, and there's no real reason to stop doing that.  Sure, I'll miss those moments when I pause at the top of the stairs in the Family Room, or at the sliding door I built in the Main Bath, and I'm full of pride with what we accomplished.


We'll miss those and lots of other beautiful things.  But I'd really like the opportunity to create more beautiful things, and we've run out of projects at The Lodge.

4. Speaking of, we finished this house, and it's time to enjoy all our hard work.  We've literally poured our blood, sweat and tears into this place, working at all hours of the day and night, and the honest truth is we've increased the value of this place dramatically.  It's not unreasonable for us to want to cash in, even if that wasn't our initial plan.  Why not take that hard work and turn it into cash for our kid's college funds?  Or to travel?  Or use it to fund our next big adventure? 

The hardest part of this decision for me was separating myself from the idea that this house was a member of our family.  This is where we had family kitchen dance parties.  Where I fed baby Bo in moonlight shining through his skylights.  But I came to realize that these memories aren't about the house, they are about the people in it, and we can have those moments anywhere.  We can have them in a neighborhood that feels more like home.  (And quite frankly, we can have them with a lot less square footage to clean.  Big houses are overrated!)

And so came our new family anthem- "Home is Wherever I'm With You."


So we're off to our next adventure.  More on that coming soon!

March 11, 2015

Bunk House Room Headboards


Let's take a break from our big fireplace reno to talk a little bedroom upgrade.  You may recall that the new third bedroom we built has a pair of twin beds, and I created this mood board from the room we're calling the "Bunk House Room."

So far I've sewn ticking stripe bedding and hung navy roman shades, but there is still a lot of work to do.


I figured that the quickest, and easiest bang for our buck would be a pair of headboards.  I was thinking something rustic out of burlap, perhaps like this:

via
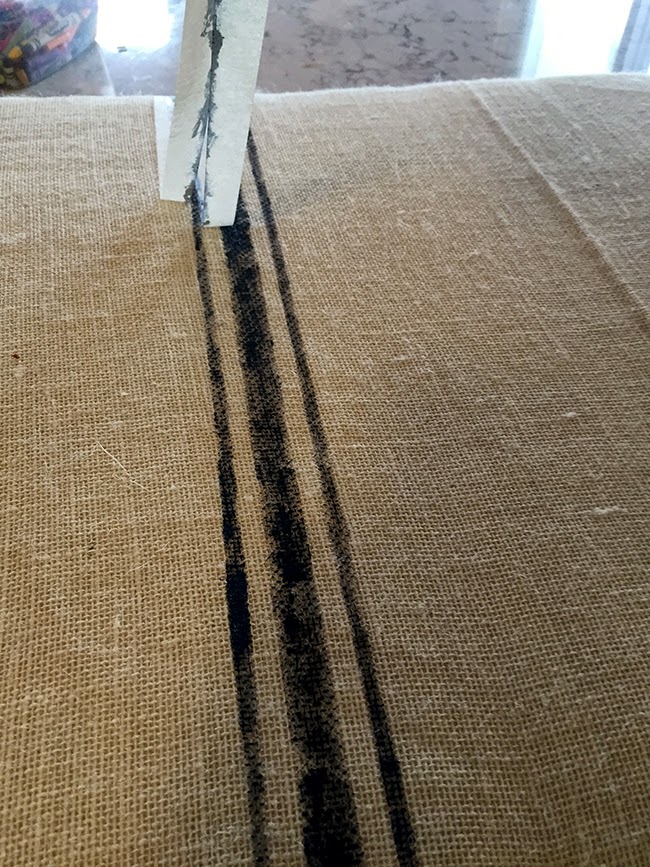
Unfortunately mine can't go quite as tall as one of my beds is directly under a window.  I started by cutting some scrap wood to size (40" x 24") and wrapping it with batting and burlap.  It was a little too plain as is, so I took a little risk with some hand painting. 

First I taped off two wide lines.


Filled it in with navy paint-


And surprisingly, even with the texture of the burlap, the lines stayed pretty sharp when I removed the tape.


It was still a little too plain though, so I taped off a skinnier stripe on either side of the thick ones.


It's a little rough, but I wanted it to have a rustic/aged look.
 

The multi-stripe approach was definitely better.


You'll have to forgive these next photos, as I'm usually not at the cabin long enough to wait for the perfect lighting in this room, but here's what they look like up on the walls.


Had I to do it over again, I'd pick a darker color burlap.  I was afraid at the store to introduce too many colors to the room so I stuck with a cream burlap, but it blends with the wall color a little too much for my liking. It does look great with that ticking stripe though.


And here's what it looks like on the other side.


Man, this wall needs some love- right?  I have plans for that night stand and lamp, but we definitely need some art for above the bed.  I played around with placement for a bit first.


Now just to find the perfect collection of art that works together and everyone likes.  (No small feat!)  I'd also like to get a little something over above the light switch, perhaps something with utility like a hook for a set of binoculars or a small basket that could hold important items like the cabin log & receipts.  I'm keeping an eye out.  In the mean time, once I figured out the sizes that I liked for the wall art, it seemed like such a shame to take everything down and leave it bare.  So I pulled out a few of the framed art pieces that we have up at the cabin and put them up on the wall.  Some of these came with the cabin and some came from our previous family cabin when it was sold.  It's not perfect, but for now it's a nice rustic collection that works.


The heart piece on the bottom is actually a tile from our previous cabin a few decades back.  It's kind of fun to bring a piece of that history all the way here to a brand new wall we built ourselves. 

So there we go- it's not the big change that I have imagined, but it's progress!

March 4, 2015

The Cabin Fireplace- Part 3

For those of you just joining us, we're working on a major wall overhaul at our Cabin Up North.


So far we've framed out the new fireplace and built the shelving units for either side.  But just because we built the two huge bookcases in a weekend, that didn't mean that the hard part was over.  In fact, it was just beginning.
 
If you haven't heard my say it before, over the years I've learned the hard way that the key to building a nice piece of furniture is sanding.  And I just don't mean sanding, but spending HOURS sanding, carefully by hand until your arm falls asleep and the wood feels as soft as a baby's bottom.  (Which is kind of a disturbing saying when you think about it. Gross English Language.) 

I used to cut corners.  I'd try using an electric palm sander.  Or taking about 20 minutes to sand the whole piece.  But it really showed in the work.  Now I always commit to a whole day of sanding before I even think about paint or stain.  I used to hate, HATE this part, because I-lack-patience-and-I'm-a-working-mom-with-two-kids-and-I-just-want-to-get-the-piece-done-already.  But over time it's become my favorite part.  I head out to the garage with some tea and tunes and I get lost in the soothing sound and repetition.  It's my quiet time and meditation and I'm literally building something meaningful with my own two hands people!  You should try it.

For this particular project I decided to use this technique from Ana White on easy paneled doors.  The plus was that I didn't need to get out my router or buy a biscuit joiner.  The down side is that I had a whole lot of pocket holes to fill. 


The most important thing with wood fill is to always fill twice.  Wood fill shrinks as it dries, so if you only fill once you won't have a complete, seamless fill.  It takes more time, but it's worth it.  I usually fill all my pocket holes and nail holes for the first time right after I finish the build, then I call it a day.  The next day I come back and sand all the holes, and them fill them again.  After it dries you can come back and really sand the entire piece.  While you can certainly see the pocket hole here, it's smooth as silk (much less disturbing of an analogy) and with a couple coats of paint it will disappear entirely.


It took me 4 days to sand and fill, sand and fill, and then super sand two bottom cupboards, two upper bookcases, and both sides of four cabinet doors and six shelves. Ugh.


After all the sanding it was finally time to vacuum.  No really- my favorite trick is using a soft bristled brush on a vacuum to get all the sawdust completely removed from your pieces.  I find this so much more effective than using tac cloth or a microfiber rag.  (Although I still do use a microfiber cloth after I'm done vacuuming as the final step.) 


So finally, five days after the initial build it was time to apply the paint.  I started with a primer so that I could be certain that the wood and wood fill would accept paint evenly.


Uh oh.  Did you catch that big problem above?  Let me give you a closer look.


On day 6 I noticed that the paneled backs that I purchased for the bookshelves to give them interest and depth didn't like the water based primer that I tried to apply.  Nothing is more frustrating than having to go back and undo your work and redo it, but I knew if I plowed ahead I wouldn't be happy with the results.  So I sanded the backs of each of the bookcases with 80 grit paper until I removed most of the paint.  Then I smoothed out the surface slightly with a 120 grit to give the primer something to hold onto.  It was another day of sanding and vacuuming and wiping and priming but 10 years from now I won't get mad every time I take a close look at these bookshelves.  I think of it as a couple hours of work now for a lifetime of sanity.

After everything was primed, I started painting using the same paint, tools and process we used for our Family Room cabinets. But because nothing is ever easy, frigid Minnesota temperatures made the curing process of the paint impossible in my only slightly heated garage.  Lucky for me my Dad offered to take the cabinet doors and shelves home to his house to paint in this heated workshop. He even took a photo for me.


So that's where we are.  Fireplace framed, cabinets built, cabinets finished and painted.  Now we just need to get everything Up North and installed.   Hold me back!

Pst- Want to follow along on the big cabin fireplace wall project from the beginning?  Or jump straight to the end?  Here you go:

Removing the Window
Part 1- Framing The Fireplace
Part 2- Building the Built-Ins
Part 3- Finishing the Built-Ins
Part 4- Installing the Built-Ins & Building Barn Wood TV Wall
Part 5- Triming Out the Built-Ins (to make them look "built in.")
Part 6- Creating a Stacked Stone Fireplace Surround 
Part 7- Building the Fireplace Mantel 
The Big Cabin Fireplace Wall Reveal