Showing posts with label Playroom. Show all posts

June 13, 2012

#188- Replace the Trim In the Playroom

So yesterday we left off the Playroom/Hallway wood floor extravaganza with all the flooring in, but definitely not finished.  After 8 hours of floor laying, the Hubs and I were dead tired, so instead of working to finish up the molding, or even taking a photo, we decided to get out of the house and go have diner somewhere as a family.  It was a much needed break, and a good thing, because we didn't realize how much work the molding would be.


Turns out the previous molding was painted after the carpet was already installed, so on most pieces the bottom 1/2" was still stained wood from where the molding was tucked behind the carpet.  The paint was thick and globby, and there was even carpet still stuck to the paint in places.  Hot. Mess.

We breifly considered buying all new molding, but that would come with it's share of challenges too.  We'd still have to paint all the molding, and we'd also have to spend hours cutting all the precise angles and joints.  Not to mention the $200-300 we'd have to spend.  Our cheap side won out, and we got to work.

Step 1: Remove all the nails from the molding.  Not as easy as it sounds, as you don't want to damage the wood on the way out.  We found that pounding the nail back through from the back side helped, along with some needle nose pliers to pull the long, skinny nails out.
 

 Step 2: Sand 'em babies.  We used 60 grit and a hand sanding block to remove as much of the thick and chunky paint as we could.  I also used a scraper along the ridge where the paint stopped and the wood was exposed, because there was often a thick line of paint there.  We didn't remove all the paint, but we got it all down to a thin and even finish that we could cover over.


Step 3: Prime.  I made sure to wipe down all my boards first with a wet rag to remove all the dust and paint debris, and then used a brush to apply a thin coat of primer to all the boards.  This coat doesn't cover up everything, but that's ok, it's only meant to give you a surface that your paint will adhere easy to.


See how the coverage isn't that great?  Don't be alarmed.
 Luckily I was out on the driveway on a nice, warm day (getting a little color while I painted might I add), so by the time I was done with priming all the pieces, they were dry and ready for paint.

Step 4: Paint the molding.  Twice.  I did two coats of thin and even decorator white trim and door paint, which I applied with a nice clean brush.  I've used foam or regular rollers for trim before and have always regretted it.  I find thin coats with a brush give you the most even finish, hands down.


All in Day 2's Trim Extravaganza took me 5 hours, although there was a little dry time in there.  Yes, it took nearly as long to paint this trim as it did to lay wood floors in our Loft.  Maddening I tell you, but in the end it looks fantastic.  I didn't have to do any measuring, just returned all the pieces to their prelableed places.  (Because we're smart like that.  Or at least we were... this time.) 

And... ta-dah!


Eventually I plan to build a table under the window where the bean bag chair is.


My favorite part is how our Flor rug now lays in the room.  I don't think I ever mentioned it to you all, but Flor rugs are NOT intended to be laid on top of carpet.  I found that out the hard way, as the corners were always popping and unhooking from each other.  I even tried to flip it over and duct tape all the seams once, but it was just an ugly mess. Case in point:


Not bad...

Yeah.  Not so much.
Now they look flat and fantastic though.

After

While I was at it with the painting and priming, I painted a couple of shelf ledges my parents had left over and gave me to hold & display some of Ryder's new "Big Boy" books.

Before

After

I didn't get rid of the homemade art that I used to have in this section, I just moved it over to the other side of the room.


Once the molding was in I just had to finish everything off with a few thresholds.  I found a matching light maple that worked perfectly for the transition into the Main Bath:


The Guest Bedroom:

And into the Kiddo's rooms:


There's that orangy laminate "wood" flooring that's in both of the kid's bedrooms.  It didn't bother me before, but of course now next to our beautiful real maple floors its driving me insane.  Oh well, one project at a time, right?  I used to get frustrated when I said that, but I'm actually thrilled with how much we've been able to check off The List in our first 14 months here.  We've been up to a bunch of other stuff too that I can't wait to show you.  This nesting thing is really kicking our house into gear! 


June 12, 2012

#187- Installing Hardwood in the Playroom & Hallway

You may recall that this Playroom used to be a bedroom before the previous owners added 2 new bedrooms to the far side of it, making this more of a "walk through" space.  We prefer to think of it as the 'Kids Wing" though, and love that all their toys and mess can be contained to one side of the house.  Behind a closed door.  Heaven.


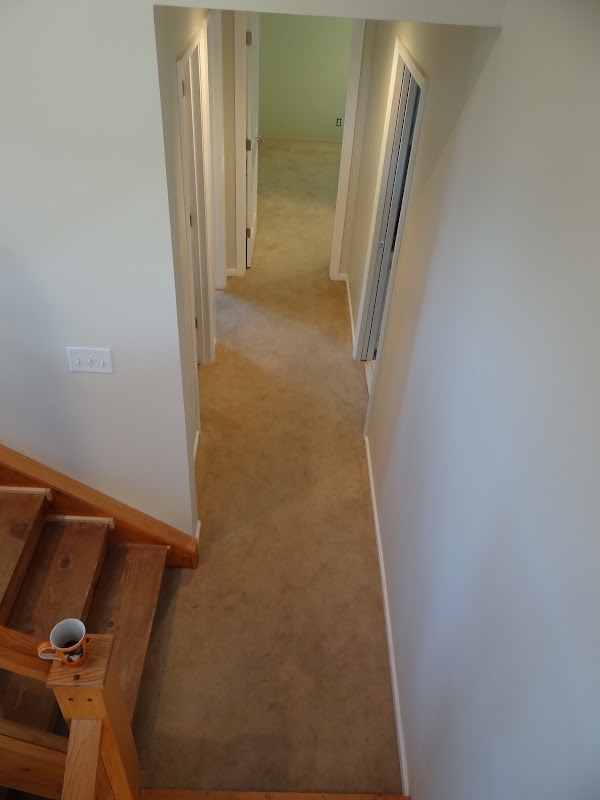
The layout of this half flight- with the current flooring.

 With the carpet in the hallway and the Playroom having seen much better days, we thought that replacing it with hardwoods would not only make this area more cohesive with the Foyer, Living Room, Dining Room, Kitchen and Loft that are all beautiful new maple hardwoods, but it would make this former bedroom feel less like a bedroom and more like the transition room that it is.

How the new flooring will look.
The two new bedrooms are already a light wood laminate.  This wood doesn't match our new hardwoods exactly, but I'm way too cheap to pull up brand new flooring at this stage, so maybe down the road we'll make the change.  We are also stopping short of hardwoods in the Guest Bedroom because at this stage the carpet in there is nice, we don't use that room a whole lot, and I'm actually a fan of carpet in the bedroom.  Again, we'll save up our pennies and make this whole wing cohesive down the road.

So here's where we got started.

With a peak at the "new" artichoke green color in the Playroom.

Coffee in the left hand corner.  Necessary.


 Step 1: Peel up the nasty carpet.


 Step 2: Remove all the carpet tack on the sides of the rooms.  I used a hammer and a chisel.

PS- Yes, that is the previous owner's pet hair caught behind the molding.  We're still finding it everywhere 14 months later.  Yuck.
Step 3: Remove the carpet pad.

Yes, we're pretty sure that those "water" spots are from pet urine.  The nasty carpet we pulled out sure gave us that impression.  I almost vomited.

Step 4: Remove all the staples.


I used a needle nose pliers and  skinny chisel.  This is the part where you curse the previous installers for using so many damn staples.

Step 4: Install the floor pad.  We used QuietWalk sold at Lumber Liquidators, because it worked great in our first 1000 sq ft of wood floors, and it's eco freindly because its made of 97% recycled materials.  You just cut it to size and duct tape the seams together.


Step 5: Lay your first row of flooring 3/8" from the wall, and start on the farthest wall to the right. 


Step 6: Click & Lock Baby.  Since we used the click-lock flooring (ours is composite hardwood, which we learned through our research handles best in the humid Minnesota weather,) it was a breeze to click each board into the row before it.  I measured and marked the cuts on the edge, and the Hubs ran down to the saw in the garage to cut the lengths.


 Step 7: Install molding and thresholds.  While we had been rocking right along up until this point, unfortunately our molding brought us to a stand still.


Rough shape. It took us about 8 total hours to get all the floors laid, (thanks to a big 4 hour nap from our little man which allowed both of us to be working on the project full time.)  By the time the last board was laid we couldn't even think about this mess of molding though, so let's chat all about this tomorrow.  Plus I'll share some big reveal pics.  I promise.

June 11, 2012

Painting the Playroom 2.0


Not long after the Hubs and I took 5 hours to bring the Loft from this:

To this:

I wasn't shocked at all when then next day I went to work and came home to find our Playroom looking like this:


 Which is why earlier this week I showed you a photo of our newly cleaned Nursery looking like this:


It's all for a good cause though, because it mean the gross carpet in this room is going hardwood.

I don't know what those stains are, and I don't want to know.

So the Hubs emptied this room, went to work, and promised to get started on the new floors the next day.  Which left me approximately 1 evening to tackle a project that's been gnawing at me for months.  Painting the Playroom.

Spoiler alert: I accidentally painted the room the same color.  Well, that's not entirely true.  My concern from the beginning was that the minty tone to the walls didn't work with the orange, navy and grass green accents I was trying to bring in.  Here's the wall color next to one of my Flor tiles.


While I wanted to take this a little more grass green, I chickened out at the hardware store.  I didn't have time to do my usual "pick up a dozen paint swatches and live with them for at least 24 hours to see the paint in different light." So I spent about 20 minutes in the store (under their different light boxes, outside to see the swatches in natural light, back inside to the light boxes...) and in the end I chose Artichoke by Martha Stewart, which felt like a lighter green that wouldn't be too dark in a playroom, but had much more yellowish-green undertones than the minty-green I was currently working with.  As you can see in the pic above though, it unfortunately wasn't a dramatic change from the current color. 

I've tried to take photos in nearly every different light, but I'm having a hard time photographing the color exactly.  In the end its much more bright, much more yellow, much less pastel.  But really, if I'm being honest, you can barely tell. I like it better though, and that's what really matters in the end right?  You'll have to wait  to see a photo though, because the paint was barely dry before the floors started to go in, and that's a post for tomorrow!  

We've been really busy around here (a ticking clock in the shape of a baby will do that to you.)  What about you guys?  Any major projects over the weekend?  Did you prefer to stay outside and enjoy the summer sun?  Luckily we found plenty of time for relaxing, and gardening too!


January 19, 2012

Disaster Closet #2

You may remember that one of my New Year’s Resolutions was to start cleaning up some of our ridiculous closets.  We're going to officially call this post is closet clean up #2, as I technically already “accidentally” finished the first closet disaster, our mudroom, back here.

My second big project is up in our Playroom.  While the rest of the room is slowly coming together...


Inside that closet, not so much...


Stop judging.
 Obligatory Ryder jumps in front of the camera to say "Cha-eeeeeeeze" photo:


As you can see, the closet is still the dark green color that this room started out with.


I ran out of the Stone by Benjamin Moore when I painted the room, so it was always in the cards to get back to finishing the closet up.  E.vent.ually.

As you can see from the listing photo, the previous owners used this closet as a Cloffice, which I think will be a great idea down the road when this is more of a Den style room for teenagers.


But right now I need storage, and lots of it.  I started by moving the wooden shelf supports on either side of the closet to the same height so that they could actually be used again to support a shelf.


Moving the shelf support up here left the old white paint behind.

I moved the support down here so that they were level.
After that I had a gazillion holes to patch up.  Fun fact- somebody painted over wall paper in here.  Big no-no.  But looks like I’m going to patch it up and do the same thing.  I like to live on the edge. 


I left the top set of shelf brackets up in case down the road I want to add a second shelf.  Right now I think one will do the trick for the taller bins and toys I want this to hold.


Next I had to find a super long shelf that I could use to span this 7’6” wide closet, and it had to be thick enough to support the weight of the stuff I was going to put on it.  It didn’t take me too long at the Home Depot to realize that this project was going to be way, WAY over my $0 budget.  And then I discovered this big guy in our “Waiting for a Dumpster” pile in the garage.


Yep, you probably don’t recognize it, since we’re looking at her much lovelier angle, but that’s Big Blue, the obnoxious countertop we removed from the Laundry Room.  

It got me thinking that the counter and cupboards in the Laundry Room are basically back to back with the Playroom Closet.


And sure enough, my trusty little tape measure confirmed it- Big Blue was the perfect length and width to span my closet.  Thank God I had saved this piece of junk from my trash throwing Hubby.

I’m smart enough to know that painting a laminate countertop, won’t really stand the test of time as I slide junk on and off this shelf, so I pried off the extra pieces of wood on the bottom of the countertop, sanded it smooth and placed the shelf in the closet upside down.


Then I broke out the trust Klitz primer, and covered the closet.  Everything.  The walls, the shelf, the trim.  Nothing escaped my white washing extravaganza.  


And then, well... I had to wait for the paint to dry, so you will too. Anyone else taking on any closet cleaning or organization in the New Year?  I’ve been Pinning organization ideas like crazy, so please share yours if you got ‘em!