August 31, 2011

My New Obsession- Organization

With the recent organizational updates to the Master Bathroom, I have gained a little more momentum in the "This is a Bathroom a TV Show created for us and isn't quite done yet" battle to "This is my Master Bathroom."  The next place I wanted to tackle was the cupboard right next to our sink where we plan to store all our toiletries. 


It's come a long way so far.  Remember when it used to look like this?


And then like this;


Now that all the doors are on and fit right, it was time to make the insides more useful.  This big empty cupboard wasn't doing much for us.


So I started by measuring a few of the items we would put in this cupboard, (i.e. a basket full of various toiletries, our big bottle of mouthwash, toothbrushes, etc...)  Then I measured for a shelf that would allow the bigger items to fit underneath it.  Unfortunately this time around I didn't have the sweet adjustable shelf template from Rockwell that I borrowed from Builder Chuck for my Family Room built-ins project, and I can't seem to find it in stores anywhere!  So once I head an appropriate height, I measured for just four holes and used a 3/8" drill bit to drill just a shallow hole to allow my shelf spoons to sit in. 


Miracle of all miracles, I actually made them even and level, so my shelf sat perfectly flat.


What's that silver bracket mounted to the side wall of the top shelf you say?  Well Bath Crashers  left behind a bunch of random bathroom hardware, and we thought this little toothbrush holder would be the perfect spot to store our brushes.  And by 'perfect' I mean better than laying in the bottom of the drawers like we've done up until now.


So not a ton happening there, but it's the little things that start to make a space feel like your home.  I still have a bunch of storage space left here too, which is nice to know we have a little more room so grow. 

How about you guys?  Any major organizational updates in your home lately?  Minor ones?  We still have a couple of chaos spaces that to be addressed like some kitchen cupboards we just dumped stuff in after the move, or the storage closet that's a little crazy.  It's only been four months though, so don't give up on me just yet.

August 30, 2011

A Few More Bathroom Updates

Okay- so let's dish a little first.  Anyone watch our Bath Crashers episode last night?  We were actually pleasantly surprised- they didn't make us look like idiots.  We gave them plenty of chances to, believe me. By far my favorite part was my Hubby's last quote, "I've got everything I've ever wanted in a bathroom.  I have a fireplace.  Jets for my body, some for my butt..."  Hilarious.  Watching the show actually helped remind us how lucky we were to be able to participate.  The bathroom really is gorgeous, and with a few small remaining touches, it's going to look so impressive.

Like the return of Jason's mirrored closet doors:


This will look so much cooler when it reflects beautiful frosted glass closet doors and not my ugly open closets.  In progress...
Once these doors were up, the Hubs could finally move into his closet.  It was about then we discovered that while he has a ton of space, he didn't have any drawers. 

Picture of his closet before the doors went back up.  Lots of hanging space, no drawers.

"So share some of your drawers with him Erin," you say, "you have plenty."  Nope, no I do not.  Thanksforasking. 

They're mine!  All mine!

I would much rather make Jason new drawers than give up one of mine, and I knew just the place to start.


Remember the laundry shoot solution that Bath Crashers left us?  It was a good idea, but I personally wasn't a fan.  Especially after they came back to trim it out, and it looked like this:


It just doesn't feel very finished to me, and I have some ideas for this space, but that's a story for another day.  Let's get back to the closets- and the Hub's need for some drawers.  Since I didn't want this in the Laundry Room anymore, I tore it down to re-purpose up in the Master Bathroom.  The vertical pieces were a bit too long, so I had to use a hack saw and a lot of muscle to cut and 4 inches from the bottom.


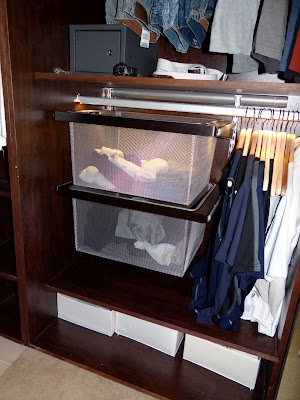
Bath Crashers left us the frame, 1 pull out basket holder and 2 baskets, so all I had to do was pick up another basket holder from The Container Store.  Shazam!


Looks great huh?  Like it was meant to be there.  While I was at it I added a little organizational fun to my closet too, in the form of my favorite Ikea closet accessory- the pull out accessory hooks.  The perfect little home for my large necklaces and belts. 


 The pull out makes it easy to see everything, but it will tuck away nicely so that the new doors (knock on wood) can still shut completely in front of them. 

So the Master Bathroom keeps progressing, and I hope to be telling you about more updates soon.  For those of you that missed the show airing yesterday, I promise to post a link as soon as it is live on their website.  That way we can all laugh at us together. 

August 29, 2011

Bath Crashers- Master Bathroom Before & After

Since we spilled the beans on Friday that our Bath Crashers episode will be airing tonight on DIY Network, 9PM EST/8PM CST, we thought we'd take today to provide a little before and after of our own.  You know, since the "finished" product will be revealed tonight.  So here's what we started with:

Old Layout
New Layout

Old entrance to the bathroom from the bedroom.
New entrance on the day Bath Crashers left.

New entrance as of a few weeks ago.

Vanity to the left. 
View on the left now, my closets, shortly after they left.


View to the left now that the closets are full.  (A hot mess and we're still praying they bring us doors.)

Old water closet to the right


Awesome glass block window in the old water closet.
Spaced aged toilet in the water closet.
New water closet entrance.
New spaced aged toilet.

Old Vanity

New Vanity
New Vanity

Bathroom storage on the day they left.

Bathroom storage today.  (Still crossing my fingers for those closet doors.)
Old Shower

New Shower

New shower with lights off to show off that awesome hydro power LED light.
 So there it is.  Can't wait to watch the show tonight, even though I'm really nervous.  Oh my gawd, I just remembered that we found the porn... I wonder how much of that they are going to show!  I'll try to upload a link tomorrow once it's up!

August 25, 2011

Our Episode is Going to Air!

Bath Crashers told us when they left in July that we could expect to see our episode air sometime in late August or early September so we've been watching our listings the past few weeks.  Our first hint was this:


If you can't read the tiny image, is says "Wardrobe Showstopper: A master bathroom gets a complete makeover, as the room is gutted and redesigned.  Included: a wardrobe, a freestanding fireplace." 
Sounds like us, huh?  But we weren't certain until we went to the DIY Network website and saw this:


The Swartzes' master bathroom makes zero sense. The shower, sink and toilet areas are tiny, cramped rooms, and the closet is huge and useless. Matt completely guts the room and pulls out the ill-advised carpet. He then flips the layout, and a series of sleek wardrobes now line the entrance to the contemporary space. Plus, a freestanding fireplace will separate the bathroom from the bedroom, providing both warmth and privacy.

Now that's definitely us.  That, and proof that I have been right for the last 6 years since becoming a Swartz that the possessive of our last name ends in zes', not z's.  Did you see that just happen Hubby?  Oh you did?  I thought so. 

So everyone tune into the DIY network on Monday at 8PM CST (or again at 11PM CST for the encore) to laugh at us!  To be honest, we're both really nervous to see how the show turned out.  At times it was really awkward to film because you knew that they wanted you to respond or act in a certain way, even if that isn't the way you would usually act.  It was this weird choice between acting (which we're terrible at) to give them what they were looking for, or just being ourselves, but then having the conversation on camera die out uncomfortably.  Maybe you'll see what I mean on Monday.  And who knows how they'll edit it, that's the magic of reality TV.  Regardless we think it's funny that our episode will air even before the room is actually completed, but I guess that's the magic of reality TV too.  Besides, we're finally starting to make some progress, which I'll update you on soon.


August 24, 2011

#175- Low Rider

As I mentioned last week, after I refinished our bed frame and moved it up to the Master Bedroom, it was immediately clear that another project was lurking.  So this weekend I took a little time to scratch #175 of The List- lowering our bed frame so that the box spring doesn't stick out. 


Here's the part where I come clean.  I took the easy way out when re-staining the bed frame, and really only stained the part that you see.  So even though it looks great above, here's what it looks like when I take the bed off. 


Yep, nothin' but class here at One Project at a Time.  I'm busy ok?  I don't have time to make the part that will never be visible look good.  My plan was working great until I showed you all.  Dangnabit.  (Sometimes I like to curse like an 80 year old man, you know, just to keep it fresh.)  Anyway, I started by removing the 1 x 2's that run the length of the bed on either side that prop up the box spring.


I'm sort of embarrassed to keep showing you these pics of my half a$$ craftsmanship, but I like to keep it real with you all, so try to keep the judging to a minimum.  The screws came out like a cinch, but the wood glue made removing these guys a little tricky.  Nothing that a chisel couldn't handle though.  Next I took the 1x2's out into the garage to cut off a few inches on each end, since when I reattach these pieces to the lowest possible spot on the frame, the chunky bed legs are in the way and makes the available space smaller.  I swear I also took a photo of cutting these in the garage that would help you visualize it better, but I'm downright ashamed of the mess in my garage right now, and I'm already walking a fine line between DIYer and horder with you all...

So let's skip ahead to the part where I brough my pieces back upstairs and reattached them to the lowest possible spot on the bed frame, flush with the bottom so that it couldn't been seen from underneath.

I rotated the 1x2 so that the same side that touched the frame before (with all the dried glue on it) didn't touch it again to make sure I had a new, firm adhesion.)  Haha, that sounded naughty. 
Then I unscrewed the 2x4 that ran down the center of the bed, rotated it so that it was now laying horizontally, and reattached it to the frame also at the lowest possible level on the frame.


If you're still with me at this point in the post, you should work for the military in decoding.  So let's get to the grand finale.  After I let the glue dry for a little bit, I put the bed back together and- viola!


No more box spring.  It still shows a little bit when the covers are pulled back, so I'll likely get a dark blue fitted sheet to cover the boxspring thanks to Betsey's advice, like this link she posted in the comments- http://pinterest.com/pin/35894193/.  Or maybe something with a pop of a complimentary color, like a deep purple or rusty orange.  We'll see where this all goes when we finally start to fill the room with some furniture, art and personal touches. 

August 23, 2011

Making a Home

It's been just about 4 months since we moved into The Lodge, and while the pace of projects is slowing bit from the insane asylum of our first few months, we're still tackling a project or two with every spare second. While its been really gratifying to watch it all come together, it's also really frustrating that this place still feels like a work in progress, and not a home.  One of my favorite bloggers, Katie from BowerPower.com, hit the nail on the head for me with this post late last week.  Sometimes you are so connected to your last home, the one you literally spent your blood, sweat and tears on, that it's really hard to see the new place as home.  I find myself missing the comfort and warmth of The Bungalow all the time, and in comparison this new house just feels big, cold and empty.

So this week, I've decided to follow Katie's lead and start making this house feel more like our home.  The best way that I know how to do that is fill it with pictures and memories of us, things that make us smile or motivate us.  Things that are unique to my family.  I started by taking inventory:


This, my friends, is the current state of our 5th bedroom or as we refer to it, the Exercise Room.  Although right now it's more like the island of misfit home decor than a home gym.  It's where all our "not sure where to put that" decor has landed, and the perfect place to start operation Make This Joint a Home.  I dug out all our frames and miscellaneous wall decor, and wrote out a list of every frame we had in each size.  Next I spent a little time playing around on my computer with design programs plugging the various frames in different configurations where the house needed a little love.  It looked a little something like this:


I even wrote in some of the ideas I had to fill each frame (since most of the stuff that's currently in each frame needs to be switched out.


P.S. I do realize the irony in the fact that I'm taking an incredibly clinical and obsessive approach to making this house feel more "homey," but all we can do is work with what we have people.  

Once I had a pretty good idea of what would go where, I realized that there were a few frames that would need to be updated to fit in with their new digs.  Out came the spray paint.


And yes, while I was at it I sprayed yet another flower pot indigo blue, since I had to snag the one from the Living Room Deck to place on the new coffee table in the Screened in Porch.  No such thing as too much of a good thing baby.


I hope to spend some spare time in the next few days reprinting photos and making some new art to fill all my frames, and get all this love up on the walls.  Sure, I've got a bunch of other bigger projects to tackle on the horizon (the Laundry Room, a head board and nightstands for our new Master Bedroom, and getting a coat of paint up in the Playroom already to name a few) but I've made it a priority to get a little piece of us up on the walls and filling up our home.  Because all this hard work won't be worth it if at the end of the day we feel like we're living in someone else's house.