October 20, 2011

How to Caulk Kitchen Backsplash & Counter Tops

Anyone else have one of those projects that you know you should do, in fact you need to do to prevent any damage to the house, and yet... it just sits out there on the list?  Here's my dirty little secret: after we put in the new glass back splash in the kitchen, we never sealed the space where the backsplash and new granite counter tops met with caulk. (Cue my husband's inappropriate jokes about how my dirty little secret is caulk.  Or lack there of.  Sorry folks, this one isn't for the kids.)


It's not that we didn't know that we had to do it.  Oh, we knew.  In fact, the day we put up the tile I had a tube of clear, silicone caulk all ready to go.  We just needed to wait 24 hours for the mortar to dry, and then 24 hours for the grout to dry, and then, well... we just never got to it.  The caulk moved to the top of the fridge, and then into a cabinet, and even back out to the garage.  We kept saying, "we really need to caulk" (my husband is dying right now) but we just never did.  Months went by.  I'm not proud of it.  But at least you can't call me lazy.  Maybe I just have my priorities mixed up.

So finally, this past weekend, it was time to get the caulk and to to work.  (That's what she said.)  I've had a number of run ins with caulking through past kitchen and bathroom remodels, and I've discovered that it's never as easy to get a clean, crisp line as it looks.  Especially when using silicone caulk.  So I've found a little trick that works for me.  It may be way over doing it.  But I prefer to not have to redo it.


Yep, I tape a line on the counter and on the wall/tile, with just enough space for where I want my caulk to go.  (try... to be... mature....)  Then I can just run a bead of caulk, use the caulk tool to smooth it to a 45 degree angle, and cleanly pull off the tape for a crisp edge on both sides.


And here, just 3 months late, is the finished product:

What's that?  Can't see the caulk?  (hold it in hold it in hold it in)  Well, that's the point.  But at least now no water can get back behind there and ruin our cabinets and walls.  Finally.

By the way- any one else want to weight in on the Playroom Wall Color post?  I am actually pretty shocked, (and incredibly humbled-thank you) by how many of you are reading about our crazy life every day, but only a fraction of a percentage of you weighed in.  Thanks so much to those that did, but you've sort of left us a a tie right now, so we could use a few more opinions if you all would be so kind.  Thanks!

October 19, 2011

I'm Having Second Thoughts

I'd say we get paint color right the first time, only about 50% of the time.  I mean there's some colors that we love instantly- like the Guest Bedroom, our Master Bedroom and the Laundry Room.  (Heck, I've painted it that color 4 times already!)  But then there are other rooms like the Family Room, and now the Playroom that just don't scream in that Matthew McConaughey rom-com sort of way- "You're the one!"


I mean, I don't hate it.  But I'd be lying it I said that from the moment it started to dry that I wasn't disappointed that it was coming out much more minty green than grass green.  Didn't we already cover up that color in the Guest Bedroom?


The Hubs keeps telling me, "it's fine," but I'm sure it's just because he hates when I do double work, and when rooms get torn apart to paint.  So I went to the computer first before I did anything drastic to mock it up.

What if all the color from the rug and curtains are too much?  We could bring it down a touch with white/gray walls.


Or we could kick it all up a notch with some rusty orange:


Or cool it down with a moody blue/gray:


Or just bring it to the original color I intended, grass green:


 In case you're wondering, here's minty green again:


In all of these scenarios (besides orange), I think I'm going to take Alana's suggestion from the comments and paint the wall behind the shelf orange for a fun pop of color, and maybe white for the orange version. (Thanks girl.)  So what do you think?  Fine like it is, or time to paint again?  It you could be so kind as to moderate a little marital dispute and give a vote for your choice by commenting below, we would really appreciate it.  That way when the Hubs says that it's just "fine," I can respond, "No it's not, the readers said so."  (Strength in numbers.)  Or you can help him maintain his sanity and tell me to worry about the other dozens of items on The List, and to leave this paint job alone.

It's up to you.

No pressure.

October 18, 2011

#178- 1-2-3 Contact

The other day when I was taking photos for our updated house tour, I realized that this rarely photographed area of our kitchen was in need of some work.


The storage is phenomenal, and I like that the glass cupboards break up all the wood a bit, but it still feels pretty boring.  "Make Glass Cabinets More Interesting" suddenly became #177 on The List.  Can I please stop adding items to The List and finish the ones I have?  Luckily,  I remembered back to a roll of contact paper I bought back when we lived in The Bungalow and somehow made the trip to the new house with us in the "crafts 'n stuff" box.


The color was right, the pattern was interesting, and the most important part- it was free.  So I measured the backs of my cabinets and cut my pieces to size.  The kind folks over at ConTact made things super easy for me by marking a grid and measurements right on the back.  (ConTact in no way paid for my mentions, I'm just a huge fan of dummy-proof design.)


Then I used the squeegee left over from Ry's gear wall art to smooth the contact paper onto the backs of the cabinets.

Leaving me with this:


And once I replaced the shelves and dishes, viola-


Pretty nice little free update, huh?  Unfortunately, with the big windows directly across from this wall, the glare on the glass makes the color a lot less noticeable with the doors shut. 

Perhaps I should line the cookbook shelf too?  Or maybe just cover the cookbooks with fun book covers?

I've still got a little more work to do here, but not bad for a 10 minute, free upgrade.
Before

After
I'm not a fan of the big black microwave, or any of the black appliances in this room for that matter, but they are all high end, and relatively new, so it would be hard for me to justify trading them all out for stainless, especially when we wouldn't be able to afford the high end features that these ones currently have. Not with all the projects we still have left on the list.  So for now, the appliances stay.  But at least my little pop of apple green color gives this side of the room some interest.

October 17, 2011

#110- Taking a Stand

So lately I've been mentioning my need to scratch #110 off The List and build some night stands for our near empty Master Bedroom.  And by mentioning, I mean annoying you all and talking about it obsessively.  So this weekend, I finally got an entire weekend off (I've been working some crazy hours at my day job and in about 23 days I had just 1 day off), and I decided to get-a-rockin'.

I used this plan from ana-white.com to match the bed frame and head board that I already built.  As a reminder, here's what we have so far:


I followed Ana's instructions to the letter, and lucky for me the good people at Home Depot were willing to cut my plywood pieces into sections in the store to make it much easier for me not only to get the wood home, but to cut it to my exact lengths when I got home.  As with my couch building project and my headboard building project, I won't walk you through ever step of the building process as Ana's instructions are more clear than my rambling will ever be.  I'll just share with you my highlights. 

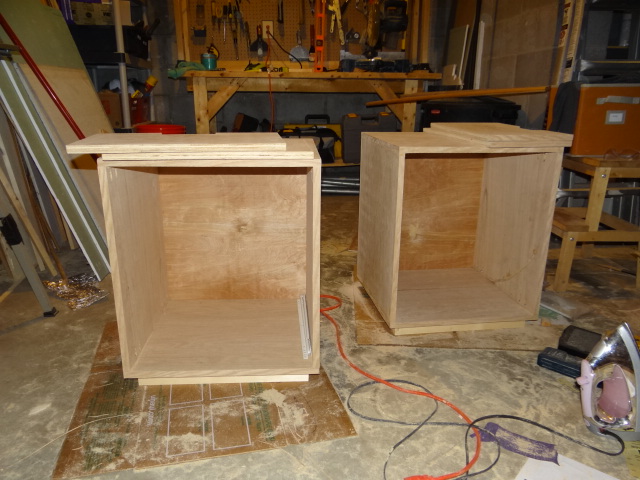
First I built my boxes, and tapped the backs on:


Then I installed the feet/base:

Then I built the drawers:

Hanging out in the garage with Big Blue, which is waiting for a dumpster.

And cut the notches in the drawer faces.  Free handing it with the jig saw is not one of my greatest talents, but after a lot of sanding to even it all out, I'm pretty happy with the result.


The only thing that I wasn't thrilled about with Ana's plans, is since the outside frame and the drawers were built with plywood, it meant that I had a whole bunch of exposed, plywood composit edges.  Like this:


I spent a couple hours applying wood veneer around all 4 drawer faces and all around the base cabinet.  Not that it's tricky, its basically just ironing it on.  But there was a lot of surface area to cover.


The Hubs actually came out to help me for a bit (and snapped the photo above.)  It was one of those magical moments when it was an usually warm Fall day, the Hubs and I were working together on a project, and the Lil' Man was running around in the garage with his own toy tools.  The sort of magic I dreamed about back when we were waiting 6+ months to buy The Lodge.

The problem with iron on veneer though, is even once you get it all applied, the edges are still rough.


Which means even more time spent sanding down all the edges of all 4 drawers, and then all the edges of the two base cabinets. But eventually, hours later, well after the Hubs and Ry had given up on me and retreated back to the house, I had this. 

Once all the sanding was done I thought I was in the clear.  Pop in the drawer tracks, attach the faces, and bam- done.  Right?  Wrong.  Super wrong. 

I don't know if any of you have ever attempted to attach drawer pulls before, but I had no idea how tricky they can be.  If your front is just 1/16th higher than the back, or the left side just 1/16th lower than the right, the drawer won't close.  I spent more hours than I care to admit after Ry's bedtime trying to get 2 drawers to go in, and after 12:30AM took the walk of shame back into the house without a single moving drawer.  It taunted me in my sleep.  I considered throwing the whole thing in the fire and dancing around the flames.

The next morning I woke with a little more clarity, and headed to the interwebs for some tips on installing drawer tracks.  That's where I found the I-can't-believe-I-didn't-think-of-that solution, using a block of wood as a guide while installing the track.  I just measured the distance up from the bottom of the cabinet, and from the top of the first drawer that my track needed to go, cut a block of wood to that width, and rested the track on top of the drawer when installing. 


In far less time this time around, I had all four drawers in.  Cue Carlton-esk celebration dance in the driveway.  Sorry neighbors.


All that's left is the drawer faces.  I pulled the drawers back out and drilled pocket holes with my Kreg Jig.


Then I placed the drawers back in, applied glue to the front edges, and placed the drawer fronts on exactly where I wanted them to go.  I used some spare tiles left over from Bath Crashers to weight the drawer front down.
Once the glue set a few hours later, I returned to carefully pull out the drawers, and screw on the faces using the pocket holes I had already drilled.  That. Just. Happened.

I've got some staining to do this week in the same dark color as our bathroom closets and the headboard, but I can't wait to get these babies up into the bedroom.  

What about you guys?  Any big projects this weekend?  Small projects?  I'm happy to say that even though this was a time consuming project, I still had time to fit in a trip to the apple orchard with my fam, a couple of nice long runs, and a yummy batch of homemade pumpkin pancakes on Sunday morning.  Epically great weekend.  Happy Monday

P.S.- Fast forward to the finished product with Part 2 of the Nightstand project here.

October 14, 2011

Our Updated House Tour


 We moved into The Lodge in the end of April, which means we're coming up on our 6 month milestone.  Recently, I was checking over The List and the House Tour to review our progress so far (to try to catch a second wind), and even though we've checked over 75 items of The List in under 6 months, our House Tour wasn't really doing us any justice.  So I took a little time to take some more photos and arrange the tour in a way you can more easily see the before and after, including some good photos that should help explain the layout of our Master Bedroom and Bath better.  Check it out!

What- you're still here?  I told you to head over to the tour... All right, that's cool.  Whatever you want to do.  Since you're still here, I guess I can show you a few of my favorite before and afters:

Before
After
I actually hadn't realized what a difference the new wood floors, and the addition of the wood risers (verses the wrapped carpet and chicken wire) had made to the house until I updated these photos.  We were worried that loosing the floating stairs would make the space feel closed off, but I think it looks much more high end and beautiful now.  The Hubs is mostly done with this project from hell, but he lost a little steam in the trimming out and poly department.  At least it's safe now and no children can fall to their death...

Before
After
 This one is one of my favorites because we didn't actually do a lot of projects to this kitchen to make it look nicer.  Changing out the tile countertops for granite and putting in the new glass backsplash really helped.  Not to mention my switcheroo on the hanging cabinet over the peninsula- it makes the room look so much bigger.  Looking at these photos now I definitely want to add window treatments of some sort.  The room is so open, it's almost hard for your eye to find a place to land. 

Before
After
Have I mentioned how much I love my new Laundry?  Oh I have?  Dozens of times?  Geesh- sorr-y!

Before
After
I've still got a little ways to go on this Playroom, but right now I just want to enjoy how bright and cheerful it is.

Before
After
 The Guest Room is pretty cheerful these days too....


After
After
I realized that my previous photos of Ry's room were pretty terrible (it's a really hard room to photograph with the super high ceiling and windows on opposite walls.)  Hopefully these photos do a little better job illustrating how it looks.  We could definitely use a rug in here, but I'm waiting to find the perfect one. 

But don't stop here, there's a bunch more photos on the House Tour of the projects we've tackled so far.  There's also a lot of the gross and sometime disgusting rooms that are still left.  But you know the drill, one project yada yada yada.....